
Welcome to the Free Motion Mavericks link-up (week 238).
Free motion quilting a moose panel
The moose panel is coming along nicely. I did learn some things which is what the whole exercise was about (other than giving my brother a wall hanging for his cottage).
As I mentioned in the last Free Motion Mavericks post, I started by outlining the background behind the moose, the water under the moose, as well as the gray trees.
I was also wondering how to proceed with the multi-coloured foliage and how much free motion quilting (FMQ) to add in that area. My motto - when in doubt, dive in! So I started by FMQ some of the most obvious parts such as the separate branches and foliage. I also worked by colour - doing as much as I could with one colour and then changing thread to the next colour.
 |
| Working with different shades of green |
You can see the difference that the FMQ makes by looking at these two pictures. In the picture below, only the outline has been quilted. Click on the images to see the details.
 |
| Just the outline done |
I then started on the brown and beige of the foreground.
 |
| Adding brown and beige in the foreground |
 |
| Tackling the moose |
 |
| Outlining the first border |
- When I'm not sure what to do but I know that I can't really ruin anything, I tend to jump in and figure things out as I go along. As I mentioned in my previous post, the FMQ on this panel is quite forgiving since there are so many colours.
- I started FMQ the most obvious parts and then made my way around the rest. Most parts can be tackled in a couple of way, such as going around a rust coloured section in the colour that surrounds it, or using the rust coloured thread around or on top of the section. Of course, I can do both, which is why I still need to go through the foliage with the rusty brown.
- I do have to keep in mind that going around an area will make the quilting pop up - so then it's a matter of deciding if the area should just pop up or should it be covered in the other colour. I think that it's a judgement call and that it might be important to be consistent, but since there is so much colour, it might not make a difference.
- The good thing about a project like this is that I can always go back and add more colour or thread. I don't usually undo my FMQ but I would if it was important.
- The next step is FMQ the water and the sky. The water should be simple because it consists of many colours. Hopefully I can use the same technique with the sky, but there is a lot less colour changes.
- Finally I'll have to decide how to finish it. I was hoping to use the wood around the panel to bind it but I don't think that it's wide enough. I think that I have some dark wood fabric, so I may end up adding a wide binding. Of course, I should have thought of that before I trimmed it 😨
- FMQ a panel with Free Motion Mavericks, July 4, 2019
I will be linking this post to several link-ups. Let's see what's happening in this summer heat! Design Wall Monday, What I Made Monday, Moving It Forward, Tuesday Colour Linky Party, Midweek Maker, Let's Bee Social, Needle & Thread Thursday, Off The Wall Friday, Finished or Not Friday, Friday Foto Fun, Monday Making, Main Crush Monday,
Free Motion Mavericks link-up
Thank you to everyone who linked up two weeks ago. It's so difficult to choose, but here are two quilts that you should check out if you didn't see them last time!
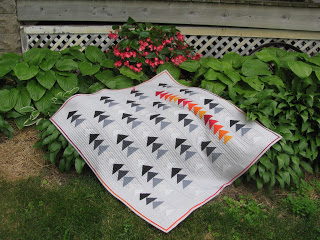 |
| Flying Geese Wall Quilt by Gretchen |
 |
| Hopscotch Tiles by StoriedQuilts |
I love your bold attitude. When in doubt, jump right in! That is me, too. Great things happen when we quit trying to be perfect. Thanks for the inspiration. I am learning FMQ and have scoffed at panels, but what a great tool to learn and practice. Thank you. I have a cool vintage Grandma Moses panel that is begging to be embellished. Onward.
ReplyDeleteHave fun Jane - and remember to link up. We want to share in your learning also!
DeleteYour moose hanging is coming along fabulously! Great to hear how you are tackling it in stages.... it would be a bit intimidating to decide what to do on it all at once.
ReplyDeleteThanks Dione. Even if I had planned it, I would have had to change my mind I'm sure. I just wish that I had planned the finishing a bit better - but I found some "wood" fabric that will be great for the binding :-)
DeleteGreat job on quilting this! And I would approach it the same way - the easiest first, working my way around the quilt.
ReplyDeleteThanks Susan. This is one quilt that I need to finish before winter. There`s not much left, so it should be doable.
DeleteOh I love him!
ReplyDeleteThanks so much Alycia. He`s almost done!
Delete