Showing posts with label mola. Show all posts

Thursday, March 05, 2020

Mixing it all up at Free Motion Mavericks

Welcome to Free Motion Mavericks' linkup (week 270). I finally have some free motion quilting (FMQ) to show you 😊.

Mixing it all up

As you may know, I really like to learn and try new things. I especially love mixing up all kinds of techniques that aren't usually found together, such as embroidery, improv piecing, beading and FMQ. That's what Exit Strategy is all about! Here's what's been happening to that piece.
Adding FMQ to Exit Strategy 1
You can see some of the FMQ that's been added. Let's look at each block.

Block 1 is about triangles and organic straight lines (i.e. not so straight 😊 ) I only have the top triangle block to FMQ. I'm not sure what I'm going to do there yet, but I'm likely to follow the path of the fern print.
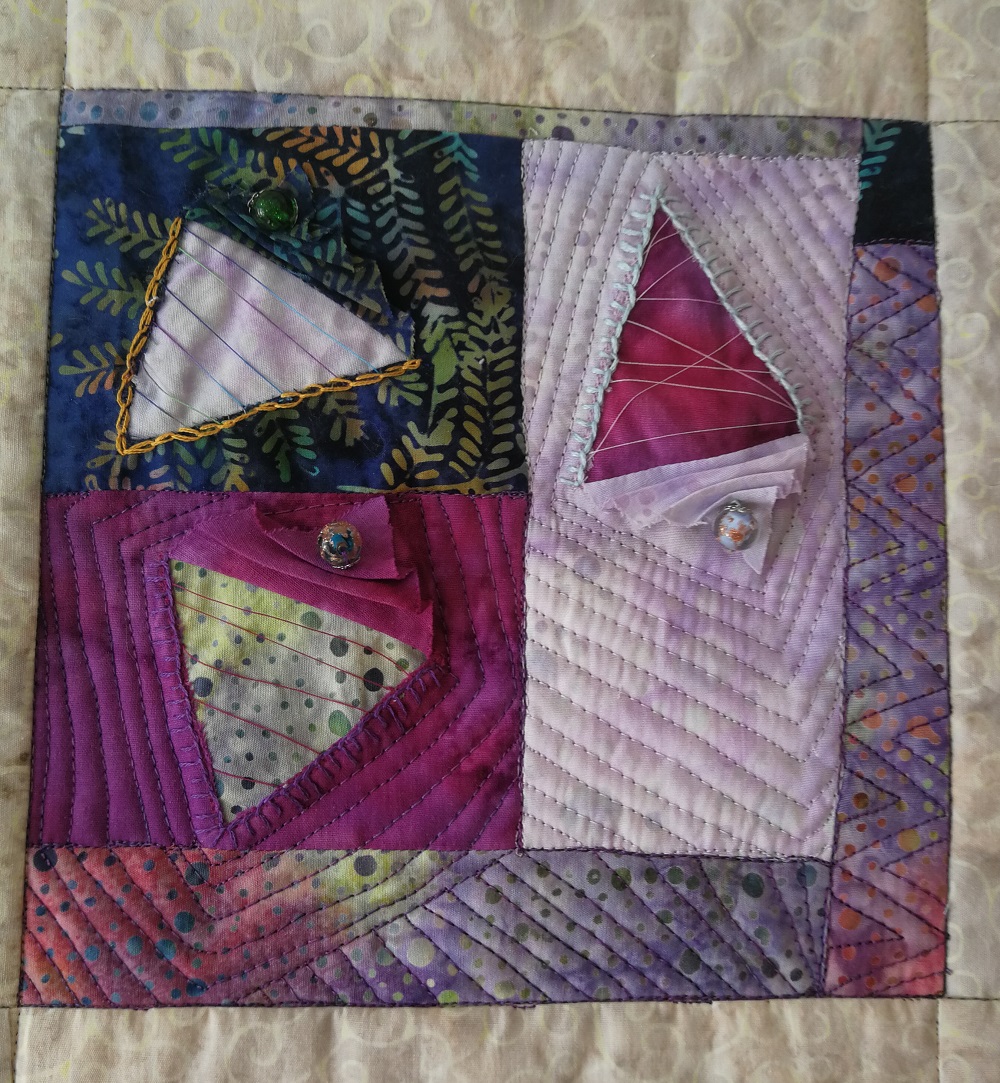
Block 1 - the triangles
Block 2 is all about texture. It's more diverse with embroidery, lots of couched fibres and a hexie. At this time, I believe that it's finished, but of course I reserve the right to change my mind. The FMQ has created a lot of contrast and the light blue triangle in the middle, which is not FMQ, is very puffy - I love it.
Block 2 - Texture and contrast
Here is a shot looking down at the block to show some of the texture and FMQ.

Block 2 - At an angle to see more of the texture
Blocks 3 and 4 are more structured. I think that they may need more embroidery in a couple of spots and maybe a few seed beads.

Block 3 - A more structured block
I've FMQ the two orange blocks but I haven't figured out the rest yet.
Block 4 - Still considering my options

Making Triangles - Shuttered Windows & Openwork

When I first wrote a post about this piece, I said that I would explain how I made these triangles. I read about this technique in "Exploring Textile Arts" by Creative Publishing International (2002). I combined two techniques. The first is a type of negative or reverse appliqué, like when I made a Mola piece (see Related links). The other technique, what I call "thread lines," is used in Openwork but can be added on top of the open triangle window.
Shuttered Windows and Openwork

  • Draw a triangle on the fabric.
  • Decide which side of your triangle will be the "flap", then cut one of the other two sides of the triangle following the line.
  • Place a contrasting piece of fabric, face up, under the drawn triangle.
  • Sew over the entire outline of your drawn triangle. 
  • Cut the other side of the top fabric of your triangle (make sure it's not the flap).
  • Move the flap of the triangle (the uncut side) out of the way. 
  • Sew a zigzag, satin or decorative stitch around the two cut sides. If your top fabric does not fray, you can add your thread lines before this stitch.
    • Thread lines: You will be following the previously stitched line around the two open sides of the triangle. Using a straight stitch, back stitch a little, then lift your sewing foot and extend the thread across to the other side of the triangle. Back stitch the thread in place and continue to where you want the next thread to cross the triangle. Keep doing this until you have the number of threads your want.
    • This can also be done by hand. 
  • Pleat the flap of the triangle and use a button or bead to keep it in place.
Since I didn't want to use a zigzag, satin or decorative stitch around the triangle, I just covered my machine stitches with a blanket or a chain stitch.


One Monthly Goal (OMG)

Exit Strategy 1 is my March monthly goal. I need to have it finished by March 31 to place it in the Out of the Box's Fibre Fling 2020 Exhibit and Sale.

What I learned
  • Some of the FMQ designs practically shouted out to me but some are keeping very quiet. I'm going to have to listen carefully to those quiet ones.
  • I will be adding some embroidery, particularly to Block 3. I'm hoping that it will be easier to FMQ after that.
Related links
Linking parties
I'll be linking up to the March OMG linkup, as well as a number of great parties. Let's see what's going on in quilt land😊 What I Made Monday, Colour and Inspiration Tuesday, Midweek Makers, Put your foot down, Needle & Thread ThursdayPeacock Party, Finished or Not Finished Friday, Off the wall Friday, Can I Get A Whoop Whoop?, Beauty Pageant, Friday Foto Fun, Oh Scrap!15 minutes to stitch 2020, Monday Making, Design Wall Monday,

Free Motion Mavericks

We had some wonderful projects link up last time. Mel Beach experimented with using two threads at a time in her FMQ while Caryl Quilts is really practicing her FMQ and getting lovely results. If you didn't see their post, check them out!

Caryl Quilts - FMQ an improv scrappy tablerunner

Mel Beach - playing with thread combinations


You are invited to the Inlinkz link party!
Click here to enter

Tuesday, March 05, 2019

A Mola finish

Funky Flower Mola

It's done! I've spent many hours embellishing the Funky Flower Mola that I started two weeks ago for the Dust Off a Quilt Book Blog Hop. I really enjoyed the embroidery and the beading.

Funky Flower Mola - finished!
After the blog hop, I added another butterfly and embroidery to the top of the piece.

Second butterfly and vines
I also added tiny pink seed beads around the funky flower.
Beading the funky flower

One Monthly Goal (OMG) for March

It's been a while since I linked up to an OMG - so here goes!
I have a mini to make for my son's cubicle! It's going to be the foundation paper pieced Moose by Made by Marney. So far, I've made two bears and a loon. It's now time for the moose 😊
A bear mini
A loon mini


What I learned
  • Adding that many beads takes a long time - although I finished it faster than I expected.
  • I had bought one container of seed beads. I got pretty nervous near the end....there aren't many left. Normally it wouldn't be a problem but I bought these on sale because they were being discontinued.
  • I experimented with some of my daughter's perle cotton and metallic embroidery floss. It's fun to see the different effects they create.
Related links
Linking parties
I will be linking this post up to the March One Monthly Goal (OMG) as well as several other link-ups in quilt land. Let's go see what going on! Monday Making, Design Wall Monday, Moving It Forward, What I Made Monday, Tuesday Colour Linky Party, Midweek Makers, Silly Mama Quilts WIPs, Needle & Thread Thursday, Let's Bee Social, Off The Wall Friday, TGIFFFinished or Not Friday, Can I Get a Whoop Whoop?, Main Crush Monday, New To Me 2019,

Project details

Funky Flower Mola
16" x 13"
Materials: Kona cotton, embroidery floss, perle cotton, beads, stones
Techniques: reverse appliqué, appliqué, embroidery, beading


Thursday, February 21, 2019

Dust Off a Quilt Book Blog Hop Mola Style

Welcome to the Dust Off a Quilt Book Blog Hop!

Molas! by Kate Mathews
The book I dusted off is Molas!: Patterns, Techniques & Projects for Colorful Applique by Kate Mathews. I've been looking at this book in my bookcase for several years but never got around to reading and trying it out. Since I've been enjoying doing hand-work recently, I thought that it would be the perfect book and technique to try.

What is a Mola?

A Mola is a textile tradition of the Kuna, an aboriginal people from the Panama area. I'm sure that you've seen their work - it is bright, hand-made, using reverse appliqué and appliqué. For the reverse appliqué, they can have up to 7 layers of different colours of solids. Pieces can also include embroidery. Traditional pieces are used as part of their blouses.

Funky Square Flower Mola

Here is my interpretation of a Mola. I wanted to use an original pattern that wouldn't look out of place in a Mola. I thought that the square flower that I free motion quilted a few weeks ago might work.
My interpretation of a Mola.
I started with three layers of Kona cotton since I didn't want to make it too complicated and didn't want to sew through too many layers. As you can see, the hot pink is the top layer, followed by maroon and then light pink. 

I started by drawing the square flower with a Frixion pen and then cutting around it, adding about a ¼" so that I can turn over the edge to appliqué. Cutting around the flower gave me a maroon background, which is what you see around the hot pink flower.

The next step was to cut the maroon fabric to let the light pink fabric show. I could have cut deeper into the maroon so that there would be light pink between the petals, but my appliqué skills weren't up to it. Two of the spaces between the petals are deeper than the others, mostly because they were wider. The light pink is actually my backing.
Reverse-appliqué to let the maroon and light pink fabrics show
Adding light green between the layers
One of the techniques used in the making of Molas is to add other coloured fabric between the background layers. In this instance, I placed light green fabric beneath the hot pink layer, but only along the edge of the piece. I then cut through to the light green fabric for the three smaller leaves as well as the middle of the larger leaf. The dark green leaf was appliquéd and then I cut (very, very carefully) through the layers to get to the light green.

I embellished the leaves with embroidery and also couched some yarn for the stem. This project has been great to practice my TAST embroidery stitches.

I used the same technique to add the yellow and lilac rectangles, but this time I cut the top hot pink fabric and inserted small scraps of the new fabric under it. Last night I went into my stash of beads, stones and buttons to embellish the rectangles.

Adding other colours to the mix


Embroidering a butterfly 
and practicing my TAST stitches


I needed to add something to the bottom of the piece but didn't have the time or patience to do more appliqué. I used 3 strands of embroidery floss as well as some perle cotton.
Creating huge blanket stitches
What I learned
  • This technique is quite demanding (as in finicky) so I found it difficult to do. I have very large hands and fingers that are not very nimble - so I find doing needle-turn appliqué and reverse appliqué difficult, unless the pieces are quite large.
  • As I mentioned, I was quite happy to stop appliqueing. Embroidery and other embellishment are also fun and will make my piece unique.
  • Having lived with first nation people (I married into the family), I am very sensitive to cultural appropriation, so the last thing I wanted was to create a traditional Mola - although I needn't worry - my skill level is really not up to it.
  • I found that doing embroidery around the reverse applique was a great way to hide my less than perfect stitches.
  • I'm not very good at doing anything for a long time, so I didn't even try to make my fly stitches even around the edge. Since this was for fun and my first piece with such extensive and varied embroidery stitches, I gave myself a lot of slack. I know that practice makes us much better and I'm sure that I will use some of these techniques eventually, although probably not extensively - it's just wasn't that much fun 😊
  • I find it so liberating to just let myself play with what I want. I do make an effort to give new techniques a chance but sometimes it's pretty obvious what I could keep doing and get good at and what would just be plain tedious for me.
  • Finally, this piece is not quite finished. I'm going to add more beads and figure out what to add on the top. I'll post my finished piece soon - so come back to check it out!
Related links


Linky parties
A HUGE thank you to
beaquilter for hosting this party!
I will be linking this post up to several linky parties. Needle & Thread Thursday, Silly Mama Quilts WIPs, Midweek Makers, Tuesday Colour Linky Party, Linky TuesdayOff the Wall Friday, Monday Making, Moving it Forward,

Below are the links to the other great participants in Dust Off a Quilt Book Blog Hop. Check them out to see what's everyone has dusted off!

Monday Feb 18th
Turid at densyendehimmel
Pamela at Pamelaquilts
Joan at Moosestashquilting
Anne at Seams like a plan
Susan at Desertsky Quilting
Selina at Selinaquilts
Kathleen at Kathleenmcmusing

Tuesday Feb 19th
Cindy Stitchin At Home
Jennifer at Curlicue Creations
Stephanie at Steph Jacobson Designs
Kathy at Kathy's Quilts
Shasta at High Road Quilter
Theresa at bumbleberry stitches

Wednesday Feb 20th
Sharon at Vrooman’s Quilts
Suzy at Websterquilt
Nancy at Patchwork Breeze
Karrin at Karrin's Crazy World
Denise at crafTraditions

Thursday Feb 21st
Anita at Domestic Felicity
Leanne at Devoted Quilter
Jennifer at Dizzy Quilter
Carla at Creatin' in the Sticks
Lee Anne at Podunk Pretties
Andree at Quilting & Learning-What a Combo! (that's me!)

Friday Feb 22nd
Bea at Beaquilter
Barbara at Bejweledquilts
Laura at Slice of pi Quilts
Sherry Powered By Quilting
Pat at Life in the Scrapatch
Carol at Just let me quilt
Kathy at Kathy's Kwilts and More
Marian at Seams to be Sew
Brenda at Songbird Designs