Showing posts with label art collage. Show all posts

Thursday, April 13, 2023

Cars, trucks and mixed media collage on Free Motion Mavericks

Welcome to week 426 of Free Motion Mavericks. I even got a little bit of free motion quilting done, even though my machine is not cooperating πŸ˜’.   

FMQ Cars and Trucks

This is my last row of designs by Lori Kennedy.  I can't FMQ a baby quilt without some cars and trucks....zoom!

A mini bus?

I drew a whole bunch of cars and trucks on paper and then FMQ them.

A little red car

Another car

There are the FMQ designs that came out the best for photos. There is also a truck in there, of course!

Mixed Media Collage

I played with some mono-printing for the first time. It wasn't as messy as I expected. 😊  This was part of a workshop with Helen Hallows, "Landscape-inspired mixed media layers", through TextileArtist.org. 

I spread Rollerball ink on parchment paper over my cutting mat in my studio. I mostly used cutout pages from a book whose hard cover I'll be using in a new handmade journal. 

Since I really didn't have a clue, I followed Helen's instructions and some of her design ideas. I was truly playing.  I really love her birds!

Some of the black marks

I started with some black ink and used a pencil to make the marks. I found these rather wide and dark.

These are images of the collages that I put together in my Traveller's Journal. 

I also used yellow and teal ink. Some I added to those printed pages and others to scraps of hand-dyed fabric. There is a little bit of stitching on each page.

Mountains, birds and sun

On some pages, I added the excess paint from my roller. That was cool and has lots of potential. 

I started out stitching directly on the left hand side of the page below. It's tricky but fine if you don't have anything on the other side of the page. I just made sure to glue the image over the stitching on the other side.

Learning to stitch onto paper and two-sided pages

However I got carried away with gluing and then wasn't sure what to do. One of my solutions was to stitch pieces on top of a background paper. Once stitched, I glued the background paper onto the page.

Ghost prints, marks and stitching 

Another way of dealing with stitches that show up on the other side of the page is to then glue something over those stitches. That can be tricky, depending on the designs.


The journal I used

within the Upcycled traveller's journal 


What I learned 
  • It looks like I have to take my sewing machine in. It seems to get caught underneath when I FMQ. It isn't the thread, the tension, the needle or the bobbin, so there's not much else for me to try.
  • I may not be able to finish up my FMQ, but I can practice the next designs for the Wild Hexies quilt. 
  • Making these collages in my journal was a great idea. I didn't feel like I had to have a "finished" piece. It was just for experimenting.
  • I also learned a few things about stitching in a journal (see above) and layering.
  • I'm relieved that mono-printing with the Rollerball ink wasn't messy and that I could do it in the studio.
  • Spreading out the ink on parchment paper worked really well and was very easy to dispose of.
  • I'm trying to psyche myself up for some gelli printing next!
Related links
Linking parties

Free Motion Mavericks 


It's been a busy week out there in quilting land 😊

Sandra of mmm quilts finished up a commission - what a lovely quilt! It took me a second to see the cats 😁 She FMQ large swirls that give a great texture and remind her of cats' entwined tails.

Kool Kats Kwilt by Sandra

Anorina, aka Samelia's Mum, quilted up a really beauty for a little girl named Evie. It was made during the March challenge, "It's All Up To You" with Island Batik.

A Quilt for Evie by Anorina (Samelia's Mum)

Melva made another mini - this one using match-stick quilting and variegated thread. 

A 5" x 7" mini by Melva Loves Scraps

Denise finished her Crazy Quilt runner - what a beauty! If you didn't catch her post, check it out here.

Denise of the Quiltery - a crazy quilt runner for Island Batik

It's now your turn 😊

You are invited to the Inlinkz link party!

Click here to enter

Saturday, May 28, 2022

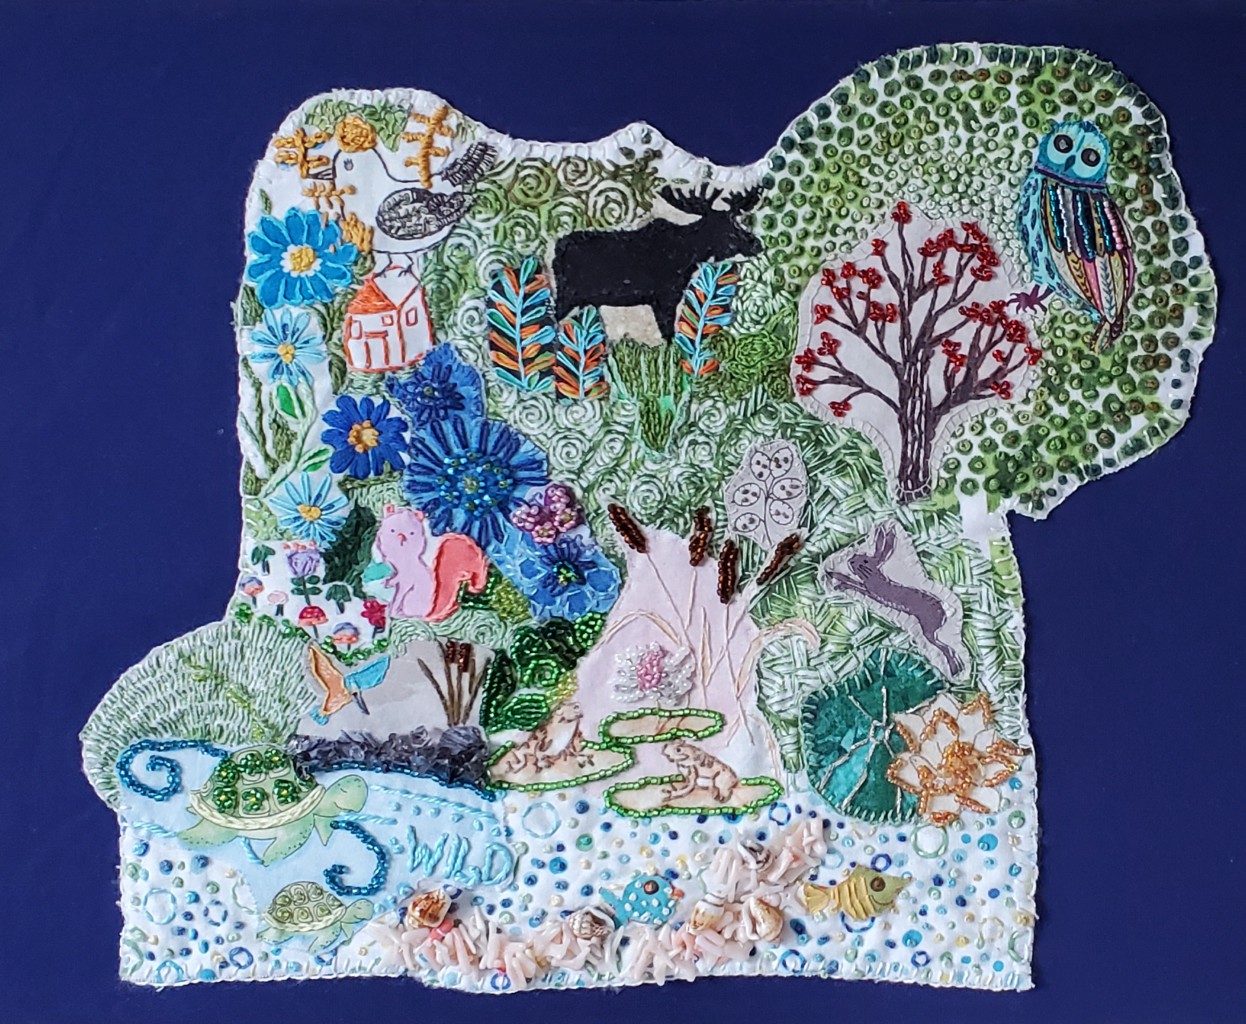
Let Them Flourish is finished!

If you've been following me on Instagram, you've seen lots of images of the progress of this piece. Lately I've been adding a gazillion French Knots, finishing up the beading and then finally mounting it on a fabric-covered canvas.

Let Them Flourish - Ready for Exhibition

Let Them Flourish (aka Biodiversity)

In the Beginning

This piece started off as a fabric collage of images related to Biodiversity, the theme that was given to us as part of the February 2021 TextileArtist.org's Stitch Club workshop. Kate Tume, our instructor, had us exploring narrative potential with embellishment.

The beginning of Biodiversity (working title)

I attached the fabric pieces to batting using Heat n Bond Lite. From there I started stitching and beading. To say that it was slow going is a huge understatement. Again, not called slow stitching for nothing 😊.

Starting the embroidery and beading

At some point I got tired of its slow progress and wondered off to other projects. I came back to it during my #100dayschallenge on Instagram. I would say that the majority of it got done between March and May 2022. It also helped that I had a deadline approaching - the Conversations exhibition with Fibre 15 (see related links below).

Towards the Finish Line!

I love using my own hand-dyed perle cotton πŸ’™

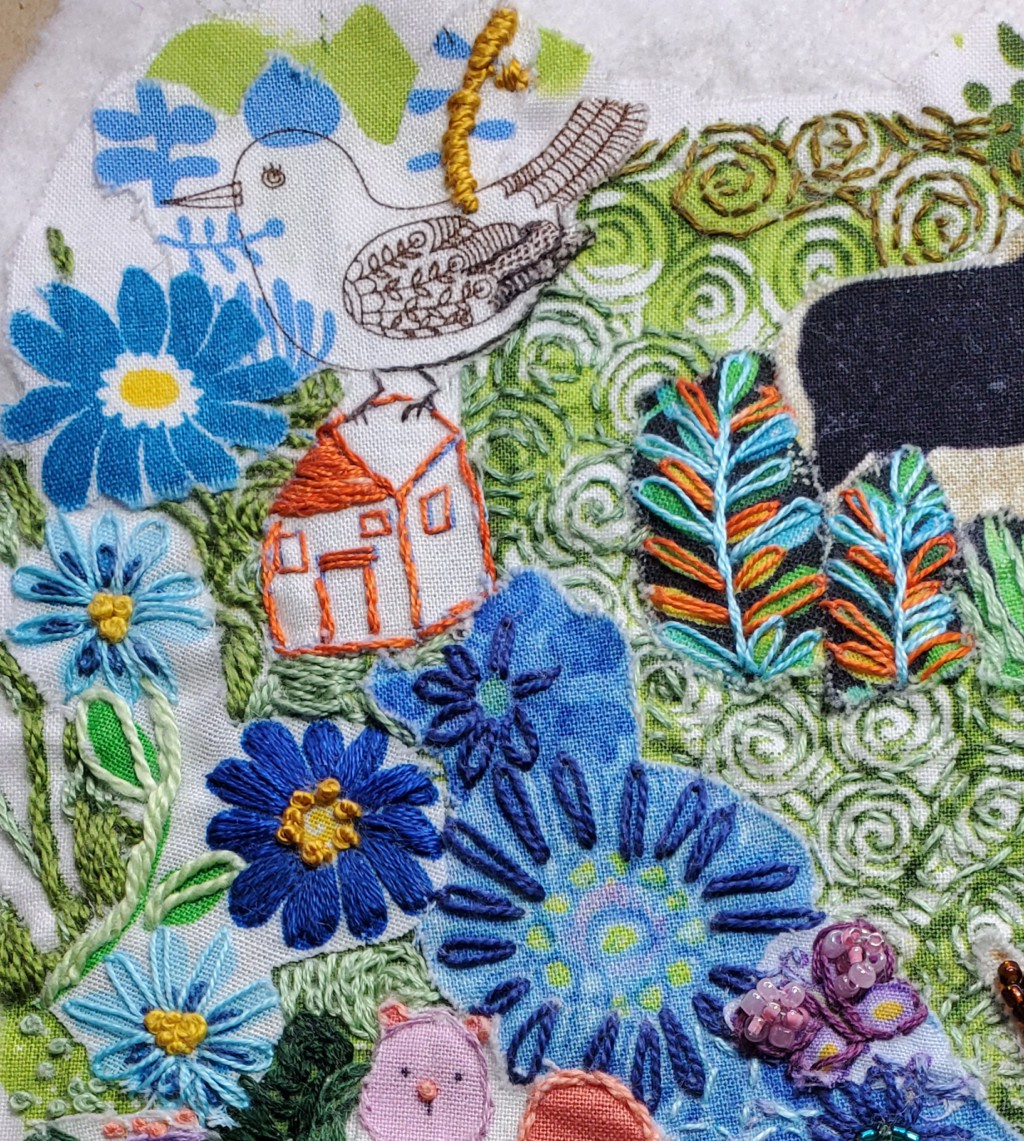
At one point I got bored and had an aha moment. I realised that I didn't have to embroider the images using the same colours that was on the fabric. Notice the house in the image below, which was printed in blue but covered in orange thread. I love that the blue peeks through. That was quite liberating! πŸ˜Š

Adding different colours than those on the fabric

The green embroidered background around the moose took forever -
I was seeing swirls in my sleep!

I added a gazillion French knots around the tree. I knew by then that it would drive me crazy, so to keep it interesting, I used different shades of green and went roughly from light to dark.

So many French knots!!!

I was worried about the owl - I wanted to add beads but wasn't sure how much. I found out fairly quickly how much was "too much"! I was going to bead every other line but got mixed up and ended up beading all of the lines. It wasn't really bad but it made the owl the focal point, which is not what I wanted.

Too many beads....

Just the right amount of beads 😊

I used sewing thread to lightly embroider various parts of the owl. 

Finishing up!

Finishing up involved covering a 14" x 11" canvas with fabric and then attaching the piece to the canvas. I used Sulky's Invisible thread since it was clearer than the other kinds I have. I wasn't able to make a knot at the end of the thread, so I left a long tail and then after taking the next stitch, tied a knot at the back.

I just put in a few pins through the canvas to keep the piece from shifting as I was sewing it down. I stitched around the edges but also within the piece to keep it securely in place. It was easiest to stitch behind beads.
Attaching the piece to the canvas


Let Them Flourish

What I learned

  • I learned that this technique is called textile collage. This is probably my favourite technique of all times. I've used it a few times to make some of my favourite pieces. I'll include links to my favourite ones in Related links below.
  • I love being able to add bits and pieces of fabric to tell a story or show a moment in time. 
  • The hardest part is probably leaving reality behind since there is no way to keep the actual perspective real since the elements come in the size that they are on the fabric! I love that whimsical part of it.
  • I'm glad that I figured out that I don't have to use the same colour as the background image to embroider. It adds a different look when using a different colour and having the original fabric colour peek through.
  • I realised that I need to change things up to keep me interested. What's not to love about many shades of green instead of just using one?!
  • I really got to know my threads - there's nothing wrong with embroidering with regular sewing thread if you just want a small accent of colour and texture. 
  • A bonus is that the technique almost always needs the little bling of beads 😊
  • It's always a slow project, even if using FMQ but it's usually well worth making. I'm making myself finish this one before I start another one - it would be too easy to get sidetracked at this point!

Related links

Linking parties

I'll be linking up to many fun linking parties. Remember to visit Muv to link up to Free Motion Mavericks this week! Put your foot down, Off The Wall Friday, Finished or Not Finished Friday, Peacock Party, Beauties Pageant, TGIFF, Patchwork & Quilts, Oh Scrap!, Slow Sunday Stitching, 15 Minutes to Stitch 2022Monday Making, Design Wall MondayMay's Favorite Finish Monthly Linkup

Project details


    Let Them Flourish
    Workshop with Kate Tume through TextileArtist.org
    Attached to a 14" x 11" fabric-covered canvas
    Materials: commercial quilting cotton, beads, shells, 
    metallic, embroidery, sewing thread and perle cotton 
    Techniques: collage, embroidery, beading


Tuesday, November 23, 2021

Best and Worst of Times

It's finally finished! My fabric concertina book, Best and Worst of Times is done. The workshop with Mandy Pattullo through TextileArtist.org was held in July 2020. Considering the amount of stitching in the book, a year and a quarter is not that long! lol

Fabric Concertina Book

The book is the story of the last two years. It goes from being full of fear to eventually finding joy. It's also bilingual (English and French) except for the title and end pages.

The front page is written in chain stitch on one of my first hand-dyed gray fabrics.

Best and Worst of Times, concertina fabric book

The first and second pages illustrate the beginning of the pandemic. Everywhere there was fear. No one knew what was going one and it really felt like time was standing still, especially at the beginning of that first lockdown.  I used tulle, cheesecloth and lots of dark colours. The running stitches in the background are black and prominent.

Fear (peur) is in the air

The third and fourth pages express how I escaped the gloom. In English it's called escape but in French it's called dreaming (rΓͺver). It's about escaping in books, to the seaside, on a hot air balloon. It's also about nature, which mostly benefited from the lack of human activity that affect the rivers, oceans, forests, etc. Colours are back and there is a sliver of optimism. 

Escape (rever) - finding a way to cope

The fifth and sixth pages are about hope (espoir) and creating (faire). It's what I did after my escape time. For me, hope and creating are represented by finishing UFOs, playing with hexies, thinking about spirit, and mostly by playing with scraps and making. It's about trying new things and I did that through the workshops offered by the TextileArtist.org Stitch Club. 

Hope (espoir) and create (faire) - to make the best of it

The last two pages are about the happy ending...has it come? Well sometimes it's here fleetingly. It's about finding joy (joie) and laughing again (rire). It's full of bold, strong colours that I love.

Joy (joie) and laugh (rire) - finding the joy in life again.

The last page is made of some pinky-orange fabric that I hand-dyed. I love the top and bottom fabric which is what you get when you dye white-on-white fabric. Isn't that fun? You can see larger versions of all of these photos by clicking on them 😊

The End? or The beginning....

Making my first YouTube video

If you're interested, I've also uploaded a short video on YouTube (my first one!) of the entire fabric concertina book, Best and Worst of Times. I hope that you like it. You can click on the link below the image to take you there.

Best and Worst of Times

What I learned

  • In my first post in July 2020, I wrote that I was missing that second layer to stitch through. Since I've been doing a lot more hand-stitching, it's not really an issue any more.
  • I also wrote..."Hand stitching is called slow stitching for a reason - the concertina book may end up being a longer term project since it's demanding a lot of stitching." Famous last words....see, 16 months is medium to long term!😊 
  • This project sat for a long time until I needed things to stitch for my #100dayschallenge on Instagram. It was great working on the book. I used a lot of variegated Superior Threads. It was a lot of fun.
  • I just realised that I didn't make a label for the concertina book - I'll have to tuck in my name and the date somewhere!
  • At work this last year, I've learned to manipulate videos. This served me well for the recording of the video.

Related links

Tools that I used to manipulate my video 
  • I downloaded a Video Convertor to my phone so that I could compress my original video enough to send it to my email. After that I used
  • Kapwing, which has a free online version that is great to trim video, add images, text, etc.

Linking parties

I'll be linking to many fun linking parties. Let's check them out! Put your foot down, Patchwork & Quilts, Monday Making, Design Wall Monday, 15 Minutes to Stitch 2021, Wondering Camera, Free Motion Mavericks with Muv, Midweek Makers, Off the Wall Friday, Peacock Party, Oh Scrap!, Slow Sunday Stitching, Mosaic Monday

Project details

Best and Worst of Times, fabric concertina book

Size: 6½" x 5¾" by 45"

Materials: hand-dyed cotton, tulle, thread and cheese cloth; buttons, hexies, commercial fabrics, 

Techniques: appliquΓ©, ruching, embroidery, free motion stitching

Tuesday, June 22, 2021

Fairy Tales Blog Hop

 Thanks so much Joan for organising this blog hop, and I'm so sorry for being late to the party. πŸ˜’

Garden Fairy    

Here is Rose, my Garden Fairy.

Rose lives in my back garden

I am very privileged that Rose lives in my back garden. She loves flowers of all kinds.

She's not always easy to spot but she did stand still for a few pictures. She loves flowers but her favourites are the pink and mauve ones. She can find some of these all summer long in different parts of the garden.

Rose loves pink and mauve flowers

Rose visiting the bird feeder

Rose let me create this piece. It's mostly raw edge appliquΓ© over some fun pink tulle with dots! I FMQ the appliquΓ© and then hand-stitched and embroidered three of the edges. Since she loves all things translucent, that's what I used. There are even small white seed beads.

Rose, my Garden Fairy

I'm so glad that you were able to meet Rose. She is looking forward to seeing the other posts in the Blog Hop and hopes to meet other fairies 😊

What I learned
  • Even if a piece is done, it doesn't mean that the blog post has been written!
  • A quilting calendar is only useful if you actually check it!
  • I had a great time creating this piece - Rose was thrilled to have an art quilt made about her.
  • I did add any batting to this piece, so it's not technically a quilt. It just didn't seem to require it, especially since the tulle was only stitched where other pieces are over it, so it adds shadow and a third dimension to the piece.
  • I didn't want to bind it so I started by adding the ribbon on the right and from there just lace and embroidery stitches.
Linking parties
I'll be linking this post to many fun linking parties. Check them out as well as the other participants of the blog hop listed below. Free Motion Mavericks with Muv, Patchwork & QuiltsMonday Making, Design Wall Monday, Midweek MakersPut Your Foot Down

Here is the list of participants. I will update the week's links as the party continues. Thanks again Carole for organising this fun event.

Monday June 21


Tuesday June 22


Wednesday June 23

Just Let Me Quilt

Websterquilt

Inflorescence

Elizabeth Coughlin Designs

Just Because Quilts

Domestic Felicity

Thursday June 24

Scrapdash

That Fabric Feeling

Ms P Designs USA

Quilt Schmilt

Patchouli Moon Studio

Days Filled With Joy

Goofin' Off Around the Block


Thursday, August 20, 2020

FMQ a mini on Free Motion Mavericks

Welcome to Free Motion Mavericks, Week 294. I interrupt my regular programming (I've always wanted to say that!) to bring you a free motion quilted (FMQ) finish! 😊

"Γ‡a va bien aller" is finished!

My August One Monthly Goal (OMG) stitched mini is finished! I couldn't wait to show it off - I'm really happy with it, and most importantly, so is my daughter (it's for her).

"Γ‡a va bien aller" mini is finished!

You may remember that at the beginning of August, I wrote a post about the start of this mini. It was created as part of TextileArtist.org's workshop with Haf Weighton, a textile artist from Wales. The assignment was to stitch up a medal or other embroidered piece using words and appliquΓ©. You can read more about the expression, "Γ‡a va bien aller" in my last post and in an article on CBC News in Related links below.

After deciding on where to place the appliquΓ© pieces, I embroidered parts of it.

Embroidering the appliquΓ©

For a change, I had actually planned this piece out, leaving about a two inch border around the appliquΓ© so that I could turn the background fabric over and make a facing. You can see in the picture above that I used a Frixion pen to mark the borders. I then added the batting and the backing fabric and basted it down.

The next step was to do some FMQ within the appliquΓ©d part since there was no way that I could do this by hand and get it finished by the end of August.

FMQ the appliquΓ©

You can see the back here after I've FMQ the appliquΓ©. It was then time to stitch the back facing and then FMQ the rest of the piece.

The facing is ready to be stitched
The back when the FMQ is finished


What I learned

  • I am really happy that I took the time to plan out how I was going to finish this mini. It made everything so much easier. I REALLY hope that I remember to do that again. 😊
  • I really like the embroidery with the FMQ. It's great to be able to use different techniques and they really play well together!
  • One lesson that I didn't learn from my last post was to start on the FMQ of the star more than a day before the post is due. That didn't happen and I ended up finishing this piece instead. I have a couple of days off next week and I plan on working on the stars. Wouldn't it be awesome to have it done ahead of time? I almost can't imagine :-)

Related links

Linking parties

I will be linking up to many fun linking parties, including the August One Monthly Goal link. I also hope that if you're visiting that you will link up also. You don't have to be doing FMQ to join the fun! Long Arm Learning, Put Your Foot Down, Needle & Thread Thursday, Colour & Inspiration Tuesday, Midweek Makers, To-Do Tuesday, TGIFFShow Me Something Free Motion Link up, Slow Sunday Stitching, Off The Wall Friday, Friday Foto Fun, Beauties Pageant, Patchwork & Quilts, Oh Scrap!, Monday Making, Design Wall Monday, What I Made Monday

I'm calling this a squirrel - it might be a while in the making but it did spring up...and includes 2 squirrels! I'm linking up with Sandra at DrEAMi! This is also my Favorite Finish Monthly Linkup with Meadow Mist Designs.

I also linked this post up to Sarah Goer's Show Me Something That's a Gift.

Update: This mini quilt was also exhibited at the Stittsville Library in December 2020. You can see Connie's posts of the show in her blog, Connie's Textile Art.


Free Motion Mavericks

Thank you to everyone who linked up last time! It's always a pleasure to see what you are working on!

Last time Gretchen of Gretchen's Little Corner posted her finished quilt. What a lovely quilt - and FMQ with spirals. She did a really great job! If you haven't read her post, you really want to see this (after you link up of course!)

Gretchen's beautiful quilt with FMQ spirals

Before we get to the link up, Muv and I have an announcement to make 😁. You may have noticed that we are getting very close to Free Motion Maverick's 300th post!  On the 300th post, which will occur on October 1st if my calculations are correct, Muv and I will both be hosting special link ups. Stay tuned for more details in a couple of weeks!

Now it's your turn! 

You are invited to the Inlinkz link party!

Click here to enter

Wednesday, June 26, 2019

GaΓ―a's Garden

If you're interested, GaΓ―a's Garden is now on display at the Mississippi Mills Textile Museum as part of the Out of the Box (OOTB) artists group's Summer Fibrations Art Show.

GaΓ―a's Garden

It's been a long time coming. I've been thinking of this piece for about a year, wondering how I would make it.
GaΓ―a's Garden art quilt
I played with the placement of the fabric, one section at a time, until I liked what I saw. Some parts were easy while others were a real struggle. I'm not sure why. It may have something to do with expectations.

I suppose that this could be called the second in two series, depending on how you define the series. It's my second "fantasy garden" piece and also my second GaΓ―a piece. Here are the first in both series.

Morning Has Broken
Art with Fabric, Spring 2018
GaΓ―a Mother Earth
Art with Fabric, Fall 2017

Both of these were made for the Art with Fabric Blog Hops, Fall 2017 and Spring 2018.


Free Motion Quilting 

Free motion quilting (FMQ) this piece took a very long time. I had said that I would be using different threads, but in the end I decided to stay with the Kimono Silk thread. since it was going so well,.
FMQ all the fun details in the fabric
I remember that I started with bright yellow thread and worked on many, many pieces that needed to be FMQ in that colour. Then I got bored before I had finished with the bright yellow and changed thread and kept going to another part of the quilt. That went on for a very long time. Eventually there were only some small spaces left to fill in.

I love how the quiet space of the swamp came together
Solving a challenge

The trickiest part of this piece occurred just as I thought that I was almost finished. I had noticed that my image of GaΓ―a seemed to be a little lumpy. I decided that I would deal with it once I had finished putting all of the fabrics onto the piece. I ended up ignoring the problem until after the FMQ. Better to deal with it later....right?

It might not have been such an obvious problem if I had sewn down GaΓ―a a little more right from the start, but somehow I doubt it. All I know is that there was a largish space that had not been stitched while all around it was heavily stitched....you can see it coming, can't you?

GaΓ―a had many sags
I might not have needed GaΓ―a to be svelte, but she was sagging quite a bit. Well, I've always wanted to try trapunto, so I ended up making a slit at the back of the quilt and giving her a little padding. The first time I sort of overdid it, and discovered that although I had sewn GaΓ―a to the background fabric, I hadn't sewn around her once the batting had been added.

I overdid the stuffing of GaΓ―a
I almost never un-stitch or redo things. I usually try to find a way around the problem, however after sleeping on it, I decided that it was worth while un-stuffing poor GaΓ―a, and at the same time sewing around her through the batting.
I added the label on top of the opening.
Here is a final picture of GaΓ―a's Garden, taken on the way to delivering her to the Mississippi Mills Textile Museum.
GaΓ―a in her fantasy garden
What I learned
  • I'm not sure that re-doing the stuffing was worth it. After finishing the piece, it seemed to be fine but in the pictures, it looks a little off. As a friend said, GaΓ―a would probably have a few lumps and bumps, wouldn't she?
  • I am happy that I took the time to re-do GaΓ―a. If I want to take my art to the next level, I will need to seriously consider un-doing work more often. I generally know right away when a problem arises but I usually talk myself out of doing anything about it. 
  • I think that if I had sewn the image of GaΓ―a onto a fusible web, that it might have avoided the problem and kept the image flatter. On the other hand, if I had done that, I wouldn't have a 3D art quilt😊
  • I also need to plan my FMQ a little more when filling up spaces that really show. I had practiced drawing the stitching that I wanted in the sun but ended up starting the FMQ too quickly. I ended up only one side being what I wanted. I think that being a little more deliberate would have been worth it.
Related links
Post related to the making of GaΓ―a's Garden
  • Summer Fibrations Art Show, June 23, 2019
  • GaΓ―a's Garden is coming along, June 2, 2019
  • Making Gaia's Garden, May 20, 2019 
  • FMQ practice and planning, April 20, 2019

  • Linking parties
    GaΓ―a's Garden has been my One Monthly Goal (OMG) for both May and June. I'm really happy to be linking up to the June Finish of the OMG. I will be linking up to Muv's Free Motion Mavericks as well as many other great linkup parties. Let's see what's going on! Moving It ForwardMonday MakingWhat I Made MondayTuesday Colour Linky PartyLet's Bee SocialMidweek MakersWondering Camera, Can I Get a Whoop Whoop?, Finished or Not Friday, Friday Foto Fun, TGIFF, Off The Wall Friday, Main Crush Monday, Favorite Finish Link-up in June, June's UFO and WIP Challenge,

    Project Details


    GaΓ―a's Garden
    20" x 22"
    Materials: hand-dyed and commercial cottons, silk, tulle, gauze, silk thread
    Techniques: appliquΓ©, free motion quilting, trapumto, improv piecing