Friday, January 24, 2014

Cute Paper Pieced Quilt Labels

As you may know, I'm totally addicted to paper piecing. In one of the new ebooks I bought from Martingale, Showstopping Quilts to Foundation Piece By Judy Pollard and Tricia Lund, I learned to make lovely paper pieced labels for my quilts.

I used the lovely three inch patterns that came with Carol Doak's Mastering Foundation Paper Piecing on Craftsy. These are easy and perfect to add a border to, as well as a space for writing on the label.
paper pieced tree label
Tree label

Winter vacancy wall hanging
Winter Vacancy
This first label is for Winter Vacancy. This is actually the second paper pieced tree I made. I had high hopes for the first one but it really didn't come out well. I used the same fabrics for the tree but used the blue of the border of Winter Vacancy for the triangles above the tree.  It should have looked awesome but it didn't! Both sets of fabrics were the same value - so they sort of merged together. I guess I proved the usefulness of that design element - contrast!

wreath wall hanging
Wreath wall hanging
paper pieced star label
Star label
This next label is stunning, if I may say so! That contrast principle does work! The contrast between the star and the blue fabric is really great and makes the star pop.

This label will be attached to the Wreath Wall Hanging. I'm just waiting to pick up a Pigma pen - it does a great job for writing on fabric.


What I learned:
  • Contrast is important!
  • Labels are important, almost as much as planning your project :-) I guess that's why I usually forget them! I used to do the same thing when I wrote essays for school - I just dove in and ignored the introduction and conclusion! 

Wednesday, January 22, 2014

Creating a Tree

Last Saturday, I took a class with some friends, taught by Elaine Quehl. She's a terrific quilt artist living in Ottawa.

We had a choice of 3 tree patterns to choose from; one summer, one fall and one winter. Most of us chose her summer pattern. Here's her finished version called Branching Out - isn't it wonderful? It's quite a bit larger than I expected - probably two feet long!

Branching Out by Elaine Quehl
The first thing we did was copy her pattern on some muslin. We then backed the fabrics we will use on the tree bark with fusible web and then started cutting pieces to stick to the muslin.

My tree trunk


It was very enjoyable but quite labour intensive. Now I have to cut the muslin, sew it onto a temporary background and sew it to add texture and interest to the tree trunk. Then comes the background fabric and the leaves! It could be a long project.

What I learned:

  • Bigger pieces were better than smaller ones.
  • To get it to look like shading, it's important to work your way from one colour to another.
  • A little accent goes a long way!
  • It never looks good close up - you have to view it from afar to give it justice.


Wednesday, January 15, 2014

Joining the &Stitches Finish-Along!

I've joined one of my favourite blogger, Julie from Button, Button... on an stitching Finish-Along!

Finish-Along! logoI don't embroider very much since quilting takes up so much of my leisure time, but I do have a couple of stitching projects that I'd like to finish. Of course, one of them is a quilt, but with some REALLY CUTE embroidered frogs - yes, I wrote frogs!

I found this pattern on the Intranet a couple of years ago when I was searching for a picture of a quilt for my work computer's desktop background. I was planning on making a swamp quilt at the time (still am, but not in the near future) so I Goggled images of quilts with frogs, cattails, etc. I fell in love with this quilt and had it as my desktop background. It would literally make me smile every time I looked at it! After several months of looking and smiling at this picture, I had to make the quilt!

Two finished frog embroidered panels
Two finished frog embroidered panels 
Frog Work Pattern by Briarwood Cottage


What I learned:
  • Be careful what quilt you put as your desktop background. You'll probably eventually convince yourself that you just have to make it!
  • Watch out when working on more than one blog post - this post got published at the same time as Finishing up Winter Quilts. It wasn't my intention. Not sure how I did this :-(
  • When taking pictures of my quilts, it happened a few times that when I'm working with the picture on the computer, that I notice a very obvious renegade thread. I was sure I had removed them all. Is it possible that as quilters, threads are just a fact of life that we tend to not see them?
Here's the link to a later blog on the progress of my Frog Work project.

Finishing up Winter Quilts

I started two wall hangings before Christmas. Since they are both more about winter than Christmas, that makes them....not late! Besides, they're not late if there are no deadlines, but it is better when they are made and finished for the season they represent!

The first wall hanging is a paper piecing project from the book, The Quilter's Home: Winter by Lois Krushina Fletcher, published by Martingale. The project is the "Winter Vacancy" wall hanging. It's made up of two paper pieced blocks. The first is a snow covered birdhouse and the other is a cardinal. It's very winter and lovely.
Winter Vacancy
I just love paper piecing! I like the way it comes so well together. I'm getting better at it and more organised so that I can cut the fabric and iron it on my home-made ironing/cutting table that's right next to my sewing machine.

I still have to work on having my seams not come apart when I remove the paper from my project. I'm experimenting with stitch length. Apparently if your stitch length is shorter, it'll almost cut the paper. The problem with short stitches is obvious if you have to rip out the stitching! I'm not sure what's worse - having seams pull apart or not being able to unsew. At least when you quilt the project, especially if it's a wall hanging that won't go through the wash, the quilting will keep the project together.

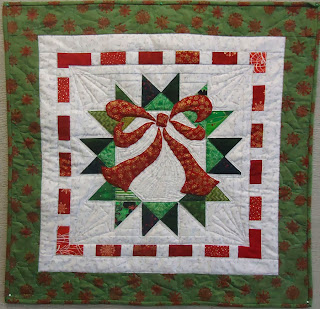
This next piece is from a pattern I purchased separately from Martingale. It's Ribbon Wreath Table Topper from the book, Comfort and Joy: 14 Quilts for Christmas by Mary Hickey. I really like its clean lines and the fact that the red around the wreath looks like a ribbon going through the project.

Ribbon Wreath Table Topper
Ribbon Wreath  Wall Hanging
As usual, since I just can't follow a pattern without making changes, there are a couple of things that I would do differently, if I ever make another one. I said that I liked the look of the ribbon going through the project, but it turns out that if you use different red fabrics for the ribbon, that it won't look so much like a ribbon (oops!).

The projects were pieced and sandwiched a while ago, but since I haven't free motion quilted in a few weeks, I just haven't had the energy to finish them. Thank goodness, that's what weekends are for!

What I learned:
  • When I change the fabrics in a project, I should consider if the changes will have an overall effect on the look of the project. Having a variety of reds is nice, but it does look less like a ribbon going through the project.
  • When I made an error on the size of one of the strips, I didn't think it would really make an overall difference. If I had looked at the overall project more closely at that time, I would have noticed that the corners where the red ribbons meet would be changed. It's not a big deal, but if I had taken the time to rip the seams of the strip when I discovered my error, this would have saved me a problem and more ripping out later on! I guess the moral of this story is to take a few minutes to consider the consequences of not fixing a mistake when the mistake (or design change) is discovered.
  • I was very impatient to take a picture of the Ribbon Wreath project but then realized that I haven't added the buttons to the project yet. There are 24 red buttons that look like berries on the wreath. I'll add them this week and post a follow-up picture! 

Friday, January 03, 2014

Celebrating My Achievements

In this age of instantaneous, it's important to take the time to think back on our achievements. So many things take time and even though they may be fun to make, it's important to reflect on not only what we've finished, but also what we've worked on and what we've learned through the process.

In our quilting group, the Frayed Knots, this year's challenge was to list and then finish as many of our UFOs (Un-Finished Objects) as possible. We all agreed that it felt good to find and list our unfinished projects. Some of our members had over 60 UFOs! My list of nine was much smaller...and I managed to finish one!!!

Handwoven blocks from the Friendship Coverlet
My oldest project dates from 1991 when I wove blocks for a friendship coverlet. My blocks are beautiful but I haven't done anything with them, except to weave a few more years ago so that I could eventually make a throw. Technically, it wasn't a quilting project, but I've decided that I would add sashing around each block to make them all the same size and then add borders. All of the squares have a wool weft and a cotton warp. They are wonderful but if I leave them just in wool, I'll never be able to use the throw since I'm allergic to wool! That's why I'd like to back the throw in either cotton or flannel (pre-washed of course!!!) It's thanks to this challenge that I've started thinking about finishing this project and even bought sashing and border fabric. I'm not sure that I have the "perfect" fabric yet, so it may take a while to actually start finishing it!

I learned a lot as I prepared this list. It turns out that many of the projects on my UFO list were not finished because I wasn't technically ready to finish them. Five of the 9 projects are almost or actually ready to machine quilt - but I've only this summer bought a machine that I could use to free motion quilt. I'm really looking forward to practicing my free motion quilting on them. This will probably keep me busy for the rest of the winter! I have a couple of Craftsy courses that will help me get them done. I'm looking forward to posting the results, eventually.

Since preparing my list of UFOs, I've used the list to keep track of the project that I've started and completed this year. Actually, this blog represents that list well, except that I don't often post unfinished projects, except for the quilt-along projects. Or that's what I thought until I reviewed this year's blogs. It turns out that I did blog about a few UFOs, mostly because of the events that brought them about: Ricky Timm's Convergence quilt that I started before seeing him in July; and then the needle turn appliqué class with Kathy Wylie. These are still UFOs, otherwise I would have announced their completion to the world through my blog :-)

What I learned through this year's challenge:
  • A project doesn't have to be completed to bring you satisfaction. Sometimes just getting it a little further along is a real accomplishment.
  • Projects often get finished when they are ready (or I am ready) to finish them. Sometimes it's a matter of learning or getting better at a new skill; and sometimes it's about waiting for a great idea on how to proceed. Either way, there's nothing wrong with waiting.
  • My list is no longer called a UFO list, but rather my List of Ongoing Projects. After all, it really is all about perspective!


The "No Deadline" Christmas Project

I really try to avoid deadlines for my quilting. I find that deadlines are meant to be broken and are very nerve racking; thus, my NO deadline guideline! (If you've just read my last two blogs, you can see how much I follow my own guideline!!!)

The only way to avoid deadlines when making something for Christmas is to accept that a project could take a few years. Although I’m not committing to having this particular project completed by this Christmas, it’s got a fair chance of happening.

I started a Christmas throw two Christmas seasons ago. It's the Hearthside Quintet designed byKathy Brown, from the McCall's Quick Quilts (December /January 2011) magazine and I fell in love. I've already mentioned that I’m not very good at planning quilting projects (maybe because I was a planner many moons ago) and this project was no exception.
The middle block is my favourite fabric

Year 1 (2011)
I started with my favourite fabric, which I thought I would have enough of, if I was very careful. I also needed green, red and gold for the blocks and then black for the border. That first year, before Christmas, I cut out everything I had in the fabrics I chose. It wasn't a scrappy quilt, therefore all of the green, etc. were supposed to be of the same fabric. I thought that I could buy some closely matching Christmas fabric after the holidays (on sale!) but there was nothing to be found. I did make notes about what I was missing and put the project away until the next November.

Year 2 (2012)
Armed with fabric swatches of the blocks I had cut out, I searched for those matching fabrics. I got very lucky, except that I hadn't really calculated how much fabric I needed! It’s that planning thing again! I was able to make almost all of the blocks – except for a couple. Since there were no more of those fabrics in the stores, I checked my Christmas scraps bag and found enough fabric to piece the blocks together. In a huge quilt, who's going to notice a couple of extra seams?

I thought about creating a fancy backing for the quilt. I bought some fabric with cardinals on it that went really well with the quilt, but when I showed it to my daughter, she said those birds looked very angry! Not exactly the look I was going for, so I ended up piecing the back so that the cardinals wouldn't be as obvious. I sandwiched the quilt and started hand quilting it.

Year 3 (2013)
I finished the hand quilting-in-the-ditch in November but it really needed something else. There are too many large areas that are not quilted. A friend suggested that I quilt a holly leaf in each of the outside corners of the block. So far, I've quilted about half of them!

I found the perfect pattern to quilt in the border. It's a large ribbon with a bow. No matter what I put there, it won't really show, so I wanted something fairly quick and easy. It's coming out great. I have one side of the quilt border finished! (What can I say, I get bored quickly these days.) For the centre squares of each block, I'll be quilting different Christmas things such as ornaments, snow flakes, trees, etc.

I was also lucky to find fabric that matched my borders (2 years later). The borders are holly leaves and berries. The fabric I found is darker but has the same design. Last night I cut and sewed on the binding. That was my objective this year - to bind the quilt and then to eventually finish quilting it. I'm going to keep hand quilting it this winter...who knows, maybe it will get finished (although it will be 2014 by then!) Stay tuned - I'll post an update when it's finally done!

What I learned:
  • Even if I don't plan projects well, there are many ways to adapt. Let's face it, I'm not creating a masterpiece here, just enjoying myself while creating pretty, useful things!
  • Taking the time to write out notes at the end of the first year was a life saver. A year later, I didn't have to spend a lot of time figuring out what to do. I hope I keep doing this!
  • I'm glad I figured out that I could piece some of the pieces of the blocks. In a huge quilt, it really doesn't show. Isn't that what our ancestors did when they quilted....made do with what they had?!
  • Although I've been working on this project for three years, I still love it. Maybe it's because I only have it out a few months of the year.  I love the pattern, the fabrics and the colours.

I wish you all a great 2014! May it be filled with fun times with friends and family as well as quality quilting time - alone and/or with friends!