Monday, October 31, 2022

Swirling Leaves 2 coming together

Hi! I hope that you're enjoying the rest of the fall.🍂 It's my favourite season and it's been wonderful with a week of sun. 🌞 My project celebrates the wonders of fall.

Swirling Leaves 2

I've made some progress on the wall hanging. The improv blocks have been stitched together and the first narrow border is attached. It took me a few days to decide on the larger border. I even posted what I thought was my choice on Instagram, but then changed my mind!

The first border was attached after I found this fat quarter in my stash. The leaves haven't been appliquéd yet so you'll see that they change around in the pictures 😊

First border up

The hard part was choosing the larger final border. I was ready to go with this border but it was just too pink.

My first choice that I posted on Instagram

I then found a few fabrics that might work. After eliminated a couple of them, I sent the picture to a girlfriend. We both picked the top left fabric. It's got some red without being too pink.

Choosing a new outer border

I then opened up the fabric, placed it on my design wall with the quilt top in front of it. I've lived with it for a couple of days and have decided that this is it! With the exception of moving two of the leaves, this will be the final design.

Almost the final design

I can't wait to start free motion quilting (FMQ) it. It will probably be this week's Free Motion Maverick project since I'm still struggling with what to quilt on Version 2.0. 

What I learned

  • I had originally planned to use the same fabric for the borders as the original Swirling Leaves. But then, what's the fun in that! I also wanted to see if I could make it a little more modern looking. I'm not sure if I've achieved that, but we'll see when it's done.
  • The border is Fusions from the Ombre Collection by Darcel Phillips for Robert Kaufman. I really love it and thought that it might be one of their permanent collections, but it doesn't seem to be. Oh well, at least I got to use it in this project. I still have enough for another border, if I decide to use it on my third Swirling Leaves (which will be a table runner.)
  • Although it isn't finished, this is my Table Scraps Challenge project for October. It's Joyful and there is a tiny bit of light/lime green in some of the leaves! I had other plans but they fell through. The good thing is that I could make them another month!
Related links
Linking parties

I'll be linking up to many fun linking parties, including the October 2022 - TABLE SCRAPS Challenge link party. You should totally check these out! Patchwork & Quilts

Thursday, October 27, 2022

OOTB Showcase and Free Motion Mavericks

 Hi, welcome to week 404 of Free Motion Mavericks. My partner Muv of Lizzie Lenard Vintage Sewing is taking a few months off. Here's wishing her all the best! 😊 I'm going to try to keep this linking party going each week, although the posts may not all be about free motion quilting (FMQ)...so what else is new!😁


Out of the Box Showcase at the Shenkman Centre


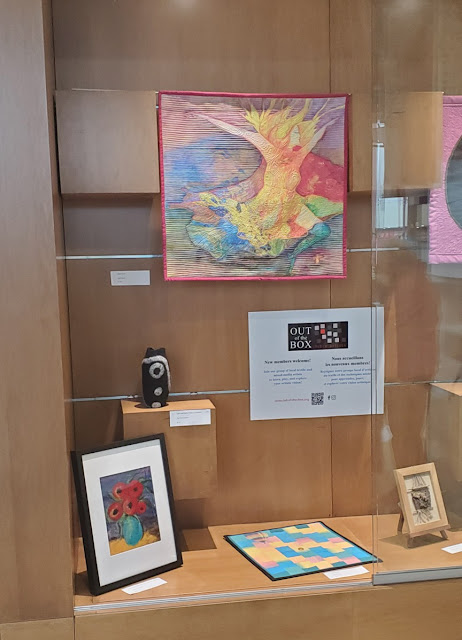
Last week a group of my fellow artists and I filled up a display case at the Shenkman Arts Centre in Orleans, Ontario. The Centre is run by the City of Ottawa and we are lucky to have the display case to share our art and possibly attract members.

This is the sign that I FMQ to include in the display case.

Out of the Box Fibre Artists sign

I was supposed to organise this activity but since I was also trying to finish up my work and help with the OOTB membership, it's a really good thing that I had a lot of help. I'm sure that all of this will get easier each time! 

I chose the theme - Happy! We ended up displaying 18 pieces by 11 member artists. Many stayed to help set up the display. I think that we did a great job 😍.

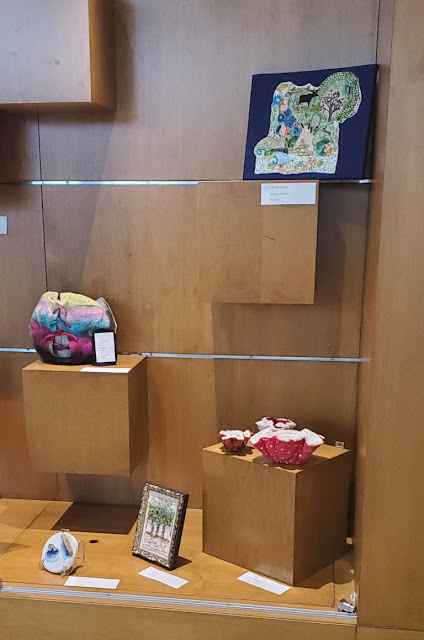
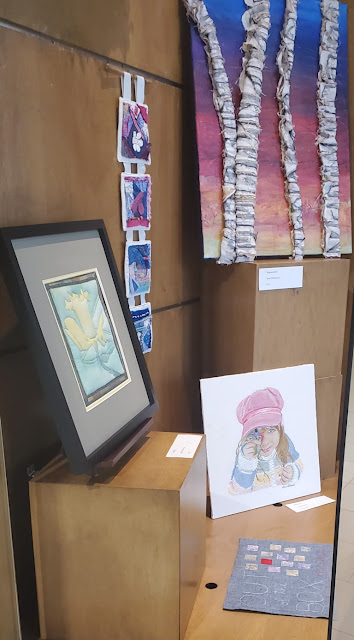
Here are some of the pictures that I took. The display case is made up of one large area and a smaller one. It also gets a lot of indirect sunlight so the reflection makes it hard to photograph. I mostly took pictures before we closed the glass windows.

These art pieces are in the large display area.

A lovely mix of fibre art

The middle section of the large area


The last third of the larger area.

There is a variety of different fibre art represented including beading, embroidery, FMQ, weaving, felting as well as some sculptured pieces.

The second, smaller case was harder to photograph because it was the side glass door that opened as opposed to the front of the display.


The small case as seen from the side


Another view of the smaller case

Finally, another look at my free motion quilted sign 😊

Out of the Box Fibre Artists sign on display

What I learned
  • It takes a bit of organisation to get a display set up. These days, organisation is not at all my strength. As I mentioned, I'm sure that it will get easier as I do more of these. Since the Shenkman Arts Centre is in Orleans, near to where I live, it makes sense that I be involved in that display. We also display at various libraries, but mostly in the west end of Ottawa.
  • The volunteers usually have a lunch before we set up the display. Since those organisational skills were dormant, we'll be having the lunch after we finish bringing down the display. It will be nice to celebrate our achievement.
  • If you're in the area, the display is up until November 6, 2022.
  • I would like to thank everyone for their best wishes on my recovery of having Covid. I was very lucky - it was just like a bad cold, but with the isolation, it sure feels more serious. My hubby had to cancel my surprise birthday/retirement party that was to be held tonight. We had a quiet evening of take-out and TV instead with a few visitors who stayed outside to talk. At least it was unseasonably warm today😎. So it's official...I am now RETIRED!!!!
  • It's also one of the reasons that I want to keep the Free Motion Mavericks going - I need to finish the Version 2.0 quilt...hopefully by the end of November.

Related links

Linking parties
I'll be linking up to many linking parties. Check them out after you've linked up 😁 Monday Making, Design Wall Monday, Midweek Makers, Put your foot down, Off The Wall Friday, Patchwork & Quilts, 15 Minutes to Stitch 2022, Oh Scrap!, Needle & Thread Thursday


Free Motion Mavericks

Welcome! Did you get any free motion quilting done this week? If you did, make sure to link up. If you didn't, you can share your quilting project anyway 😊.

In our previous link up (which closed today in New Zealand lol) Raewyn linked up her very mavericky bear quilt. She didn't win her inner-fight to do an all-over pattern and I'm very, very glad! If you didn't see it, you'll want to check out the FMQ details. Very cool!

Wonderful Bear Quilt

It's now your turn!

You are invited to the Inlinkz link party!

Click here to enter

Sunday, October 23, 2022

Playing in isolation

Hi, I hope this post finds you well. I'm afraid that I am now officially under isolation - that second bar appeared on the darn Covid test 😒. I don't know how much I'll be able to sew and stitch in the next few day. If I follow the same path as my daughter, I'll be sitting up somewhere with a fuzzy brain and no energy. Not looking forward to that!

Projects in progress


I'm making a runner and another wall hanging based on the Swirling Leaves piece that I made for the Hello Fall Blog Hop in 2020. It's always been one of my son's favourite, so I'm going to make him a runner. The other wall hanging is going to the workplace charity auction that will be held in November or December.

Swirling leaves wall hanging

I have enough neutral background stitched up for the wall hanging. Have I told you that I love improv piecing? I did learn a few lessons so far, so keep reading to find out what!😊

Stitching in progress with lots of trimming

Almost done the background for the wall hanging

Fabric strips pile

Next comes the borders and then the appliquéd leaves. A couple of days ago, on my way back from picking up the mail, I stopped in my neighbours' yards to grab these leaves. They make rather realistic leaf templates, don't you think?😁

Leaves and templates

I'll be digging into my scrap bins of hand-dyed fabrics gifted to me by Elaine Quehl. I'm sure that I'll find the perfect scraps of fabric for the leaves since they are the focus of the pieces!

Slow stitching update


I've been slowly working on my hand-stitched snippet roll which will be loosely based on our fall trip (see Related links below). It's a little more planned than a regular meditation block but once I start stitching, it's just as meditative. It's going to be a long snippet roll, so far about 44" long. It will hang on that antique bobbin which comes from the Mississippi Valley Textile Museum.   

Meditative hand-stitched snippet roll


Fall colours in my back yard


I may have gone several hundred miles to take the Agawa Canyon train tour but I could have seen the fall colours in my own back yard. I took these yesterday. The fire bush is living up to its name! 


I also love the view from my back yard. The red maple in the school yard seems to be sharing its colour with the sky. 

A bit of a sunset from my back yard

It's past time to clean up the yard so I hope that the weather keeps cooperating for at least another couple of weeks.

What I learned
  • Although I love improv piecing, mostly because I'm accuracy challenged 😊, I did discover that I do have to either:
    • cut my fabric strips relatively even, or
    • piece the fabric with a consistent seam.
  • Turns out that if your fabric cut is uneven and your seam is inconsistent, even I will have to use my seam ripper 😲
  • So, I started being more careful about my seam allowance and everything is great! I trim the blocks often to ensure that things are even.  
  • After picking leaves to use as templates, it really important to either make the template within a few hours or to place the leaves under some books to keep them flat as they dry. Ask me how I learned that lesson!😉
  • I even took the time to read my Swirling Leaves post to make sure that I remembered what I learned. I didn't write it down, but it looks like I created the background to fit the leaves placement. I didn't do this for this first quilt, so I'll see if it makes a difference. I'll update you on that when I make the runner, or finish this wall hanging.

Related links

Linking parties
I'll be linking up this post to many linking parties. It's time again for Tips and Tutorials on the 22nd with Kathleen McMusing. Slow Sunday Stitching, Quilting & Appliqué, Off The Wall Friday, Put your foot down, Oh Scraps!, Peacock Party, Monday Making


Thursday, October 20, 2022

Places & Communities on Free Motion Mavericks

Hi and welcome to week 403 of Free Motion Mavericks. I hope that you are all well. Tonight I free motion quilted (FMQ) a large area of the Version 2.0 quilt using Lori Kennedy's book and website. It was a lot of fun.😊

FMQ Places


Tuesday night before falling asleep, I was thinking of the FMQ that needed to be done on Wednesday. I knew that it needed to be fairly simple. I got inspired (I love it when that happens!) I decided to FMQ all of the places that Stéphane has lived or that are special to him. Here is the list: Timmins, Kirkland Lake, Sudbury, North Bay, Crystal Falls, Ottawa, Orléans, Matachewan, Cornwall and Barrie. These are mostly in Northern and Eastern Ontario. I also added Ontario and Canada.

Part of the Places and Communities section of the quilt
(click to see larger image)

For reference, here is the outlined section on the quilt that I completed.

Outlined in white is the Places and Communities section

As you can glimpse from the first image, the space is surrounded by place names. I then made the sun and an airplane. The only template that I made was for the sun since I have trouble getting that right. I just used a white chalk pencil to outline it. All of the ideas for the images come from Lori Kennedy and were adapted as needed. See the links in Related links below.

Place names, the sun and an airplane

Once I drew out the images, I was ready to FMQ them. As you can see, the sun is the one that I had the most trouble with.

Drawing out the images

I then worked on the bottom section adding what is essentially a cabin in the woods. Then came the line of cars and trucks and finally a neighbourhood with homes and trees.

Cabin in the woods, cars and a neighbourhood


You can see the FMQ better on the back, except that the places are backwards 😊


A better view of the FMQ from the back

Another image from the back

What I learned
  • It was so much fun finding the designs to include in this area. After deciding on the places, it came to me that I could FMQ things about community.
  • Lori Kennedy has some great posts for all of these. I did start with her book (see Related links below).
  • The angles of the triangles always mess me up when I try to do the sun. I'll have to practice that (a lot!) to get comfortable FMQ it.
  • I can't wait to show you a picture of the whole quilt in progress. It will have to be next time - my helper is in bed with Covid 😦. So far I've managed to avoid it. 🤞 
  • Breaking News: Only one week before my retirement😁 I can't wait to be on permanent play mode!!!😎

Related links
Linking parties

I linked up this post on Cheryl's Favourite Finish Monthly link up
This is also my OMG for October - I'm thrilled that I kept quilting. I'll be linking up to the November OMG to get this baby finished!

Free Motion Mavericks

I hope that you will have something to post below. Here is my last Version 2.0 post with birds.

Bird on a branch

It's your turn!

You are invited to the Inlinkz link party!

Click here to enter

Sunday, October 16, 2022

Fall Wonderland

I took an amazing trip with my daughter during the weekend of Canadian Thanksgiving. I wanted to celebrate my up-coming retirement with a trip. Taking the Agawa Canyon train has been on my bucket list since I heard about it many, many moons ago. 

A memorable train ride

The train to Agawa Canyon departs from Sault Ste. Marie, Ontario. I've been a few times, usually driving through to get to Lake Superior or to head to the Mid-West. This time we stayed two nights, had an amazing meal and a delightful trip to the Agawa Canyon. 

As we were going around bends, I wanted to take a picture of the front of the very long train. You can see from this image that the train compartments are in great shape. Since it was the last weekend of the fall season, my daughter and I were very luck to be able to sit by ourselves and had lots of leg room 😊.

Spotting the front of the train through the window

Here are a couple of photos that I took from the train. I'm not sure why, but the photos are so much more vibrant on my phone. It seems that as soon as I send them elsewhere, they loose their vibrancy. 😒

The view from the train

I love the shadows cast by the train


That's me - proof that I was there enjoying myself 

When we got to Agawa Canyon, we had an hour and a half to walk around. The day was sunny with some clouds. It was perfect!

Jeannine managed to take this picture without including all of the tourists!

My favourite photo framed by the red maple leaves

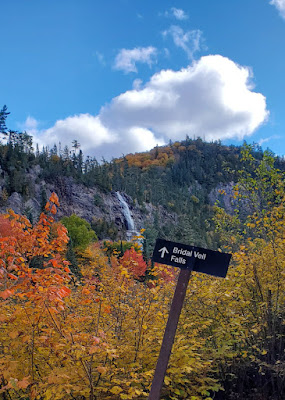
I love this one of Bridal Veil Falls in the background


Swaying pine trees, like in the Group of 7 paintings

A little bit of red to liven up the falls

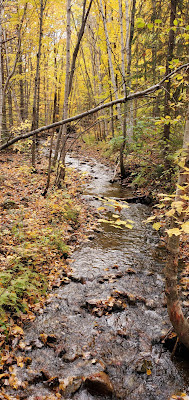
I think that I love rocky streams as much as water falls!

Water cascading behind the foliage

Fall stream

Here are some of Jeannine's lovely photos.

Sun peaking out of the clouds

What an amazing reflection

One of the locomotives that pull the train

Translating this into textile

I took some fabric scraps with me but didn't do much on the trip except take photos and sketched out some ideas for a meditation stitching project. There isn't much to see at this time, but here are some fabrics and one of my journals that I used to sketch in and write ideas.

Fabric stitched together for the base. The fun starts after that! 😊

Some very rough sketches and words to remember

Book with a woven binding - now a sketch book!


What I learned
  • As I mentioned, I realised how much more vibrant my pictures are on my phone. I've tried all kinds of things but without success. 
  • I've looked at programs but although they say that they are free, they are not. If I'm going to invest, I guess that I'll have to do some research.
  • The train trip was wonderful. I'm very glad that I did it, although I have to admit that I thought that it would follow Lake Superior for a while - but it didn't. The train goes much more into the interior of that area. I guess I'll just have to go back!
  • I didn't bring my stitching on the train - it was too full, but I did make a few sketches. I started a meditation stitching project that will be partly based on my photos and sketches.

Related links

Linking parties

I'll be linking up to many linking parties such as: Slow Sunday Stitching, My Corner of the World, My Sunday Snapshot, My Sunday BestOff The Wall FridayPatchwork & QuiltsPeacock Party,


Thursday, October 13, 2022

Pocket Journals

Hi! I hope that you had a wonderful Canadian Thanksgiving. I took a train trip to the middle of the Northern Ontario bush - it was amazing. 😊 Since coming home, I've also made two pocket journals as part of the October Challenge for the Handmade Book Club. 

Quilty Recycled Pocket Journal

This first journal is all made of recycled materials. Our teacher encouraged us to make a sample signature (the pages that make up the book) out of photocopy paper. I had so much fun with it that I made 4 signatures and finally a cover. 

A very quilty pocket journal

The images are all from the Connecting Threads' October catalogue. The whole thing is covered with lovely quilting fabric and quilts. You can see the pockets on both side. The book is also reversible.

Second signature with pockets

This is the cover of the journal as well as the last two signatures. It was so much fun cutting and gluing the images on those pages.

Many quilty lovelies on these pages.

The journal also stands up. These are the front four signatures. 

Front four signatures of the journal

These are the signatures as seen from the back of the journal.

Back four signatures of the journal

Finally, this is the back cover. 

Back cover of the recycled pocket journal


Bookmark Pocket Journal

This second pocket journal will be a birthday gift for my husband. He really liked my Accordion book with pockets and I said that I would make him one for his bookmarks. 

Front of the Bookmark Pocket Journal

I made this one using scrapbooking paper. It was a little thicker than recommended but it turned out well.

Bookmarks in the pockets


Closed Pocket Journal with the bookmarks

What I learned
  • It was great doing the sample journal before the "real" one, although I managed to make the same errors on both of them!😁
  • The signatures were fairly simple to make, as well as the book cover. It was finishing up the journal with a button and string that got me!
  • My cord on my first journal was too thin and didn't go all around the journal. When I changed it, I managed to put the signatures upside down.
  • I figured out the hard way, why the cord needs to be wrapped around the journal. If you don't, since the journal is reversible, it just opens up from the back!!!
  • For my bookmark pocket journal, I got carried away and stuck the cover to the front signature before putting the button in place. I was able to put the button close to the edge and did the same thing with the back, so it doesn't really show. I did cover the front pocket with more cardboard since I managed to get blood on it. The hazards of working with needles (which we know all about right?)
  • I'm looking forward to picking up a couple more bookmarks for the journal. Hopefully I can wait for his birthday before I give it to him 😊
  • I hope to write a post this weekend to share pictures of our trip. Stay tuned!

Related links

Linking parties
I'll be linking up to several linking parties. Why not see what's going on out there? Peacock PartyTGIFF, Beauties Pageant, Off The Wall Friday, Patchwork & Quilts, 15 Minutes to Stitch


Project Details


Quilty recycled pocket journal 
Size: 4½ " x 3"
Materials: photocopy paper, magazine images, cardboard, button and cord


Bookmark pocket journal 
Size: 5¾ " x 3½"
Materials: scrapbooking paper, cardboard, button and cord