Sunday, May 31, 2020

A big hexie squirrel

About a month ago I made a squirrel - that is a little (or sometimes big) project that just insists on getting done, right NOW. I knew that this would be my May DrEAMi (Drop Everything And Make it), a link up that's always a lot of fun, and hosted by Sandra at mmm! quilts.

The Big Hexie Experiment


Big Hexie Experiment
I bought the Better Homes & Gardens "Handwork happiness" magazine a while back (see Related links). I was intrigued by the way that the little table mat "Hex Marks the Spot" was finished.

Last year my lovely neighbour made me some large 2" hexie templates. Then, in the fall, I was gifted some very bright scraps by a quilting friend.  With all of these supplies, I thought that I would try the finishing technique of this project.  
Handwork happiness magazine

2" hexies


Since I was gifted both the templates and the fabric, I gave this one to my lovely neighbour. She loves orange so it was perfect for her.


I've made small hexie projects in the past, and the hardest part is the finishing of the pieced. In this project, the seam allowance of the hexies on the edge of the piece are ironed to the outside. The batting, which is the same size and shape as the top (with its edges ironed out), is place on the bottom. You then put the hexie top face up and then place your backing on top of your top, facing right side down. At this point, you very carefully sew ¼" along the edge, leaving an opening a couple of inches wide. You flip the fabric inside out and then stitch the little opening. This technique is sometimes called the pillowcase technique for finishing a quilt. In Related links, I have linked to a YouTube video to explains the technique.

My lovely neighbour sent me these pictures after I had forgotten to take some of the finished cosy.
Being useful as a wine cosy :-)

Finished hexie cosy


The back of the cosy


What I learned
  • The technique worked very well. 
  • I did have a bit of a problem pulling the edges of the hexies to the outside since I must have sewn parts of it down when I sewed the hexies together. Next time, I'll try to be more careful with my starting or finishing stitches.
  • I also had to trim the edges to ¼" since my edges under the hexies are not very consistent.
  • As I wrote this post, I realised that I hadn't taken a picture of the finished hexie cosy. Oh well....but as usual, my neighbour came through. 😊
Related links
Linking parties
I'm linking up to Sandra's DrEAMi! link up as well other fun linky parties, Slow Sunday Stitching, Oh Scrap!, Can I Get A Whoop Whoop?, Finished or Not Friday, Put Your Foot Down, Colour & Inspiration Tuesday, Monday Making,


Have a great week and stay safe, healthy and sane😊

Wednesday, May 27, 2020

Pinwheels on Free Motion Mavericks

Welcome to week 282 of Free Motion Mavericks. I'm now in the process of free motion quilting (FMQ) my Pinwheels and Stars Baby Quilt.

Pinwheels and Stars Baby Quilt


On my last Free Motion Mavericks post, I had just been doing some stitching-in-the-ditch around all of the blocks. I took my time and since the background fabric is white, there was usually white fabric to stitch around so that the thread didn't show up too much. I know that I could use invisible thread but I really want to learn to get better, not just hide my mistakes. Overall, I'm quite happy with the results of this FMQ so far.

Quilting-in-the-ditch to outline the star

Quilting-in-the-ditch is done
and it's ready to FMQ
Picking a FMQ design 

Now comes the hard part - what design to use?

My first question is: do I want the FMQ to be circular /curvy, or angular / straight? Since the piecing of both the pinwheels and stars is angular with half square triangles (HST), do I want to emphasize this or create contrast by adding curves? I can, of course do both but it would need to be consistent throughout the quilt.

My second question, applies to the pinwheel blocks: do I use a separate design for each HST or an overall design?

I guess my third consideration is purely practical - how much effort and time do I want to take to FMQ the pinwheel blocks, given that they will be secondary to the centre piece.

I quickly looked at my FMQ journal but decided that I would check the internet for "fmq designs for pinwheel blocks". I got an interesting variety of images. I drew variations of some of my favourites:

FMQ curves within the block

Assortment of FMQ lines that could be used in the block

Overall designs that can be used
Choosing just one design is beyond me at this time (fuzzy brains don't like making decisions).
Since there are 7 sets of pinwheel blocks within the baby quilt, I could FMQ each set of blocks differently. I think that as long as each pinwheel is treated the same within each block, that this should give it enough cohesiveness. I can only hope 😊 Let's face it, no matter what, it's bound to be a cute baby quilt - so I'm going for the practicing with variety option.

Here are the two sets of pinwheels that I FMQ this evening.

I chose to FMQ spirals around this first batch of pinwheels, mostly because they are the worse constructed ones. My problem at the time wasn't piecing bur rather trimming. I'm hoping that the spirals won't accent the problem.
FMQ spirals in each pinwheel block
This second design is from Angela Walter's video, Three Ways to Machine Quilt Pinwheel Blocks. In this block, she creates a tiny pinwheel in the white background fabric and then adds extra lines to highlight the mini pinwheels. In the coloured triangles she uses a dot-to-dot design to add two wedges inside them.
Mini pinwheel shape in the background triangles
Adding a mini pinwheel shape in the background triangles
What's on for the week
  • I've signed up for the TextileArtist.org Stitch Club and have just accessed the Facebook page. I haven't done this week's workshop yet, so I'm hoping to get that going so that I don't fall behind.
  • I also want to work on my Traveller's Blanket. Here is my last post. I've done a little bit of work on it, including making a couple more meditation stitched blocks.
  • Finally if the fuzzy brain lifts a little, I have a niece who is waiting for her curtains 😊
What I learned
  • Am I over thinking the design for the pinwheels? Probably. On the other hand these images will be pasted into my FMQ journal so that I'll have a number of choices for the next time.
  • Full disclosure (as they say), one of the reasons I'm going with a variety is that the design I like the best is the one that I almost always choose....so I'm going to try out other things. When I've tried them out, we'll see how they turn out and if my favourite is still the same😊.
Related links
Linking parties
I'll be linking up to many fun parties. Let's see what's going on out there! Midweek MakersNeedle & Thread ThursdayPut Your Foot Down, Finished or Not Finished Friday, Friday Foto Finish, Can I Get A Whoop Whoop?, Peacock Party, Monthly Favourite Finish with Meadow Mist DesignsMonday Making, What I Made Monday, Design Wall Monday, To Do Tuesday, Colour & Inspiration Tuesday,


Free Motion Mavericks


The party wasn't big last week but we had some wonderful link-ups. Thank you! As the instructions for the link-up states, the first person who links up from a new country gets a special mention and their country is added to the list. So, a big welcome to Turid from Norway. She finished a FMQ dinosaurs quilt for her grandson. As you can imagine, he was thrilled! If you didn't catch the post last time, here's the link!

Dinosaurs Quilt by Turid
It's your turn now!


You are invited to the Inlinkz link party!
Click here to enter

Tuesday, May 19, 2020

More learning with the Traveller's Blanket

Monday was a long weekend in Canada and I happily spent most of the afternoon doing some slow stitching with my daughter. She was embroidering and listening to video essays while I was working on my Traveller's Blanket and listening in on the programs. It was so peaceful and pleasant. I wish that I could spend all of my afternoons like that😊

Traveller's Blanket


So what it a Traveller's Blanket? If you google it, you will find links to Dejanne Cevaal's work. Dejanne has made a number of Traveller's Blankets - blankets that might have been made by travellers to depict what they had seen during their travels. I follow Dejanne on Instagram and saw that she was offering an online course. Since I've really enjoyed meditation stitching, I thought that this would be a great way to display them.

I'm using a very fine piece of cotton that I dyed a couple of years ago. I love the colours and I'm sure that it will make a great background to my small meditation stitched blocks.

My dyed background piece (39" x 25") 
The idea is then to attach pieces of fabric to the background and to embroider them on and around them.
First block stitched down with a blanket stitch
and then adding seed stitches
I finished the first block and then attached the second block last night. I also pinned an embroidered hexie that will be stitched down next.

Two blocks stitched down and the hexie pinned
For the online course, so far Dejanne has sent us a couple of PDF lessons and we are sharing on a private Facebook group. It's a lovely group of ladies from around the world.

Here are some of my favourite meditation stitching.
Impressions of Dried Flowers

Star Light


Web in the Flower of Life

Orange, Pink & a feather


Pretty Moon & Stars; Angles; Green & Blue with Bark; and Shining Rose
Here are some of the hexies that I embroidered. The spring bulbs have now gone but they were lovely a few weeks ago.

Embroidered hexies in the spring garden

Close-up of embroidered hexies
What I learned
  • In the first meditation stitched block that I attached, I ran out of the pink embroidery floss that I was using for the outside chain stitch. As I was posting my pictures on Facebook, I realised that I could leave the chain stitch open and have a few seed stitches spilling out of the open frame.
  • I'm not a big Facebook fan but this is a lovely small group so things can easily be found.
  • It's really fun to see other participants' work. The fabrics that are being attached to the blankets tell a story. Either they were acquired while travelling , hand-dyed, etc.
  • I have quite a few meditation stitched pieces done but will be making more to add to the blanket. 
  • I want to stitch a border around each block. It's fun that I can add more stitching to the borders later.
  • I'm looking forward to seeing how my hexies look when interspersed around the blocks.
Related links
Linking parties
I will be linking this post to many fun linky parties. Let's see what's happening out there! Oh Scrap!, 15 Minutes to Stitch 2020, Monday Making, Colour & Inspiration Tuesday, Free Motion Mavericks, Off the Wall Friday, Foto Fun Friday, Can I Get A Whoop Whoop?, Peacock Party, Slow Sunday Stitching, Midweek Makers, Needle & Thread Thursday, Put Your Foot Down,

Wednesday, May 13, 2020

Baby Quilt at Free Motion Mavericks

Welcome to week 280 of Free Motion Mavericks. I found a free motion quilting (FMQ) project to work on during my Free Motion Mavericks posts. Here it is!

Pinwheel & Stars Baby Quilt


This project has been around for years (a very early UFO). I started the blocks at least 5 or 6 years ago, before I figured out that piecing was not my thing. I love pinwheels and the fabrics I used are so bright and cheerful. I had made the blocks that make up this quilt, but I would have needed at least double this amount to make the full quilt. If I can find the magazine with the original quilt pattern, I'll add it to Related links below.
Mini pinwheel blocks and large stars
Bright pinwheels and stars
Then, in 2016, I made my first baby quilt featuring a large negative space for FMQ, A Beautiful Day. The second quilt, Charming, was based on the same concept and was published in Make Modern Magazine in January 2018.
A bright yellow Beautiful Day baby quilt
A Beautiful Day
Details of the FMQ Moon and Sun

Charming baby quilt from Make Modern Magazine
Charming Baby Quilt in Make Modern Magazine

It's around that time that I found these blocks. Since I was not going to make more blocks, I decided to place these around a large negative space that could be used for FMQ.
Pinwheels and Stars baby quilt sandwich
Lots of negative space for some fun FMQ in the middle
Tonight I started stitching-in-the-ditch. I will be outlining the blocks and then the fun begins. If you have any suggestions for the middle, please let me know. At this time, I'm thinking pinwheels and flowers. I'm also considering using coloured thread for the central FMQ. What do you think? I'd love to hear your thoughts and ideas 😊

Adding a fabric strip on the side
to test the tension
What I learned
  • I'm really glad that I had this quilt sandwiched and ready to go. It will be a fun project for Free Motion Mavericks and I actually have a new baby to give it to once we can visit again.
  • I saw some quilters add a strip of fabric on the extra batting and backing of the edge of their quilts to check their stitching tension. I remembered and tried it here. What a great idea. Thanks!
  • I've got some of the stitching-in-the-ditch finished. Next Free Motion Mavericks I'll have some FMQ to show you!
Related links
  • A Beautiful Day Baby Quilt, June 24, 2016
  • Charming Baby Pattern - Make Modern Issue 21,  March 1, 2018
  • The original pattern was Make a Wish by Karen DuMont in Quilt Almanac 2011.
Linking parties
I will be linking this post to many fun linking parties. Let's see what's going on. Also, don't forget to link up to Free Motion Mavericks below. Colour & Inspiration TuesdayMidweek MakersNeedle & Thread Thursday, Monday MakingPut Your Foot DownFriday Foto FunCan I Get A Whoop Whoop?Peacock Party, Oh Scrap!, UFO Busting, PHD in 2020, What I Made Monday, Design Wall Monday,

Free Motion Mavericks


We had some lovely projects linked up last time. Thanks so much for taking the time to join our party! We've been watching Quilting Gail make her Stay-at-Home Round Robin quilts for a few weeks now. Well, the results are well worth seeing! Go to her post to see the FMQ from the back of her quilt. She must of had a lot of fun doing all that FMQ! It's really lovely😊
Quilting Gail's Blue Stay-at-Home Round Robin quilt
It's your turn!

You are invited to the Inlinkz link party!
Click here to enter

Monday, May 11, 2020

Adding rug hooking to my artist's tool box

It's been a while since I felt like reaching out. Although I needed some quiet time, I did continue to stitch and learn. That is my go-to in times of stress. Here is a bit of what I've been up to. 😊

Rug Hooking


I met a lovely lady, Robin Whitford of Hooking Outside the Lines, who teaches rug hooking. I must admit that it suited me better to take a virtual class rather than going to the store as it is usually taught. For an introduction course to rug hooking, it wasn't really necessary to be next to the teacher. The technique is really not very complicated. Like anything else, practice makes it easier. That's not to say that it can't get complicated, but for an introduction - it was perfect.

rug hooking - Echoed Heart
A rug hooked Echoed Heart 
After a two-hour class, I had made a square and rectangle with wool. Those were my practice pieces.
orange rectangle rug hooking
Making a practice rectangle
and then pulling it out

One of the things that I like best about rug hooking is that I can just pull on the wool to take it all out. If you don't like it, it's relatively easy to just start over. Of course that also depends on the type of yarn and the backing that you use. Burlap and the wool I used were very forgiving so that it's possible to just start over with the same wool, in the same place on the burlap.

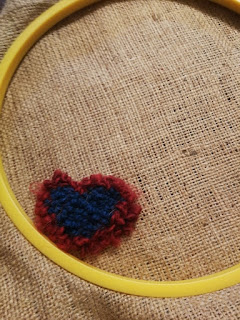
After the class, I wanted to keep practicing because the hardest part it getting the wool hooked on the other side of the hoop. Once your fingers figure this out, the rest is fairly simple. So I started making a shape in the blue yarn. It sort of looked like a heart, so I continued with that shape. Then I got bored and added the red yarn around it (an echo in quilting terms 😊).
heart rug hooking in hoop
Echoing the heart in red

rug hooked blue heart shape
Making a heart shape with blue wool


Since I want to learn rug hooking to use in my textile art, I knew that I would want to make smaller pieces. I removed the burlap from the hoop and then zigzag stitched around the heart. I also zigzagged around the piece of burlap so that I could continue to use it without it un-raveling. 

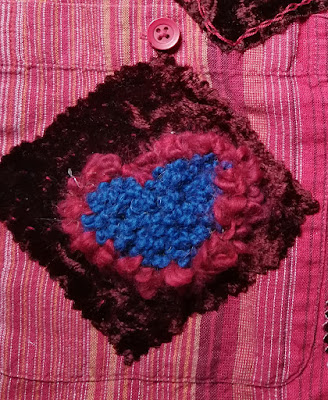
I was very happy with this first piece and incorporated it into one of the art quilts that I'm working on. I used a square of red velour, cut out the shape of the heart from the centre and then reverse appliquéd the heart onto my piece. It was easy to attach because the wool of the heart extends over the edge. 
rug hooking inserted into reverse appliqué square
Reverse appliquéd the heart to my art piece
The next day, I decided to make a small landscape - nothing like diving right in!

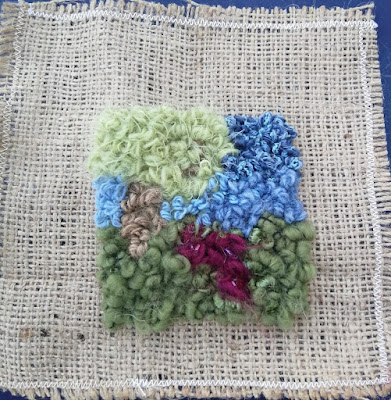
It's wonderful that I can use most of the lovely novelty yarn that I've been accumulating in the last few years. It's great to see how a yarn translates to rug hooking. Some keep their shapes while others end up splitting or getting quite shaggy (like the top of the tree).  

Small rug hooked landscape

close up of rug hooked landscape
Close up of rug hooked landscape
partially done rug hooked landscape
In progress picture -
it needed help.
It was fairly simple to make the foreground in green and I added some purple in shapes that could have been flowers.

My son helped me by suggesting a longer trunk for the tree. It also helped when I added blue yarn for the sky on both sides of the tree. You can see the improvement from the progress image, which mostly looked like a big clump of fuzzy green. I used three different yarns for the sky.

I added some beads to the flowers, hoping to make them look more like flowers.

What I learned
  • Rug hooking is very cool. Not too difficult to learn the basics but has so much potential.
  • My teacher, Robin Whitford, is very experimental and doesn't follow the rules - my kind of artist!
  • I really loved how the different fibres and yarns looked after they have been hooked on. 
  • The bark was particularly interesting because I used pieces of twine that one of my favourite restaurants uses to tie the paper that wraps their sandwiches. If the twine has never been used, it comes out in distinct curls but once it's been used and pulled out, it became all fluffy.
  • I used the hoop to learn, practice and make the first heart shape. After that, I just did the rug hooking without the hoop. That's also how I do a lot of my embroidery unless it's a really precise piece.
  • I'm not sure how I will be using rug hooking in my art, but it's great to think of the potential. I do want to experiment with other types of backing. I have some cotton and linen pieces that I would like to experiment on. Actually, wouldn't it be cool to hand-dye the backing material and then add rug hooking to it, leaving some of the spaces empty? Oh the possibilities 😊
Related links
Linking parties
I will be linking this post up to Free Motion Mavericks which is hosted by Muv right now. I'll be hosting on Thursday so remember to come by. Let's see what's going on and join in the fun! Monday Making, Design Wall Monday, What I Made MondayColour & Inspiration Tuesday Midweek Makers, Needle & Thread Thursday, Put Your Foot Down, Off the Wall Friday, Finished or Not Finished Friday, Friday Foto Fun, Can I Get A Whoop Whoop?, Peacock PartyOh Scrap!, Slow Sunday Stitching,