Saturday, July 24, 2021

Mystery UFO

This quilt has now been on my design wall for several months. I felt like doing something different, so I thought that I would work on it. I had the fabric strips and extra pieces in a project box but no pattern...where did this project come from?  

Mystery UFO (UnFinished Object) solved

First clue: I checked to see when I had first taken pictures of the quilt on my design wall. I found this picture in December on my Studio Tour post, and on my phone it first appeared in mid-November. It would seem that I didn't write a post about it.

Here it is on my design wall during my studio tour.

It first appeared in Mid-November


Second Clue: The pattern wasn't in my project box, so it might come from an e-book.

It took me a while to go through my e-books but sure enough, the pattern is in Stripology 2 by GE Quilt Designs. I know that I saw the quilt in a blog post and loved it, but of course I can't find it now....so if it was in your blog, please let me know. I even wrote to the blogger because I was nervous about the piecing, but she reassured me, and it wasn't too difficult.😊  

* Update: Wendy of Pieceful Wendy found the post for me - it was Nancy of Grace and Peace Quilting. She made her quilt 36" x 36" because the pattern for the quilt is pretty small (24" x 29"). I'm not up to making it bigger with more hexies, but that's what borders are for 😊. I thought that I had finished the quilt on Sunday (July 25) but this week I'll audition some fabrics for the borders. It's going to get done! Thanks Wendy and Nancy! 


Progress and stitching up the columns

I say that it wasn't too difficult, but this is from someone who is accuracy challenged and pretty intimidated by piecing. My very favourite block is the 9-patch! I'm not really a fan of piecing but when I make a quilt that isn't improv pieced, it's almost always scrappy so that I don't have to cut all of the fabric at once. 

Before I found the pattern, I thought that I would just have a go at stitching the rows together. After stitching a few, I realized that I was probably not doing this right because I had not idea how I was going to attach the second row to the first - they are all hexies! That's why the seam ripper made an appearance. It turns out that the pieces are stitched one column at a time.

My seam ripper was very useful!

It was also handy when I sewed my first two half hexies together in that column. I'm really not good at thinking in 3 dimensions, so I ended up having to pin them together to figure out where to stitch. After that, it went quite well.

Pinning the pieces to get the correct angle

You can see the weird piecing at the top of each column. The pattern calls for cutting the extra pieces into quite smaller pieces to finish up the top. I really don't like dealing with small pieces, so I'm going to stitch these partial pieces to the top of the strip and then trim them when the top is all pieced. This should give me some added security since I'm really good at having these types of pieces be too small. 😊 

Adding extra long top pieces that will be trimmed off

Since my last design wall picture, I've cut and pieced the rest of the strips so that the quilt top will be 6 hexies by 8 hexies. It's supposed to be a 24" x 29" crib quilt.

What I learned

  • It might be a good idea to write the name of the e-book in my project box. 
  • I remembered why I don't really like piecing but it wasn't that bad. I've attached 5 of the 8 hexies in each column and all of the pieces are on my design wall.
  • I've been really restless and not feeling like FMQ or hand stitching, so this is a nice change.
  • It'll be nice to have something else on my design wall!
Related links

Linking parties

I'll be linking up to many fun linking parties. Why not check out what everyone is up to?  Let's Make Baby Quilts, Put Your Foot Down, Finished or Not Finished Friday, Patchwork & Quilts, Oh Scrap!, 15 minutes to stitch 2021, Design Wall Monday, Monday Making

This will also be my Squirrel and I'll be posting it to Sandra's DrEAMi! next Saturday, 


Thursday, July 22, 2021

More Embroidered Mixed-media Botany at Free Motion Mavericks

This is the second post about my Embroidered Botany Workshop with Amanda McCavour. You can find the first post in Related links below.

Mixed-media flowers

This was actually the first day of the weekend virtual workshop. We used an assortment of mixed-media to fill in our embroidered botany piece. During the workshop I made a flower and that evening, since I was so inspired, I made a second piece - an Allium flower.

On that first day, we made our sample using FMQ on both the Sulky Solvy and Fabri-Solvy. The Sulky Solvy sticks to itself when ironed, so it's really great at trapping bits of yarn, thread and roving between its layers. The Fabri-Solvy is much stronger and so will handle a lot of free motion quilting (FMQ) or thread painting.


Flowers made of thread and yarn on Sulky Solvy 

My second piece is an Allium, one of my all time favourite flowers - I have of lot of these planted in my garden.
Allium made of thread and yarn

I'm not going to go through the whole process but in these pictures you'll see that it's not difficult and lots of fun. 
Start covering your flower with threads and yarn

Draw the image on the Sulky Solvy


Keep adding to fill in the space

Cover your filled flower with another layer of Sulky Solvy
then cover with a protective cloth and iron

Free motion thread paint your flower

Ensure that all of the parts of your design
are well connected by thread


Dissolve the Sulky Solvy in warm to hot water and let dry

Translucent project in the making

Ever since I played with organza and other transparent /translucent fabrics, I've been planning a garden curtain for my studio. The first two pieces are now ready for the rest of it to be made one day. 😊

First two pieces pinned on the curtain

What I learned
  • There is so much potential in this technique. Flowers could be made with the mixed-media or just thread, like the sculptured flower. The thread-only flowers don't have to be sculptured and I'm looking forward to trying them out.
  • I've been thinking about this project for over a year, so I think that it's going to be a medium term project over the next few years.
Related links
Linking parties
I'll be linking up to many fun linking parties this week. Check them out if you have a chance! Midweek Makers, Put Your Foot Down, Needle & Thread Thursday, Finished or Not Finished Friday, Off the Wall Friday, Beauties Pageant, Peacock Party, TGIFF


Free Motion Mavericks

Welcome to week 341 of Free Motion Mavericks. It was a very quiet party - I think that many people are enjoying the summer and holidays. So here are two lovely quilts from our regular partiers - I'm glad to be featuring both of them this week. If you didn't see their posts last week, go check them out!

At Chrisknits, another Quilts Plus BOM top was quilted for her neighbor’s little boy - lucky guy!

Quilts Plus BOM top quilted at Chrisknits

Our second lovely quilt is part of Quilting Gail's Christmas in July party with Island Batiks, Never to Early. What a lovely wall hanging!

Quilting Gail's Never Too Early project

It's now your turn!

You are invited to the Inlinkz link party!

Click here to enter

Friday, July 16, 2021

Trying to get from fine to great!

Hi, it's been a while. I haven't been motivated to do much of anything except a little bit of gardening. I thought that it might be time to try to kick motivate myself out of my funk. So here's a project that I've been working on. Unlike most projects where, whether it's good or not so good, I try it once and move on, I'd really like to get this one, not just fine, but great! 

Version 1

My daughter took this picture of our "All for One" pose with her, Chevy and me. I've been thinking of how to embroider it - so this is my journey 😊

All for One

I wanted to embroider this image onto a denim coloured cotton fabric. I wasn't sure how to proceed. In this first version, I tried a couple of new techniques.


All for One - version 1

The first new technique was to mount the background fabric onto the frame of a painting canvas (8" x 8"). First I removed the canvas for the frame. Then I pinned the fabric over the frame with tacks and used the frame as an embroidery hoop. This works well if the image doesn't go anywhere near the edges of the frame. The back of the frame is much wider than an embroidery hoop, so it's difficult to stitch near the edge of the fabric.

Close-up of All for One

I started by tracing the photo onto tracing paper. For the stitching, I followed Sue Stone's suggested technique: to stitch directly through the tracing paper with the fabric underneath. I used a stem stitch of 3 or 4 strands of embroidery floss. When I finished stitching the outline, I carefully ripped off the tracing paper.

I did a little bit of filling inside the image. I even used some fluffy yarn to stitch part of Chevy's coat.

I'm not crazy about my stitching. I'm not sure if it's because the stem stitch is looser after having stitched through the paper and fabric or from pulling the paper off. The awkwardness of stitching using the frame can also account for some of it.

What I learned

  • I think that a tighter stitch would be better.
  • Sue Stone uses a backstitch, so that might have made a difference.
  • I'm not sure that I want to have just an outline or to add something extra as a fill.
  • What I'd like to try next:
    • Use a background colour that is more skin tone.
    • Use a different stitch.
    • Stitch more details such as shadow.
    • Possibly add a sleeve or two, to add texture. It's also possible to add appliqué but I don't think that I'll do it in the next version.
  • I really like having my piece finished on a frame like this, but this time I'm going to embroider it as usual and then cut and tack it to the frame after it's done.
  • I've always had problems with the corners when adding fabric to a canvas. However, after taking the canvas off of the frame, I saw how they cut and folded it. I highly recommend that you do this if you want to figure it out.
Related links
Linking parties

Wednesday, July 07, 2021

Embroidered Botany Workshop at Free Motion Mavericks

A few weeks ago I took a wonderful weekend virtual workshop with Amanda McCavour - Embroidered Botany and Water Soluble Stabilizer. It was offered through the Quilt Surface Design Symposium (QSDS), which is usually held in Ohio. 

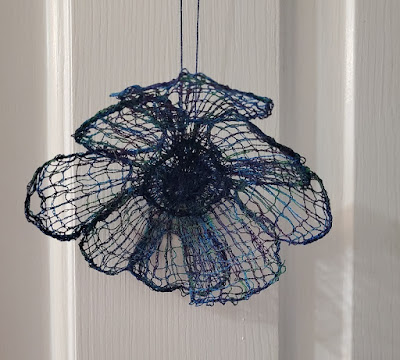
Sculptured flower 

Amanda is a great teacher and we got to play and make many samples using FMQ on Sulky Solvy and Fabri-Solvy. Both are water soluble stabilizers that you can free motion quilt on. When you are finished, you simply rinse or soak your piece to dissolve the background, leaving your FMQ design. If you're not familiar with the product, it does sound weird but it's really awesome. I'll give you a highlight of how it's done.

Sculptured flower made of variegated King Tut thread on Sulky Solvy 

This is actually our second day project but it really shows you what can be done with FMQ on Sulky Solvy. It really isn't that difficult, especially if you've done a bit of free motion quilting.

I drew the template directly on the Sulky Solvy and put it in a regular embroidery hoop. I then slid the hoop under the free motion foot and started painting with the thread. The tricky part is to ensure that all threads are connected somehow, otherwise once the water soluble stabilizer disintegrates, you'll end up with a lot of loose threads!

Using the free motion foot to thread paint on the Sulky Solvy


Sewing around to flower to connect the threads

Once the petals have been FMQ, the stabilizer can be dissolved. To give the petals a 3-dimentional look, I placed them to dry over a couple of small bowls. Below you see the two petals as well as the centre piece.

Drying the thread pieces

Once the petals have dried, the extra thread can be trimmed off and the pieces are hand-sewn together to form the flower.

What I learned

  • As I've mentioned before, I love working with translucent fabrics. As well as using tulle or organza, this is another way of creating translucent, lace-like pieces.
  • This is the result of the second day of our workshop. In a future post, I'll show you the mixed media botanicals that we created on day 1.
  • I didn't think that I would like using the embroidery hoop to FMQ but it really helped keep the Solvy neat when FMQ.
  • Can you imagine a whole room of these sculptured flowers hanging from the ceiling? It's really stunning 😊 I saw Amanda's installation at the Canadian Textile Museum in Toronto many years ago. It's amazing but I can barely imagine making a few of these, let alone hundreds! In Related links you will find the link to Amanda's website. Check out her poppies - it's really special! 
  • I actually took a course with Amanda at Quilt Canada, when it was held in Ottawa in 2019. In that class we were supposed to make Landscape Scarves. Since I really don't wear scarves, I made a few samples to explore different ways of using the Fabri-Solvy and Sulky Solvy.
  • When I searched for Solvy in my blog, I found that I had used Sulky Solvy even before I took Amanda's class at Quilt Canada. I made a small piece that looked like lichen to attach to a piece of lava when I made my Islas Canarias art quilt.

Attaching a piece of lava rock with lichen made of Sulky Solvy


Last year I made small lace-type pieces
with white thread on Sulky Solvy
Related links

Linking parties

I'll be linking up to many fun linking parties. Check them out, after you've linked up to Free Motion Mavericks below! Monday Making, Midweek Makers, Put Your Foot Down!, Finished or Not Finished Friday, Off the Wall Friday, Can I Get A Whoop Whoop?, Beauties Pageant, Peacock Party, Patchwork & Quilts

Free Motion Mavericks

Welcome to week 339 of Free Motion Mavericks' linking party. Last time we had some lovely quilts and quilting 😊 Rebecca Grace got a brand new snazzy quilt beast and played with some FMQ designs. I'm thrilled that it went well and that she remembered how much fun it is to just zoom along! 

Love those wonderful colours and FMQ by Rebecca Grace!

We also want to encourage Lea Anne of Podunk Pretties with her FMQ. She doesn't particularly like FMQ but she's persevering and finishing up some UFOs. Congrats on your finishes!

Lea Anne is FMQ this lovely blue and yellow leaders and enders quilt.

It's your turn now!

You are invited to the Inlinkz link party!

Click here to enter