Wednesday, May 22, 2019

Free Motion Mavericks link up

Welcome to Free Motion Mavericks (week 230).

I've only written one post since the last time I hosted Free Motion Mavericks - I've been really busy at work and sick with some kind of bug. Nothing serious but I feel like I've been hit with a ton of bricks! So this is going to be a very short post.

Here is a mini that I made three years ago when I was learning to write again. I followed a video by Joanne Sharpe, read her books and practiced writing my letters for a while.
Be Here Now - a reminder 
This mini is on the wall behind my sewing machine. It's important to be in the present and focus, especially when I FMQ.

Related links
Linking parties
I'll be linking this post to several linking parties. Let's see what's going on 😊 Monday Making, Main Crush Monday, Moving It Forward, What I Made Monday, Tuesday Colour Linky Party, Midweek Makers, Finished or Not Friday and Friday Foto Fun, Design Wall Monday

Free Motion Mavericks
There were seven great link-ups two weeks ago. Thanks everyone who linked up and visited! It's  always lovely to have virtual visitors. Afton Warrick of Quilting Mod finished her tasty Perfect Treats quilt. The FMQ of those great ice cream treats was done by Tisha Cavanaugh of Quilt Icing. If you haven't seen it, it's well worth the click!


You are invited to the Inlinkz link party!
Click here to enter

Monday, May 20, 2019

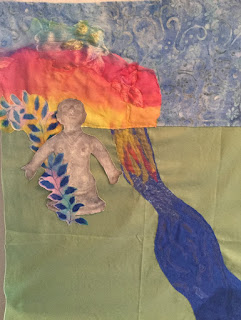
Making Gaïa's Garden

After a bit of productive procrastination, I'm back to working on my art quilt.

Gaïa's Garden

It's always a long process, so I thought that I would share some of it with you. Here's a recap (see Related links below).
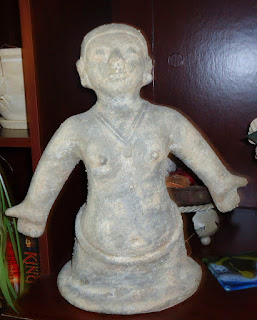
My model for Gaïa
My model for Gaïa
Choosing a colour palette
My model for Gaïa is this picture of a reproduction statuette of a beautiful Pre-Columbian female figure from Colombia, South America.

I used photo transfer medium to make the fabric image.

Gradients Multi
33366 11D Moda


It took me a long time to start because I was looking for the right fabric, which I found in the Gradients by Moda line.

Fussy cutting and trying out possibilities
Next I went through my stash and fussy cut fabric, including the background. I just placed them on the design board to get the general effect and to ensure that I had enough fabric.

That's where I was in my last post, with lots of work left and many possibilities.

The next part is the one I find most intimidating - taking everything off the design board and creating the background.

I attached the sky (including my hand-dyed yellow and pink cotton), the green background and the river. Then it was time to play with the colours. I took out my box of gauze, tulle, and silk.

It's difficult to see in the photo but the sky and river really shimmer. I separated the river into 3 sections - the reflection of the sky, a more turbulent riven and then a calmer lake.

Knowing what to keep
Creating the background and adding shimmer

From the many versions on my design board, there were a few things that I knew that I would keep.

These were the leaves beside Gaïa and the large plant, flowers and bird in this photo.


It took several tries to get the other side of Gaïa finished. My original thought was to use the light leaves. I also tried out some yellow/orange leaves but they just blended into the reflecting water. Finally I choose the darker blue leaves to create more contrast. Since the image of Gaïa is light, she needs a little help to stand out.

Should I use the light coloured leaves?

What about the yellow/orange leaves?

Finally choosing the darker blue leaves
Below you can see that I added a couple of leaves on top to create a curve.

My next two challenges can be seen in this image. The first one is by the river where I want to create a quiet space with a bit of a swamp or pond. The second one is the lotus flower at the foot of Gaïa. This is where I'm at, although I can still change my mind since the challenging pieces haven't been attached yet.
What it looks like so far

I'm working mostly from my design board which is on my ironing board. When I like something, I just pin them into place and go to the sewing machine next to it. I've been using Superior Threads' Kimono Silk thread to attach all of these pieces. I'm trying not to add too much detail at this point since once everything is attached, I'll be free motion quilting the piece. At that point, I may use heavier thread, depending on the effect that I want.

Working on my design board
Using Kimono Silk thread

What I learned

  • Deadlines have their usefulness (I guess) but since I got a bit of a reprieve, it's taking that much longer to make. Turns out that the description was due in mid-May but the final product is only due in mid-June. I'm afraid that I'll be using every last minute of that extra time - to make it and to productively procrastinate 😉 
  • There is still a ways to go, although it usually goes a little faster once things fall into place.
  • As I've been writing this post, I realise that I'll be placing the swamp in the lake part of the piece. It make more sense, although reality is not especially important here! 
  • As for the lotus flower, I think that if I add more fabric around it, I'll get a better sense of how it will look.
  • My background has a few puckers in it. Since I'm making this up as I go along, I'll probably cut around the river and adjust the fabric.
Related links
Linking parties
Although I haven't started quilting yet, I've sure been using my FMQ skills to stitch all of this fabric down. I'll be joining Muv at last week's Free Motion Mavericks, as well as many other great link-ups. Let's see what's going on this lovely Victoria Day weekend. Oh Scrap!, Monday Making, Main Crush Monday, Design Wall Monday, Moving It ForwardTuesday Colour Linky PartyMidweek MakersFinished or Not Friday and Friday Foto Fun, Off the Wall Friday, Favorite Finish Monthly Linkup

Remember to link up any quilting projects on Thursday when I'll be hosting Free Motion Mavericks! See you then 😊

Wednesday, May 08, 2019

FMQ garden and pond

Welcome to the Free Motion Mavericks link-up (Week 228).

FMQ garden and pond

You may have been watching this free motion quilted (FMQ) practice piece progress in the last couple of months.
Latest of the FMQ garden and pond
It started off as a quick FMQ drawing in grey thread.
FMQ garden and pond in grey thread

Adding colour to the FMQ garden and pond
Since this "practice piece" has so much potential, I've continued adding to it. I made a list of things that could be added:
Last night's results
  • more flowers ✔
  • shrub
  • grass ✔
  • butterfly
  • bird
  • rocks ✔
  • frog
  • turtle ✔
  • fish
  • cattails
  • other pond vegetation ✔
Although the list is long, realistically it is limited by my drawing skills. I may be able to eventually draw something with practice, but at this point, I only had one more evening to finish this post!

Last night I added the Rudbeckia flowers based on Muv's great tutorial (the link is in Related links). I also added grass in front of the pond and the grey outline for a rock and more water.

Tonight I added some water, more vegetation in front of the pond, a rock with a turtle sunning herself and a few more plants in the garden. I also added some lines with a Frixion pen in order to square it so that I know how far I need to FMQ.
The pond now has a turtle sunning herself on a rock

There is more vegetation in front of the pond

There is more grass and flowers in the garden
What I learned
  • Last night I Googled "how to draw..." many of the things on my list above. I wasn't in a good learning space so my attempts to draw butterflies and fish were not successful. I know that I can do this, eventually and these don't have to be in the piece yet.
  • I didn't add a frog (one of my favourite animals) in this piece but the turtle got in without too much effort. 
  • I was worried that the Rudbeckia would dominate but they look fine in the photo of the whole piece.
  • I really am doing this backwards because the background should have been done first....that's what happens when you don't plan...but it's a wonderful use of my ability to adapt!
  • I really debated about using the grey thread to outline new features since I know that I'm now using colour, and I did outline with grey last night in order to be consistent. However tonight I just skipped it. I'm not sure that it makes a huge difference.
  • I'm really not sure what I want to add in the background. What do you think - would a couple of butterflies and/or a bird be enough, or should I add a shrub and plants to make it denser? I would love your opinion if you want to share it😊
Related links
Linking parties
I will be linking up to many fun linking parties. Join me to see what else is going around Quilting Blog Land and don't forget to link up to Free Motion Mavericks below! Design Wall Monday, Moving It Forward, What I Made Monday, Tuesday Colour Linky Party, Midweek Maker, Let's Bee Social, Needle & Thread Thursday, Off the Wall Friday, Finished or Not Friday, Friday Foto Fun, Can I Get A Whoop Whoop?, Monday Making,

Free Motion Mavericks
I am so thrilled with your continued support of this link-up. Two weeks ago we had TEN link-ups. Yeah!!!!! I really hope that this is the beginning of a trend. The emphasis may be on FMQ but we had a few link ups with hand quilting and others made on longarm machines. If you're wondering about the difference between free motion quilting and longarm quilting, check out Leah Day's post: Quilting on a Home Machine Versus Longarm Machine. I'm happy to have all quilters join us!

The hardest part of co-hosting this blog is choosing just one project to highlight! You are all amazing quilters! Here is Vasudha of Storied Quilts who designed and free motion quilted Diamond Showers on her longarm. Wow! Here's the link to her post, in case you haven't seen it yet.
Diamond Showers


You are invited to the Inlinkz link party!
Click here to enter