Friday, February 19, 2016

More FMQ Practice

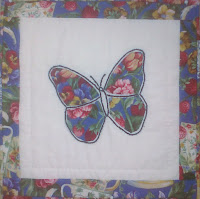
butterfly appliqué and embroiderly
Still flitting like a butterfly
Here I am, flitting again! Oh well, there could be worse things than flying around from project to project like a butterfly.

I've discovered a great way to practice my free motion quilting (FMQ) while doing something creative and fun. What more can a quilting gal ask for?

It's a weekly Journal Challenge called Colour Me Positive, sponsored by Lulu Art store in Australia. It's mostly for artists who create art in their art journals, but any medium is welcome.

Every week they have a positive theme or quote to encourage creativity and art. Just my kind of positive, loving space. The weekly post includes the latest weekly prompt as well as a link to ideas and examples of art and techniques related to it. It really is lovely and wonderful.

Week 3 of Colour Me Positive
All participants are encouraged to post a picture of their work, and write a few words on Facebook. There is absolutely no stress about participating every week. If your art work is ready by the end of the week, you post it and are included in a draw. Otherwise, everyone is encouraged to post whenever they are ready. The participants are very encouraging in their comments and "likes".

This was my first post for Week 3. The prompt was: “Make today so awesome that yesterday gets jealous.” For me, this means that if I want to make today awesome, then I have to be present. I have to enjoy each moment of today, because there is only today. I remind myself to do this with the statement "Be here now".

FMQ the sun
It took me a while to figure out how I wanted to interpret this. I chose the sun because it symbolizes life (and I can draw it!) For the writing, I used stencils, outlined the letters with thicker thread and then FMQ inside of them with finer thread.

I drew the sun's outline with iron-off marker and then quilted feathers within the sun shape and its rays. This gave me an outline to follow but left space between the sun and the rays. I like the open look of it.

After I added the wording, I didn't know if I should leave it as is, or keep FMQ. You may notice in the right hand corner, the word "Today". I was thinking of including some key words, but I didn't really like the look of it. That's why it's just there, not connected to anything.

As you can see, I decided to stitch close lines in the background (they are called match sticks). To make sure I didn't get totally off track, I drew the odd line with a ruler with my iron-off marker.

My latest creation is for Week 6. It's based on a quote by His Holiness the Dali Lama, "Be kind wherever possible. It is always possible.” I wasn't going to write all that, so as you see I abbreviated it!
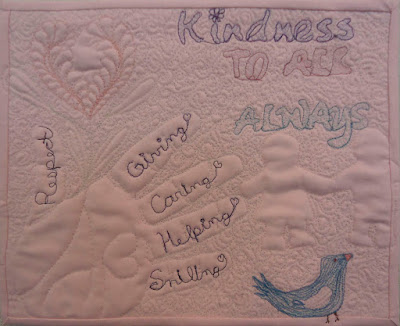
Week 6 - Colour Me Positive (11 ½" x  9 ¼")
Since kindness includes many concepts, I used the outline of my hand (I can trace that!). I also wanted to include a representative from the plant, animal and people world - since kindness extends to all. I am very partial to the Buddhist concept of "Do no harm" - which for me can be translated into kindness to all.
Drawing the flower

I drew the bird from an image and created the heart-shaped flower. Here is a picture that I drew of the flower, before quilting it. I had a template of people that I outlined and quilted around.

The background quilting is made up of small swirls. I tried to use muted colours to go with the pink. That wasn't an easy thing for me to do!

What I learned:

  • Writing on fabric using FMQ is not easy, and there's no spell check. Oops!
  • I used one of my previous lessons learned by applying painter's tape around the project so that I would know where to stop quilting. It worked out well, but I need to be a little more accurate in the placing of the tape.
  • It's taking me about 2 weeks to create one of these. The hardest part is figuring out what to draw and the most tedious part is finishing it off (binding etc.)
  • I'm hoping to use more than free motion quilting in my next one. Will it be appliqué, beading, or paint? I don't know yet - it'll depend on which week I decide to interpret. I really want these fun pieces to help me learn, try and practice new things.

I've linked these to awesome linky parties: Free Motion Mavericks, Needle and Thread ThursdayLinky TuesdayLet's Bee Social, Fabric Tuesday


Monday, February 08, 2016

Hockey Day in Canada Landscape Quilt

Did you know (or care) that Saturday was Hockey Day in Canada? I found out when my husband wished me a Happy Hockey Day! I know that it's a big deal in many places in Canada, with special games and events. I don't personally follow any of it, but I appreciate that people care about our national sport.

The green and blue stripped background fabric is from Paris.
The shiny green and blue stripped background fabric is from Paris.
A few weeks ago I decided to play with fabric that my brother got for me from Paris. He found a store that was going out of business and got some lovely samples, remnants and a couple of yards of some great fabric. The fabric is mostly upholstery weight in linen and other fibers. I'm sure I'll be able to incorporate them into art quilt projects eventually.

I chose a piece that had a cool vibe to it - something that might be used for a winter project. I played with the fabric and got very frustrated, so I did what I usually do then, I left it there overnight to get a fresh perspective in the morning. It worked!  I started working with the little bit of winter scene fabric that I have, and then raided my Christmas stash.

From my stash and bag of scraps, I found the little bit of hockey fabric as well as some interesting blue-grey for the ice.

An old fashioned winter scene
The winter scene fabric I bought last summer has an old fashion winter landscape with houses, barns and trees. In my Christmas fabric stash were these wonderful deer and the trees.

To try and get it to work together, I created sections within the piece by using a blue-green fussy cut fabric.

I had a lot of fun with the sky. I found a couple of pieces of an interesting night sky and then found this tulle with stars in my stash. I had used it years ago to decorate my cubicle for a Christmas cubicle decorating contest.
Tulle sky and snowflakes
After free motion quilting the piece, I added some more wooden fabric as the binding and quilted that too.

In my stash I found snowflakes, trees and added a snowman. As I told my daughter, I'm not sure how I feel about the landscape. It was fun to play with and is really a collage. Art quilts don't all have to be serious, do they?


What I learned:

  • I didn't plan this piece (what else is new), so I ended up unstitching the long blue-green columns sticking out of the picture to put the wooden border around the piece. 
  • As I mentioned, if things are not working out, it's best to just leave the project and come back to it later. So far, it always works!
  • When I make a collage type landscape, I feel like I'm cheating, but really trying to pull all of these different elements together is probably more work than creating a landscape from scratch.
  • I haven't decided if I pulled it off - if you want to offer me some constructive criticism, I would certainly appreciate it.
So, Happy Hockey Day in Canada! May your favourite team win. :-)


Wednesday, February 03, 2016

Orange Peel Table Runner

I never thought I would enjoy hand appliquéing orange peels! After appliquéing 144 orange peels for the Orange Peel Quilt Along with Julie of Button Button, amazingly enough, I didn’t want to stop. However, not being completely crazy, this time I wanted a smaller project. I searched the internet and found the Orange Peel Table Runner pattern by Sharon Holland and presented by the Canadian Quilter magazine.

Orange Peel Table Runner
The pattern called for piecing the orange peels but I really wanted to keep hand appliquéing, so that’s how I made it.

Orange peel blocks with quilted flowers
I wanted to make a runner for my friend Heidi. We have been pen pals since I was in grade 7. We met on the Polar Bear Express, the train that goes from Cochrane to Moosonee and back. She was with her family visiting Northern Ontario from Pennsylvania and I was with my girlfriend Lyne and the rest of my class. Heidi asked Lyne and me what language we were speaking because we were using the Northern Ontario version of bilingual – a few sentences in French followed by a few in English. The switch is usually happens when we’re struggling for a word, or if we’re talking about something we would experience in one particular language.


Heidi and I have been writing once or twice a year for over 40 years! With the advent of email and Facebook, we’ve re-connected a little more often. When I heard that she had redone her dining room, it was the perfect opportunity to make her a quilt.

Orange peel appliquéd on half-square triangle block
The orange peel block in this project was a lot like the previous project except for two important differences.

  • Instead of placing the appliqués on only one background fabric, this one is done with two colours.
  • Each block is made of two half-square triangles. Some are made of fabrics of the same colour while others have the beige or white that form the middle of the runner.

I was nervous about leaving the hand-sewn appliqués without extra machine stitching. I want the orange peels to stand up to regular washing! I ended up FMQ on the inside of each orange peel and then adding a small flower in the middle of the yellow circles. For contrast, I didn’t quilt inside the beige blocks.
The back of the runner

I was lucky to find a beautiful batik for the back. With the quilting details, it makes the runner reversible!


What I learned:
  • I forgot when I started making the appliqué blocks that Julie had gotten us to make the blocks larger than required so that we could trim them to the correct size. I really wish I had remembered this! As you can see from the picture, the orange peels are not even, especially at the edges of the runner.
  • A bonus for making this runner was trying out some quilting strategies for my larger project from the Quilt-along. Quilting ¼ inch inside the edges of the orange peels was not a great idea. It was very difficult to get nice edges. I’m not sure what the answer is, except to possibly use an all-over pattern that will go through the orange peels. 
  • I really like making scrappy projects where I can cut pieces from a variety of fabrics as I go. I realize that these are the projects that I don’t mind piecing (as opposed to having to cut up fabric all at once, from very few fabrics, which is what I’m doing now…but more about this in a later post).
Update on the Orange Peel Quilt-Along Project 

When I started this post, I didn’t realise that I hadn’t posted an update on the Orange Peel Quilt-Along Project since last December. Here’s are my blocks.  I think that I’ve assembled the quilt, but it’s been so long that I’m not sure! I know that they are stored in a safe place, with the rest of the project fabric (in case I want to use it for binding), and I even know where they are – but I’m not going to dig them out until I’m ready to quilt it.
Orange Peel Quilt-Along Project
Here is Julie’s post of all of the participant’s quilts. You can also check out all of Julie’s Orange Peel Quilt-Along Posts.