Thursday, December 24, 2015

Joyeux Noël!

Merry Christmas and a happy holiday to all. I've decided to take some time off work to do what I love best - hide in my studio (bedroom) and quilt!

Last week I took out my Christmas fabrics and finished one of the projects I had started two years ago as well as a gift for a friend.

 I first saw quilted snow globes on Monika Kinner-Whalen's website.  When I found a snow globe at Shopper's Drug Mart, I picked it up. The insert is for a picture, but it's great for a very small quilted something.

When I opened it up, I realised that it was much smaller than I thought. Since the week before Christmas is not when I'm at my best, I created my snow globe by using a couple of Christmas fabrics to come up with something simple. On the first side, I machine appliquéd a penguin onto a green background and added an ivy (or if you want to use your imagination - a mistletoe!).

For the next step, I added batting and a background, and just quilted around the penguin.
Finally, to make it reversible, I appliquéd a tree-shape on yellow background, added the Santa who is checking his list and looks surprised that my friend's name is there - or not? The big star was added on top. Finally, I did a zig-zag stitch all around the piece to keep it together.


When I finished it, the Santa side looked drab, so I just added a few red balls using red thread onto the tree. 

It's my first attempt and far from perfect, but as they say "Better done than perfect!"  The snow globe is quite pretty since it lights up in different colours. I'm really hoping that they will go on sale after Christmas so that I can pick up a few :-) If I'm in the mood, I would love to make them as pretty as Monika's. Check this out - it's gorgeous! I think that doing them by hand might be better, given their size.

Have an awesome Christmas, and/or holiday season. Don't forget to slow down and enjoy your time with friends and family.
Andrée


Tuesday, December 15, 2015

Practice Makes Better

I know in theory that practicing a skill increases your skill level. However, I’ve never really seen the results so obviously for myself. It’s now been a little over two years since I started free motion quilting (FMQ) on my new-to-me jag. I first blogged about it in Playing & Quilting, August 27, 2013. At the time, I had no idea how much this would change my quilting.
Free Motion Quilting practice piece
My first class was Free Motion Quilting a Sampler with Leah Day on Craftsy. I started by doing stippling, “S” curves and paisleys. It took a while for those “S” curves and paisleys to look like they were supposed to. I quickly learned that drawing was the best way for me to learn. Now, whenever I want to learn a new FMQ pattern, I take out my pencil and paper and draw until I’m comfortable with it. After that, it usually takes me only a couple of practice tries on fabric to get ready to quilt the real thing.

A modern looking paisley
I’ve recently decided to practice my FMQ on a more regular basis (what ever that means) because just FMQ completed projects is not enough. I still doodle FMQ patterns whenever I get the chance but I really want to expand my repertoire of patterns.

I started by gathering the solid fabrics from my stash that I had inherited from my mother. I hesitate to use them in quilts because they’re mostly cotton/polyester blends. These are perfect for making practice sandwiches. I spray basted rows of long skinny pieces of batting left over from previous projects between the fabrics. For these practice pieces, I found that they didn’t have to be taped together.

For my first practice piece, I concentrated on paisleys and leaves. I found some great ideas in a Dover library book, A Treasury of Design for Artists and Craftsmen. My favourite was a modern paisley that doesn’t have outside edges except where the lines within happen to go to the edge of the design. With an iron-off marking pen, it was easy to draw the outline of the paisley and then quilt the lines within it.  If I was to use this pattern again, I could practice it to figure out how to continuously quilt it without having to travel from one end to another. That would ensure that both sides would have the open effect that makes it special.

Paisley with curves
Paisley with curves
I also practiced breaking up the space within the paisley to add different designs. I used many straight lines at different angles, from triangles to zigzags, as well as a few curved pieces including a paisley within the paisley. This is a very versatile design that can include pretty much anything you can FMQ within it. The bigger your original paisley, the more you can add.

I got the idea for the leaf patterns in a Zen Colouring Designs magazine. The image didn’t come out well since I used much lighter thread. Again, it’s the same principle of dividing the space to add different designs.
Leaf - divide and conquer

I had so much fun FMQ this practice piece that I ended up binding it and placing it on my wall at work. I smile every time I see it.

I also practiced my cathedral windows based on Cindy Needham’s Machine Quilting Wholecloth Quilts on Craftsy. As she recommended, I took the time to draw out an on-point grid with my trusty iron-off marking pen and then followed her instructions. My edges are a bit off but otherwise, it’s a pretty decent try. It makes such a rich background.
Cathedral windows
Cathedral windows

What I learned:

  • Use solid fabrics for my practice sandwiches. Using ugly patterned fabrics isn’t a good idea because I can't see the quilting as well, if at all.
  • Spray basting strips of left-over batting between the two layers of fabric is good enough, as long as the practice piece isn't used for anything else.
  • It’s important to stop quilting at least one inch of the border, otherwise the design gets distorted. This is NOT the first time I’ve learned this - and probably not the last time I’ll forget it!
  • Practicing like this has given me a lot of confidence. I’m now planning my next fully FMQ project.
I have linked this post to the following linky parties: Let's Bee Social, Free Motion Mavericks. Also celebrating 3 years of partying at Let's Bee Social! See what everyone is doing on Oh Scrap! 
My post was featured on Free Motion Mavericks! Check it out!

Monday, November 30, 2015

Fall Tree Project

Fall Tree project
Although I'm finally posting my finished Fall Tree Project, it has been completed for a couple of weeks. I think that it's the best work I've done to date. This project is not my own creation since I used a pattern and took Elaine Qhehl's workshop. It is, however my adaptation and I'm really impressed! I know that doesn't sound very humble, but I'm surprised by how well it turned out given the changes I made to the original project.

As I mentioned in my earlier post, adding the leaves was time consuming and an little challenging. I really wanted to get it "right". As I looked at the trees changing colours this fall, I finally figured out that there is no "right" way, since changing leaves don't following only one pattern.

Sometimes they changed mostly at the tips, or where the sun kissed them the most. At other times, it seemed to be all over the place. I also noticed that although a tree might be changing predominantly to red, there were still hints of yellow and orange. And of course, there were usually touches of green here and there.

Elaine Qhehl's original tree
Since this is my representation of a tree changing colours in the fall, I'll admit that to have done it "right", the tree should have had maple leaves. Around Ottawa, Ontario, that seems to be the only type of tree this size, that would have red leaves. However, since I've never been able to draw a maple leaf (as Canadians we try since it's on our flag!) that wasn't even an option. So here it is - my representation!

Unfortunately my photos' colours are inconsistent. I was hoping to take a photo of the quilt near the burning bush in my back yard, but the leaves fell the day before the photo shoot. All that was left on the tree after the blustery day were the berries. It really was fall.

Here's a recap of the project. If you want more details see the posts, Creating a Tree and Tree Project Almost Finished.
Creating the tree trunk
1. Creating the tree trunk
2. Attaching the trunk to the background


4. Blocking, cutting and quilting
3. Adding the leaves
What I learned:
  • Quilting around the leaves was the best strategy and it worked. It made the leaves pop.
  • The tree trunk required a lot of quilting to keep it flat.
  • I was nervous about using only one colour of thread to FMQ around the leaves but it looks just fine.
  • I wanted to bind the quilt but I didn't like the look. I ended up creating a facing using Terry Aske's tutorial. The images above were taken before I added the facing, but it came out great.

Fall Tree by the burning bush


It took me so long to finish this project that I've already started two new landscape art quilts. You may have seen the beginning of the first one, Mountainview Workshop in my last blog. I'm also creating a quilt to accompany some vignettes that I'm writing for my Memories Into Story course. This will be a true multi-media piece that will incorporate landscape art quilt with writing. I'm looking forward to presenting it soon.

I have linked to the following linky parties: MOP MondayMonday Making, Main Crush Monday, Fabric Tuesday, Let's Bee Social, Needle and Thread Thursday, Link-A-Finish Friday, Fabric Frenzy Friday and Free Motion Mavericks


Friday, November 13, 2015

A Mountainscape Workshop

Another Landscape Art Quilt for the Challenge? You bet!

This Remembrance Day, our guild offered a workshop with quilter Hilary Rice. We worked on a mountainscape quilt full of curves. It was great fun! Hilary has created her own patterns and teaches the technique based on Vikki Pignatelli's Crazy Curves Technique.

From a lovely kit of hand-dyed fabrics purchased from Hilary, we made our own mountainscape quilt. It took me most of the day to put the quilt together. It's now pinned and ready to sew.

Mountainscape quilt pinned and ready to sew

The next step is to sew the pieces together with a blanket or hem stitch, using invisible thread. At the workshop I tried out my Kenmore's hem stitch but it really wasn't very good. I'm sure that my new-to-me Jag (everyone needs to name her sewing machine!) will be able to do the job. It won't be for a few days since I'm currently working on free motion quilting a table runner.

Here's our pattern with the sky pinned in place. The technique is fairly simple, especially when you use a pattern (I'm so used to just making it up as I go that the thought of using a pattern is becoming a novelty.) 
Sky attached with pins
The first thing I did was copy the pattern onto freezer paper. I then placed it on foundation fabric, which in my case was white Kona cotton. I cut the first pattern piece from the freezer paper, without touching the foundation. I then ironed the freezer paper onto my sky fabric. I cut that first piece, adding a 1/4 inch seam allowance. 

The tricky part is then to replace it onto the foundation. The first piece is easy because it's all raw edges, but it changes as the next pieces are added. After cutting out and ironing the freezer paper onto the next fabric, I finger pressed the seam allowance of the fabric that overlaps the piece above it. The raw edge of the fabric is then placed under the next piece (the one below that's still on freezer paper), and place the finger pressed over the sky fabric above it. That's when all the pins come in. I then pinned that fabric where the fold meets the piece above it. 
Pinned project with possible embellishment!
That's essentially the process. When a curve is very pronounced, you clip the folded seam allowance. If you want to learn the process and don't have access to Hilary's workshop, apparently Vikki's book explains the process very well. 

As you sew the fabric pieces down with the blanket or hem stitch, you can add tulle, organza or tuffs of yarn. After that, the mountainscape is ready to be sandwiched and quilted.

I'm sure that I'll be doing some cool FMQ and embellishing my mountainscape. I can't imagine doing it any other way...that's my favourite part!

Linked at Can I get a Whoop Whoop?, Monday Making, Fabric Tuesday, Main Crush Monday, Design Wall 

Wednesday, November 04, 2015

Tree Project Almost Finished

I must admit that I'm a little behind on my Landscape Art Quilt Challenge. My Landscape Art Quilt project for September has now become the project for September, October and November. This makes sense since this one is at least 3 times the size of my usual landscape quilts (that's my justification and I'm sticking with it!)
Tree trunk before the leaves


I originally thought it could be almost finished by the end of September. NOT!!! It turns out that there were many, many leaves to cut, place and stitch. Besides, you can't rush a work of art :-)

I'm very happy to say that it's coming along nicely. I took photos of it a few days ago and since then I've finished adding and sewing on the leaves at the top of the tree. Last night I cut both the backing fabric and the batting. I'm really hoping to start quilting it tonight.

The real challenge will be blocking and cutting it. I know that there are quite a few leaves that will get chopped off. It's going to break my heart, but that's quilting for you.

Fall tree almost finished
At times it was painful to add all of these leaves, but after doing a few branches, it was very encouraging. As you can see, I chose to do my tree in early fall. I spent a lot of time looking at trees to see how they change colours. It really is often one section at a time. Also, a tree with predominantly red leaves will still have quite a few yellow and orange leaves.

I'm really starting to learn to notice things in nature. I've always "seen" it, but now it's not just appreciating the beauty of it, but also analyzing what I see. How one part may change, but not the other, or how light affects it all. Fascinating! I guess that's how artists see. I never thought that would happen to me.

As I mentioned previously, this project is a UFO (UnFinished Object) based on a course I took with Elaine Qhehl, called Branching Out.


What I learned:

  • Smaller landscape quilts are much easier to make - and finish. It will be a beauty though.
  • Next time, I hope to remember to block the project with tape or something like it so that I have a better idea of where to stop.
  • It's easier to be encouraged once a few branches have been completed.
Linky Parties: Please check out the following links and see what everyone is doing!
Quilt Story, Let's be Social, WIP Wednesday, My Quilt Infatuation - Needle and Thread Thursday, Can I get a Whoop Whoop?Link-A-Finish FridayFort Worth Fabric Studio Blog

Sunday, October 25, 2015

Quilty Great Fullness

This quilting space, these stacks of coloured plastic with quilting  projects and UFOs
(Unfinished Objects), this wonderful new-to-me Janome sewing/quilting machine, the lovely collection of threads that looks good enough to eat, these bright piles of fabrics all yearning to be picked for the next project, the books and mags with enough quilting ideas for two lifetimes – so
noticing the gradation of colours as leaves change from green to yellow, orange or red,
many quilts, so little time – the view of the field and sky from my chair as I sew, the way I look at the world now that I’m making landscape art quilts, noticing the gradation of colours as leaves change from green to yellow, orange or red, the way that light reflects off water,
the way that light reflects off water
the sky at different times of the day and how it affects everything, the friends I’ve made as I participate in guild activities, quilting retreats and road trips, my friends, family and colleagues who always have something positive to say about what ever I’m trying out now, 

the sky at different times of the day and how it affects everything
the new techniques I see and sometimes try as I participate in both online and in-person classes, the pleasure I get from reflecting and writing online through my blog about my projects and experiences, connecting through the web to quilters around the world, the thrill of finding quilters who have similar tastes and interests, this red rover computer that allows me to communicate with other quilters through linky parties and quilt-alongs, this colourful table runner whose free motion quilting (FMQ) makes it “pop”,
this colourful table runner whose FMQ makes it "pop"
the art that surrounds me as I write this on Mom’s dining room set, my daughter who accompanies me on my quilting journey by listening to my ideas, by advising me on the use of colour and by being my  #1 fan, the love and positive energy that I put into each creation, the feeling of connection as I get “in the zone” while creating beautiful things, and my pride in growing and learning as I advance on this wondrous quilting journey.
the way I look at the world now that I’m making landscape art quilts

With love and gratitude.
Andrée

I'm taking a creative writing course through the University of Toronto's Continuing Education. Turns out I love it! One of our exercises is to read Carin Makuz's great full and to write what we are grateful about. This is my quilting gratefulness. 

I've linked this up to Free Motion Mavericks
I'm linking this post up to Free Motion Maverick's 300th blog party anniversary. I never thought back then that I would be co-hosting with Muv! Thanks for visiting😊

Monday, October 12, 2015

Guest Blog – A Unique Wedding Present

I have a guest blogger today. Kathy Lajeunesse is a colleague and friend. We quickly found out that we had a common interest in art and textiles. Here is her blog:

While I consider myself creative, I do not consider myself much of a quilter with my one and only quilt project still unfinished after 15 years!  Recently though, my interest in quilting has been piqued in two ways.

The original wedding invitation
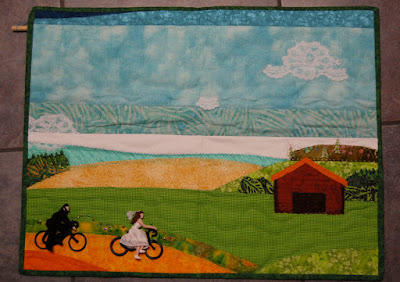
Every 3 to 4 weeks, I am inspired by Andrée when she brings in her latest quilt project to work. As her readers know, she is prolific turning out a quilt a month and often more. Secondly, last April I attended a show of the Ottawa Out of the Box Fibre artists, and I was blown away by the talent in that group and in particular by the beautiful landscapes made by several members. So in May, when the following invitation arrived in my mailbox for my niece’s wedding (designed by her fiancée) – I took the leap of faith that I could interpret the image and create a unique wedding gift for the happy couple.
Pastel colour palette
Pastel colour palette 
I decided to stay with the pastel palette. I began by surveying scraps of material in my own sparse inventory. I found a few fabrics, but needed more. I made a visit to Fabricland to match some more colours. With a few supplies gathered, I took them into work and received some advice from Andrée on how to proceed. She also shared a few written resources and off I went!

The background was pieced together in a morning and then I worked away at the details of adding embroidered trees, and appliqueing the barn into place over the next month or so. 

Embroidered Trees and Appliqued Barn
Embroidered trees and appliqued barn
Andrée offered to quilt the piece, and I took her up on the offer.  Following that, I added a few very fine sequins to decorate the roadside, and bound the edges.

The Groom and Bride on Bicycles
The groom and bride on bicycles 
Early on, I had decided that I would applique the cyclists on as a last step, although I was not sure exactly how that was going to play out. I surfed the web to see if I could buy some tiny bikes, but everything I found was too big.  In the end, I formed the figures and bicycle frames out of modelling clay and the wheels were made from rubber washers.  The bride and groom’s clothes were cut and sewn on VERY carefully – the wedding dress was made from raw silk left over from my own wedding dress sewn some 20 years ago!  Black felt was easy to work with for the groom. The last touch was to sew a message on the back.

I was pretty excited to present my finished wall hanging to my niece and her fiancée.  They loved it.


Label
Quilt label
What I learned:
  • I love the creative process; OK, I already knew that.  Even if you don’t actually know how you are going to do something in the beginning, have faith in the creative process.
  • Material puckers if you don’t measure well.
  • My 40 year old sewing machine works just fine!
  • Purchasing material is addictive.
  • I can complete my unfinished quilt if I parcel a little time here and there.  That is my next project!
Kathy
A unique wedding present
I`ve linked Kathy`s guest post to the following parties. Join in the fun and see what everyone is up to!


Thursday, September 24, 2015

Too Much Quilting?

My version of the Charley Harper Quilt
I finished quilting almost every inch of my version of the Charley Harper quilt, designed by Melissa Lunden. The original was on the cover the the International Quilt Festival Quilt Scene magazine (2013\2014). I originally wanted this to be the front of a quilt with a pieced back, but I just couldn't do it. I'd rather have two quilts to FMQ than one!

This is the first quilt larger than a wall hanging that I quilted so densely. I had an absolute ball quilting it. Free motion quilting (FMQ) is sooooo addictive. I was going to practice all kinds of FMQ designs in the rectangles but it only took one block to figure out that they wouldn't show up since the printed fabric was so busy. Really, I should have known that. Oh well, that's what experience is for. After this quilt, I may actually remember this!

Letting the fabric dictate the quilting
So except for two of the fabrics, I did what I usually do with busy fabric; I let the design dictate the quilting. I followed the fabric design and quilted around flowers and leaves, and lines and scrolls. For the maroon fabric, to add contrast, I didn't FMQ it at all. As for the fabric with tiny hexagons, that's the fabric I started practicing my FMQ designs and quilted 3 larger hexagons within it. I quilted them all like this for consistency, but they're practically invisible!


For the circles at one end of the quilt, I FMQ the first one by going around the design and then quilting from the edge of the circle to the inside, following the fabric pattern. I wasn’t really pleased with it, so all of the other circles were quilted using one of Angela Walter’s FMQ patterns from her Shape by Shape book. The FMQ doesn’t show much from the front, but can be seen better from the back.
The back of the quilt - FMQ the circles


I did all of the stitch-in-the-ditch and FMQ in the rectangles and bottom circles using the taupe Superior Thread’s Bottom Line.

To quilt the feathers on the brown background, I bought some WonderFil – Invisifil, which is a 100 wt. soft poly. After my second feather, I knew I had a problem. Even after playing around with the tension, there was no way I could get my machine to play nice with the thread, which kept breaking. I decided to change thread but was in a panic about finding thread that would match. I bought some thread but they weren’t the right colour. Finally in desperation I looked in my miscellaneous thread drawer and found the perfect thread. It was an Omni Thread, poly-wrapped Poly Core, size 30 by Superior Threads. I had gotten it from Superior Threads’ Try Me Specials where you choose the type of thread (at very good prices) and they choose the colour. The Omni Thread was the perfect colour and quilted like a charm.
Close-up of the background feathers

I drew the outline of my first feather, but after that, I was able to just keep going. I love making big feathers and then making smaller ones to fit particular spaces.

The only problem I had while I was quilting the feathers occurred when I was about ¾ finished. I ran out of taupe Bottom Line thread. Thank goodness I have a supplier who came through for me. Crisis averted!

If you’ve read any of my blog posts, you will know that I’m not a great planner. That’s why I’m very proud of the fact that I put together my binding before I started quilting.

This week I got to work early and had a wonderful photo shoot with the quilt! I felt like an artist draping my quilt over benches, walls and fences to take photos. It was a great way to start a work day!
The quilt's photo shoot


What I learned:
  • A year ago I would have laughed if someone had said that I would care a lot about thread! I’ve really come to appreciate the effect that thread has on a quilt.
  • I didn’t FMQ the maroon rectangle at all. I’m still not sure if I like it – but if I ever decide that I don’t, I’ll just lightly quilt it. 
  • Have you noticed in the picture of the quilt on a fence, that I used a few inches of the background fabric in my binding (on the left side)? Not good. It looks like there’s no binding there. I think I won’t forget this lesson!
  • I love FMQ but I don’t think that I’ll be quilting other quilts as heavily as this. I’m not sure what the perfect amount of FMQ is for me, but I do find this quilt too stiff. That is definitely a drawback of quilting so densely.
  • In October 2013. I posted a blog called "Too Much of a Good Thing", where I wondered if a quilt so densely quilted would be stiff. It turns out I was right. 
  • This quilt was done as a learning project – from choosing the fabrics to the quilting. I’ve learned so much from this quilt. It was totally worth the effort!

I've linked my post to the following Linky Parties. Check out the fun!


Sunday, September 20, 2015

Quilting Expectations

I've been thinking about expectations a lot lately. These thoughts are mostly quilting related, but these could apply to many parts of my life. As with many things, the only time I'm conscious of expectations (mine and others) is when things are not going as I think they should be, otherwise why question them?

Landscape Art Quilt Challenge button
I've decided to re-examine my quilting expectations. I've often said that quilting is about fun and wanting to do things as opposed to having to do them. I'm also about avoiding deadlines - and ironically I started a monthly landscape art quilt challenge! (more about that later).
Still flitting around like a butterfly

I’m thinking about all of this as my list of active quilting projects keeps expanded. I've had a difficult summer and it would seem that I dealt (or didn't deal) with this by starting many projects but not finishing much.

I started by looking at my list of ongoing projects, especially those that have been in the design stage for a long time. It might be time to question these. Do I still want to make this? If I do, what's stopping me from completing it? If I don't want to make it, then is there a reason that I have to?

Block 36 of Grandmother's Choice
Reviewing the list, I decided to remove four projects. One was a quilt that I said I would make for friends, but I'm not interested in doing it anymore. Since my friends don't really have expectations of what quilt I'll make, I've opted for a much simpler quilt made of 5" charm square batiks. This will be much easier to make and probably just as appreciated. The other three projects seemed like good ideas at the time. I did start one of them, but I'm sure I'll be able to use the few blocks I've already made for something else.

Embroidered Frogs
Blogs for Frog Quilt
After making a few of these quick and fun landscape art quilts, I've decided that I don't want to make complicated (i.e. pieced blocks and/or appliquéd) large quilts any more. I do have two of these on my list, but they’re more than half done. I want to finish my Grandmother's Choice quilt (I’m looking forward to designing a medallion centre block for it); and the Frog quilt (it's too cute to stop but may take a while!)

As for the monthly landscape art quilt challenge, I have to say that it hasn't been too stressful, mostly because I can't image anyone in blog land would really care if I do this or not; and it has helped me think of techniques and subjects that I'd like to try. Speaking of which, here are a few ideas that may or may not happen:
  • I saw a flock of Canada geese that was landing on the water. It was so cool. I'd love to find photos of these and try quilting them.
  • I have a really great picture that I took in China of rice fields in the evening. The colours are amazing and it would be a great image to make in the style of Monika Kinner-Whalen, of My Sweet Prairie Studio. I love her mixture of background thread sketching and hand-embroidery.
  • I’ve also fallen in love with Muv's (of Free Motion Mavericks) Free Motion Landscapes. Her friend, Linda Wulf Koenig also made a lovely one using hand-died fabrics. This is definitely on my list!
  • The Great Wall of China would be great, done from photos we took there last year.
  • I love swamps and I want to depict the swamp we had next to our cottage. I've already started gathering photos for a project.
Since it's already past the middle of September, instead of starting a new landscape art quilt, I'm going to complete a landscape UFO. It’s a tree that I started in a course with Elaine Quehl of Ottawa. I thought I had lots of work still to do, but after taking it out last night, it might be manageable in the next couple of weeks. For some reason, I find this project very intimidating. I guess that's another reason to keep at it!

I’ve decided to make the tree in the fall season. I've been intensely looking at the trees as they change colours. Hopefully I'll find the fabrics to pull it off!  

What I learned:
  • I am often my harshest critic and a lot of my crazy expectations are self-inflicted. It's good to take a step back every once in a while and review these.
  • I often get great ideas for landscape quilts on the drive into work (that's because I'm not driving and I get to look at the amazing scenery on the parkway). I think that it's a good idea to put these ideas down somewhere. I don't have to make them all, but at some point I may be ready to try them.
  • I love that the quilt world is so huge and includes so many types of quilting. It's wonderful to be able to try all of these things and see what I like and what I'm best suited for.
How are you handling your quilting expectations?

I hope you have a great week.
I have linked up this week with Free Motion Mavericks.

Monday, September 14, 2015

Yellow Kayak Landscape Quilt

The Yellow Kayak landscape quilt for August’s challenge is done!

August's Landscape Art Quilt - Yellow Kayak
August's Landscape Art Quilt - Yellow Kayak (11½ x 12½)
I wrote about most of my process a week ago. I did get a question in my comments, do I thought I would address it here.

Did I fuse the fabric pieces together? In this quilt, I did. I don’t always but I knew that I probably wouldn’t work on it soon after I layed it out, so I added a little bit of fusable web to the pieces to keep them in place. I do use a light fusible interfacing under by background fabric to ensure some stability, especially when I do the thread sketching. Otherwise the fabric tends to pucker up.

Sky buckling
If you look at the photo after I thread sketched the trees, you can see that the sky fabric is buckling because there is so much stitching in one section and none in the other. It also did the same in the water section, around the flower.

Maybe professional quilters might disagree, but when it’s a small art quilt, as long as you end up quilting about these spots, most of the puckers will leave or not show as much. Around the flower, the water evened out well. In the sky, because I didn’t quilt it much, it comes out puffier – but as far as I’m concerned, this is fine.

I followed the picture to quilt the water. The shading on the fabric was great, so I just quilted around the spaces that had waves, while keeping the still areas unquilted.
Water puckering around the flower

In the area around the rocks and the log, I actually used a black colouring pencil to add some shading. Since I don’t expect this quilt to get washed, this should be fine. Maybe one day I’ll have the nerve to use paint or even markers – but I’m not there yet (especially since I added this near the end of making the quilt. It wasn’t time to ruin it!!!)

For the kayak, I used a metal clip from a lanyard. (I collect bits like that!) I then added a button on top (another collection) and finally, after a lot of consideration, I used 2 black shoe laces.
Original photo


I wasn’t sure what the logo was, but my daughter very helpfully Googled it. I tried using a marker and even machine quilting the design – until my daughter suggested that I hand-embroider it. I’m sure glad she was there :-)

I couldn’t resist adding the butterfly to the finished piece to add a little bit of colour and fantasy I think that might be my signature (when ever it makes sense of course).

What I learned:
  • I love having the help and advice of my kids. They often add ideas or see things that I don’t.
  • The border is some wood fabric from my stash. I love it. If I had planned this ahead of time though, I would have made it a little wider.
  • I’ve read a great tip since I finished this that I hope to try next time. That’s to block the quilt (without cutting it) and then apply 1” painter tape around the edge before quilting the piece so that I don’t quilt on the edge.  If I had done this, the best part of my sky wouldn’t have been cut off!
  • This landscape quilt was for a friend’s birthday – it’s her wonderful photo of her kayak. I’m happy to report that she likes it!

Yellow Kayak
Yellow Kayak
Come back later to see what great landscape art quilt I’ll come up with. I’m really hoping to get struck by inspiration soon!!!

Enjoy the fall.

I've linked my post to these parties. Have a look at what everyone is doing.
Wow! Muv has featured my quilt on her blog, Free Motion Maverick! Check it out! (and thanks so much).