Showing posts with label Elaine Quehl. Show all posts

Thursday, June 22, 2023

Daisy Beauty on Free Motion Mavericks

Welcome to week 436 of Free Motion Mavericks. Happy Solstice 😊 I actually have a finish with free motion quilting (FMQ) for you today. Yeah!

May's Table Scraps Challenge done ✔


It's a tad late, but it's done well and I love it 😍. May's Challenge colour was orange and the letters were F and L. The scrappy log cabin block was quickly finished and the gorgeous yellow daisy batik Flowers were attached...but something was missing. I hoped to add lace for my "L" but I wasn't happy with what I tried. 

Sometimes a project needs to percolate before it talks to me or I find that perfect thing that will make it sing.

Daisy Beauty - May's Table Scraps Challenge

This is where it sat for a while. I did post this image on Instagram and linked it up to the May Table Scraps Challenge link-up. 

 Where it sat - simmering

I tried a few pieces of lace but couldn't find anything I liked. Finally, looking for something else, I found this crochet lace - perfect! 

I found the lace - now what?

I didn't know how I wanted to finish it. Do I add stems and/or leaves? Finally today it came to me - FMQ daisies so that there is an impression of lots more daisies. I think of them as shadow daisies. 

I did add a second echo around the yellow daisies and then I started the shadow daisies. I only quilted the first one with yellow thread. I wanted the daisies to recede, so I used variegated threads in pink and yellow, and light and dark pink.

More daisies and a line of small leaves

First daisy with an echo


I moved the lace out of the way - at that point it was only attached at the binding - to FMQ a daisy underneath it.

Once the daisies were quilted, I added a continuous line of small leaves around everything, including the binding.

Here is the back - you can see the FMQ better from there.

FMQ as seen from the back

Daisy Beauty label

Since I had the fusible web handy, I made the label right away.


What I learned
  • You can see in the image where the project was percolating, that I had left an extra large backing. I was hoping to just turn the backing to finish the quilt, but when I trimmed it, I cut through it. So the piece has a regular binging.
  • I actually added the binding before the FMQ. On such a small piece, it really doesn't make a difference, and it's so nice to have a finished piece once it's quilted!
  • These hand-dyed fabric scraps come from my friend Elaine Quehl's extras. I absolutely love those orange-pinks and have used them quite a bit. I may have to dye some myself eventually!
  • We had a presentation at our last guild meeting by someone who has studied the judging of quilts. She gave us many tips. I was extra careful when I FMQ the curves - going slower than usual and it paid off - no eyelashes (that's when the back tension is off in a curve, because the quilter is going too fast!)
  • I also followed my own advice about bindings and it came out really well.
  • Before adding the label, I attached the lace with a few stitches. It doesn't show except in the back, when it's not covered by the label.
  • I don't want to be so finicky about my quilts that it won't be any fun to make them, but these small steps make for a better piece, and are really not any more work. I just have to remember them 😁
Related link
  • Tips for adding a binding - see What I learned: An Agenda Cover and Update on Free Motion Mavericks, January 05, 2023
  • Posts for this year's #Table Scraps Challenge 2023
Linking parties
This project was a squirrel - I made the deadline for DrEAMi! Yeah!

Free Motion Mavericks

Welcome and thanks to everyone who linked up 😊

Brenda from Songbird Designs has FMQ a beautiful flying geese quilt in the Island Batik Challenge. She used feathers, diagonal lines and block within a block in the middle of her stars! Click on the image on her page to get a close-up.

Come Fly Away With Me by Brenda of Songbird Designs

Donnalee had some left over fabric from a quilt kit and was able to make a lovely runner and a mini. So cute! Aren't small project fun to make?
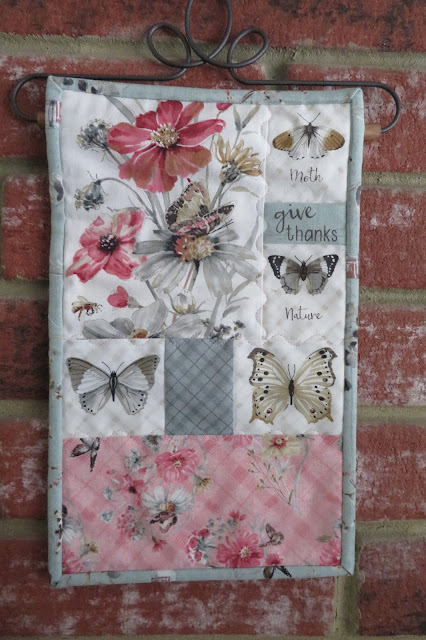
mini wall hanging by Donnalee

Melva finished a Dresden quilt for a client last week. I love these pink and red fabrics.

A finished Dresden quilt for a client by Melva

Gail hosted TGIFF last week with her finished quilt. She used Graffiti and Wild quilting designs. This week we'll be seeing the back of her quilt since she made if following Kelly Young's “Perfectly Pieced Backs” book.

Gail's quilt with Graffiti and Wild quilting

Margo of MY Quilts and Crafts got terrific news - two quilts, 'Modern Time' and 'Inside Lines', were accepted in the International Quilt Festival Houston 2023. Congrats!

Margo's quilts, 'Modern Time' and 'Inside Lines' will be at the 
 International Quilt Festival Houston 2023

It's now your turn!

You are invited to the Inlinkz link party!

Click here to enter

Thursday, January 26, 2023

Going somewhere is Finished on Free Motion Mavericks

Welcome to week 417 of Free Motion Mavericks! I hope that you've had a chance to play since I last posted. When I began this piece, I had no idea that it would end up being free motion quilted (FMQ). I think that the FMQ added a lot to it. I'll let you judge this for yourself.

"Going somewhere..."


This piece began, as many of them do, with a workshop on TextileArtists.org. I haven't had time to do as many workshops as I would like, but this one grabbed my attention. It took me a while to start, but once I did, I couldn't leave it! 😊

Going somewhere... original orientation

Going somewhere... is upside down better?

It all started with a fat quarter of Kona "School Bus" and some lovely hand-dyed orange-pink fabrics by Elaine Quehl. I also took out my stash of translucent fabric scraps. The workshop, Stitching in the Round, was created by April Sproule. She provided a template of a spiral, but of course, I had to make my own! 😁 
Following April Sproule's Further Development video, I created my own template of two connected spirals. To work, the spirals needed obvious negative and positive spaces. I coloured in the negative space and added a couple of extra starting and finishing points to create some interest and clear paths to follow. 

Creating my own spiral template

I transferred the template to my fabric and started playing. I asked April how she decided where to put the extra fabrics onto her background. She mentioned focal point and colour, but since I was just starting, I wasn't sure what I was doing, so I just added different sheer fabrics in 5 areas, mostly below and to the side, but with one stripe in the middle. Connecting some of that background fabric with the spiral creates unity, so that's what I did on the left side. I had lots of empty space under the smaller spiral, so just create an interesting block underneath it. 

Starting to put it together.


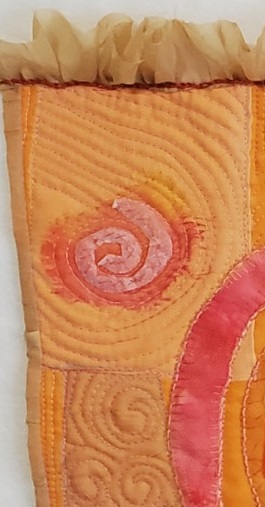
That interesting block is one of my favourites and I stitched it early on.

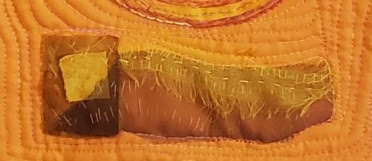
An interesting block

At the beginning, I spent most of my time on the left side spiral and background. There was a lot of hand stitching! 
Very slowly stitching things up

I used some beautiful scraps of hand-dyed fabrics as well as sheer fabrics. I also varied my thread, although I tried to use each element a few times in the piece so that it would add consistency. This is what my final stitched piece looked like. I knew that I would have to do something with it - either add a lot of hand stitching around everything, or do some FMQ.

Finished attaching the appliqué

Free Motion Quilting (FMQ)


As  you can guess, FMQ won out! 😊It was soooo much fun 😁

FMQ finished - so how do I finish the actual piece?

You may have noticed in some of the pictures that at the top right corner and the bottom left corner, there were small chunks of fabric missing. My original intention was to trim the fabric, but of course I waited too long and wanted to keep the whole area. I covered these holes with matching fabric and all is good!

I didn't have any more Kona "School bus" fabric for the binding so I came up with (it turned out) a great idea! I used strips of one of the sheer fabrics (it's curtain fabric) to add interest at the top of the piece. Why not ruffles at the top? I based this down and then machine stitched it so that it would stay upright. I worked in sections to make sure that I liked it before continuing.

Making ruffles for the top

Adding ruffles was a lot of work and probably would have been too much all around the piece, so I used 1½" strips and attached these like regular binding. I am really happy with the result.😊 I thought that I was finished, but this morning I decided that it needed just a little more stitching. I added a chain stitch in a #12 perle cotton over the machine stitching of the ruffles. I also coiled up the bottom of that hanging sari yarn. 

Going somewhere.... when I thought that it was finished

Here are some of the details.

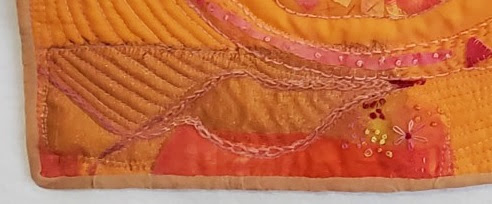
Embroidery and FMQ over very shiny sheer
with silk and hand-dyed cotton

Fancy tissue paper swirl
over silk


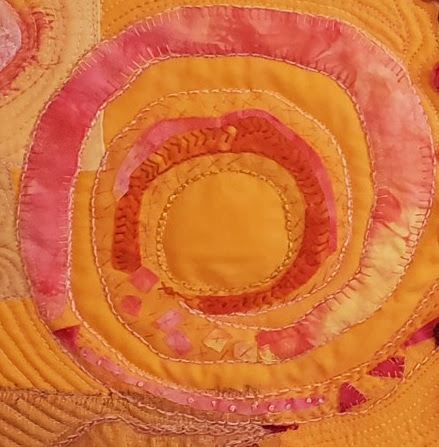
Spiral with embroidered hand-dyed
fabric pieces and snippets


Sari yarn coil, appliquéd triangles and circles
 with embroidery

Interesting block of sheer fabric (overlapped to makes it darker),
silk and hand-dyed cotton square with simple embroidery


What I learned
  • There was a lot of learning in the last couple of weeks as I worked on this piece.
  • The bottom, shiny sheer fabric had a very loose weave so I was glad to FMQ around and into it to add stability. My overcast appliqué stitch was shredding away.
  • I worked with some beautiful printed tissue paper that came in a lovely box of chocolates. I added the spiral on the left and used it in some of the triangles. It stitched up really well. I do want to experiment more with stitching on paper.
  • The circles of fabric on the smaller spiral were stitched down with blanket stitch circles. They came out very well.
  • It's not always easy to figure out when to stitch fabric down before you embroider it, or just to let the embroidery stitch it down. There was only one piece, near the centre of the small spiral that I could have stitched down before I edged it with chain stitches. The chain stitch didn't catch everything, but once it was embroidered, it was easy to stitch a few sections down with thread. This didn't show, so I'm not sure that stitching it down before the embroidery was necessary. 
  • I loved using sheer fabric for the binding. I will do this again!
  • April suggested that we use silk organza (not washed) as a stabilizer behind the piece. I usually use a very lightweight cotton but since I had some silk organza I tried it. It was really lovely to stitch on and did give it a nice stability to the piece. I'm not sure that it's better than my lightweight cotton but it's a great option.
  • I curled up the other end of the sari yarn because without it, it looked too much like sperm (not the effect that I was going for) 😲
  • In the end I'm happy with the sheer fabric that I added to the background. It's hard when you don't really have a plan, but I thought that the focal point would be the spirals.
  • Did I change the focal point when I added the coiled sari yarn, or the darker interesting block? I may have, but I hope that since everything is connected, either physically or though colour and fabric, that it's ok. 
  • I did want lots of movement, which I think I was successful in doing.
  • When I showed my daughter the finished piece, she suggested that I turn it around. I like it but it does change the focus. Do you have a preference? Let me know😊
Related links
Linking parties

Project details


Going somewhere....
Made based on a workshop with April Sproule
17¼" x 12½"
Materials: Kona cotton, sheer fabrics, sari yarn, hand-dyed fabrics, tissue paper, perle cotton and embroidery floss
Techniques: embroidery, FMQ, ruffles 
April Sproule


Free Motion Mavericks


Gail from Quilting Gail finished her lovely "Quilt More Worry Less" hanging. If you didn't see it, you may want to check it out! She has also picked a centre block for her SAHRR quilt (Stitch at home round robin). You can see it here.  

"Quilt More Worry Less" hanging by Quilting Gail

It's now your turn 😊

You are invited to the Inlinkz link party!

Click here to enter

Sunday, October 23, 2022

Playing in isolation

Hi, I hope this post finds you well. I'm afraid that I am now officially under isolation - that second bar appeared on the darn Covid test 😒. I don't know how much I'll be able to sew and stitch in the next few day. If I follow the same path as my daughter, I'll be sitting up somewhere with a fuzzy brain and no energy. Not looking forward to that!

Projects in progress


I'm making a runner and another wall hanging based on the Swirling Leaves piece that I made for the Hello Fall Blog Hop in 2020. It's always been one of my son's favourite, so I'm going to make him a runner. The other wall hanging is going to the workplace charity auction that will be held in November or December.

Swirling leaves wall hanging

I have enough neutral background stitched up for the wall hanging. Have I told you that I love improv piecing? I did learn a few lessons so far, so keep reading to find out what!😊

Stitching in progress with lots of trimming

Almost done the background for the wall hanging

Fabric strips pile

Next comes the borders and then the appliquéd leaves. A couple of days ago, on my way back from picking up the mail, I stopped in my neighbours' yards to grab these leaves. They make rather realistic leaf templates, don't you think?😁

Leaves and templates

I'll be digging into my scrap bins of hand-dyed fabrics gifted to me by Elaine Quehl. I'm sure that I'll find the perfect scraps of fabric for the leaves since they are the focus of the pieces!

Slow stitching update


I've been slowly working on my hand-stitched snippet roll which will be loosely based on our fall trip (see Related links below). It's a little more planned than a regular meditation block but once I start stitching, it's just as meditative. It's going to be a long snippet roll, so far about 44" long. It will hang on that antique bobbin which comes from the Mississippi Valley Textile Museum.   

Meditative hand-stitched snippet roll


Fall colours in my back yard


I may have gone several hundred miles to take the Agawa Canyon train tour but I could have seen the fall colours in my own back yard. I took these yesterday. The fire bush is living up to its name! 


I also love the view from my back yard. The red maple in the school yard seems to be sharing its colour with the sky. 

A bit of a sunset from my back yard

It's past time to clean up the yard so I hope that the weather keeps cooperating for at least another couple of weeks.

What I learned
  • Although I love improv piecing, mostly because I'm accuracy challenged 😊, I did discover that I do have to either:
    • cut my fabric strips relatively even, or
    • piece the fabric with a consistent seam.
  • Turns out that if your fabric cut is uneven and your seam is inconsistent, even I will have to use my seam ripper 😲
  • So, I started being more careful about my seam allowance and everything is great! I trim the blocks often to ensure that things are even.  
  • After picking leaves to use as templates, it really important to either make the template within a few hours or to place the leaves under some books to keep them flat as they dry. Ask me how I learned that lesson!😉
  • I even took the time to read my Swirling Leaves post to make sure that I remembered what I learned. I didn't write it down, but it looks like I created the background to fit the leaves placement. I didn't do this for this first quilt, so I'll see if it makes a difference. I'll update you on that when I make the runner, or finish this wall hanging.

Related links

Linking parties
I'll be linking up this post to many linking parties. It's time again for Tips and Tutorials on the 22nd with Kathleen McMusing. Slow Sunday Stitching, Quilting & Appliqué, Off The Wall Friday, Put your foot down, Oh Scraps!, Peacock Party, Monday Making


Friday, March 04, 2022

Tulip Medley for Project Quilting 13.5

I haven't had much time to join Project Quilting this year, but since this week's prompt is Rhythm & Repetition, I decided to take a couple of hours to make something. That's all I allowed myself because I know that I'm quite good at over-thinking and over-doing my projects. This was just a chance to play without expectations.

Rhythm & Repetition

In the Project Quilting 13.5 post, Trish included a couple of helpful links to articles on what rhythm and repetition looks like in art. I've included the links to these articles in Related links below. I was really tempted to do something with dots (they are so much fun to FMQ as pebbles!) in homage to Yayoi Kusama but I wouldn't want to do that quickly, so it'll be for another time.

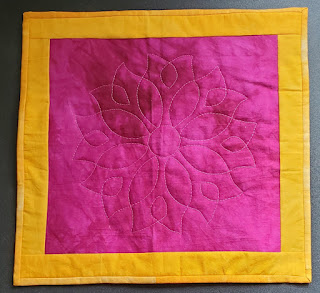
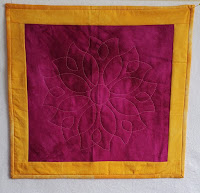
Tulip Medley - Project Quilting 13.5

Stencils have been on my mind lately (for FMQ but also as tools for surface design) so I took out my lovely collection of stencils. As for the parameters of this quick project, I found an amazing pink hand-dyed fabric by Elaine Quehl and used bright yellow hand-dyed fabric for the borders. Whatever stencils I used would have to fit this textile frame. 

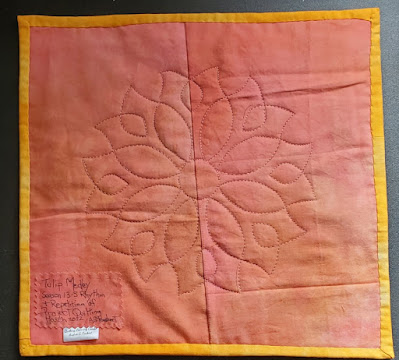
Since I couldn't be sure that any marking tool would come off properly, I opted to mark the back of the piece and FMQ it from the back. I've used this technique several times and as long as your thread tension is excellent, it works incredibly well. I stitched with the same Glide thread that I used for the Fantastic Fusion project, and knew it would be perfect. You can see the Frixion marks on the back of the project. I can ironing it off now that I've taken this photo.😊

Back of the piece marked with a Frixion pen

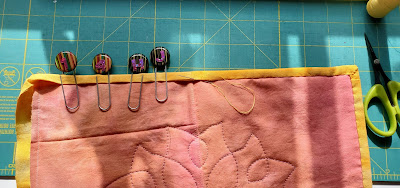
It was difficult to stop at just FMQ the outline of the design but I did want to keep it simple...and quick. Below you see my hack for keeping the binding down while it's being hand-sewn. Instead of very expensive clips, I use large paper clips. These have letters on them since I also used them for keeping bundles of fabric together when I piece. 

Using large paper clips to keep the fabric edge down

Here is a close up of the free motion quilted stencil. I even buried my threads!

Close up of the free motion quilting

Here are another photo with different lighting.

Tulip Medley


Project Quilting 13.3 Kitchen Influence

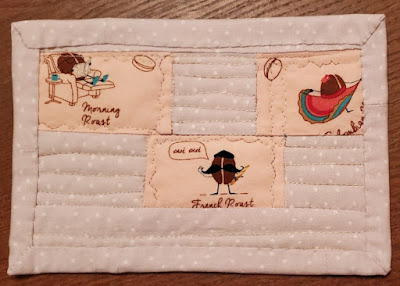
On January 30, 2022, Trish announced the third prompt of the season - Kitchen Influence. I've been wanted to make mug rugs but didn't have much time to make them or write a post about them. Since I've been linking up to the odd linking party through Instagram, that was the perfect solution. I posted in the last hour before it finished, but I made it! 😊 

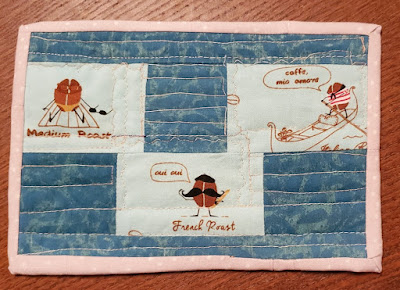
I took out my favourite coffee fabrics and came up with two designs. On one side, in light blue-green, is Medium Roast on a beach, then Venetian Blend in a gondola and finally French Roast wearing a beret. I love these fabrics and bought them in two colours. The other side is on a pink background with Morning Roast on a lazy chair, a Columbian Roast dancing and another French Roast.

Blue coffee bean novelty fabric

Pink coffee bean novelty fabric


What I learned

  • It was difficult to stop myself from doing more free motion quilting or even adding beads or some trapunto to the piece. It's now done, but maybe one day I can keep playing with a version 2.0 
  • I wish that I had made 2 separate mug rugs with the coffee fabric because no matter how hard I try, I can never get both sides laid out the same. They are cute but the FMQ is a little wonky.

Related links

Linking parties

I'll be linking up to many fun linking parties. Why not check out what's going on out there....and of course check out Project Quilting 13.5, I will also be linking up to Free Motion Mavericks with Muv. Off the Wall Friday, TGIFF, Beauties Pageant, Put your foot down, Peacock Party


Project details


Tulip Medley
Created for Project Quilting 13.5
Materials: hand-dyed fabrics, Frixion pen, Glide thread
Techniques: Free Motion Quilting (FMQ)


Saturday, February 19, 2022

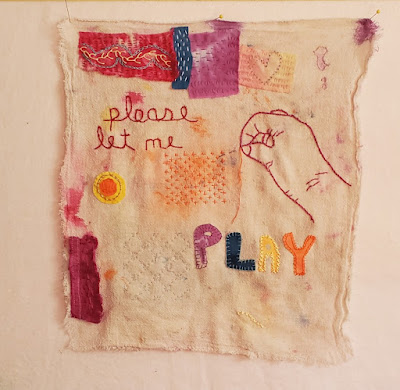
Please let me play

I've been very busy quilting during the last few weeks. It's been such fun! However, I realised that with all of these busy projects, I'm missing the meditative calmness that slow stitching brings. So today I spent some time finishing up my "Please let me play" piece.

Adjusting the composition

In the Out of the Box Textile Artists Group, we've been learning about composition. I've read a lot about it, but it always feels more intuitive than just following rigid (or black and white) rules. I get the feeling that there's a lot of gray area in there to play with. Sometimes you know why a piece isn't working but at other times, it's not as clear.

That's why I turned to my artist friend, Elaine Quehl for help on this piece. Here is my  final piece.

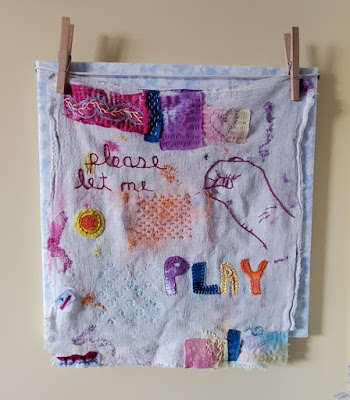
"Please let me play" - embroidery on a clean-up rag

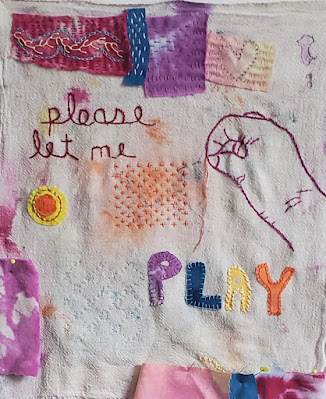
When I asked Elaine for help, the image below is what the piece looked like. The colour on this photo is not very  good, but you get the idea. I knew that I would add things at the bottom but wasn't sure if the composition was the best that it could be. Elaine agreed with adding pieces at the bottom and suggested that the bright fuchsia piece on the left was distracting. Although it was my favourite fabric, I had to agree with her.

Composition on the design wall, before getting advice

I then played with fabrics and came up with this. I replaced the bright pink piece with a lighter one, but after I had stitched it, I ended up removing it - it wasn't the colour so much as the extra piece.

Playing with possibilities

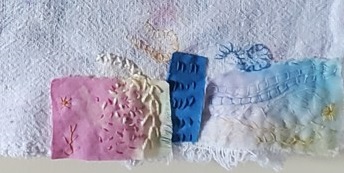
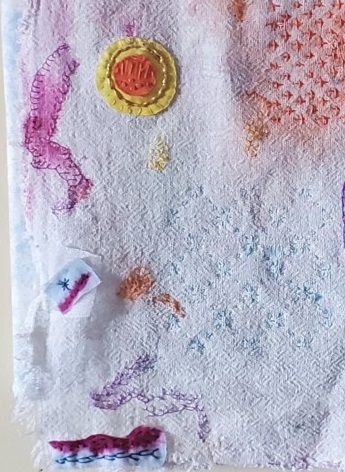
I added pieces at the bottom as a type of echo of the top strip but kept the colours lighter. You can also see that I played a lot with embroidery stitches on both the fabric pieces and the original rag. I have been following Mirjam Gielen of Mirjam Textiles on Instagram (see Related links below). She has a very organic way of stitching that I find fascinating, so I bought her Basic Stitches e-book and used a few of her stitching variations on this piece. To keep it subtle, I used regular sewing thread. 

Trying fun stitch variations

Keeping the added stitches subtle

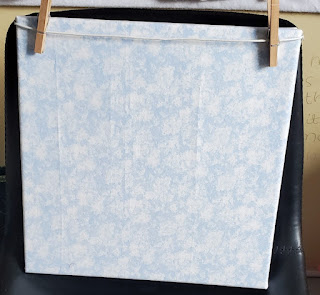
As I was wondering how to hang this piece - it because obvious - on a clothe line! I covered a 14" x 14" canvas with very light sky fabric. I then attached a piece of clothe line with tacks at the sides of the canvas and used wooden clothes pins to hang the piece.  

Creating my own clothe line to hang the piece


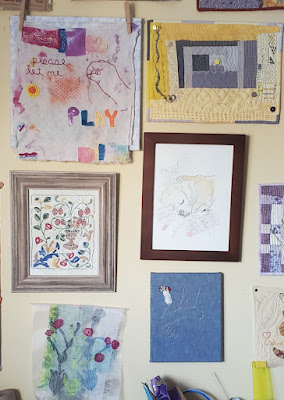
"Please let me play" and Chevy - pride of place on the art wall

To find out how this piece came to be, check out my original post and see Venessa Marr's work in Related links below.

#100dayschallenge2021 on Instagram


Today "Please let me play" is my last post of the 100 days challenge on Instagram. I started the challenge on August 6, 2021.  I did the math and I'm very impressed! It took me 197 days to do the 100 day challenge - that's an average of a post every second day! Wow! 

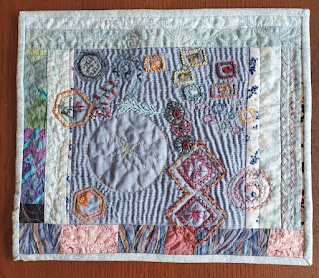
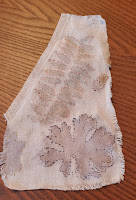
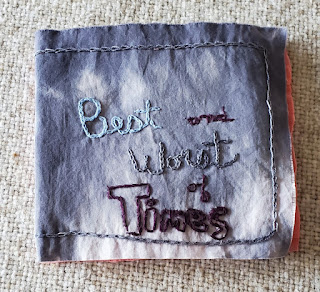
I started the challenge with slow stitching. I created a piece, "Mixing it Up" that incorporated both free motion quilting and embroidery. I then worked on stitching some eco printed fabric and also finished my first concertina book "Best and Worst of Times".

Mixing it Up with FMQ and embroidery


Slow stitching on
 eco-printed fabric


Finished my Best and Worst of Times concertina book

Recently I also posted more traditional quilting projects since I was doing less slow stitching. You can see my projects by going through my blog or my Instagram. The one piece that I'm still working on is the Traveller's Blanket. I hope to finish it before the end of the #100dayschallenge2022. 

Slowly stitching the background of the Traveller's Blanket

I hope that you'll continue joining me on my stitching journey, either through my blog and/or Instagram. I really appreciate all of your encouragement. If I keep posting at the same rate as the last challenge, I should be finishing up just before my retirement in October 2022 😊😎

What I learned

  • I have really enjoyed stitching on a piece of cloth that symbolizes my artistic journey. The message is very apt because frankly all I want to do is Play!!! (as opposed to work)
  • There is so much to learn about composition and I hope that it gets easier with experience. Thanks so much Elaine for your advice!
  • I've also learned a lot on my #100dayschallenge2021. It gave me the incentive to play with slow stitching and finish/advance some of my UFOs or WIPs. 
  • I'm going to try to re-incorporate slow stitching into my daily routine. I feel like I need the calmness.

Mirjam Textiles

Related links

Linking parties

I'll be linking up to many fun linking parties. Let's see what's going on! Put your foot down, Finished or Not Finished Friday, Off The Wall Friday, TGIFF with Quilting Gail, Peacock Party, Beauties Pageant, Patchwork & Quilts, Slow Sunday Stitching, Oh Scrap!, 15 minutes to stitch 2022, Monday Making, Design Wall Monday

Project Details


Please let me play
14½" x 13" on a 14" x 14" canvas
Material: clean-up rag spotted with dye, hand-dyed fabric scraps, organza, embroidery floss, perle cotton (hand-dyed and commercial) and thread - attached to a fabric covered canvas with clothes line and wooden clothes pins
Techniques: embroidery, boro and sashiko