Showing posts with label stencils. Show all posts

Friday, March 04, 2022

Tulip Medley for Project Quilting 13.5

I haven't had much time to join Project Quilting this year, but since this week's prompt is Rhythm & Repetition, I decided to take a couple of hours to make something. That's all I allowed myself because I know that I'm quite good at over-thinking and over-doing my projects. This was just a chance to play without expectations.

Rhythm & Repetition

In the Project Quilting 13.5 post, Trish included a couple of helpful links to articles on what rhythm and repetition looks like in art. I've included the links to these articles in Related links below. I was really tempted to do something with dots (they are so much fun to FMQ as pebbles!) in homage to Yayoi Kusama but I wouldn't want to do that quickly, so it'll be for another time.

Tulip Medley - Project Quilting 13.5

Stencils have been on my mind lately (for FMQ but also as tools for surface design) so I took out my lovely collection of stencils. As for the parameters of this quick project, I found an amazing pink hand-dyed fabric by Elaine Quehl and used bright yellow hand-dyed fabric for the borders. Whatever stencils I used would have to fit this textile frame. 

Since I couldn't be sure that any marking tool would come off properly, I opted to mark the back of the piece and FMQ it from the back. I've used this technique several times and as long as your thread tension is excellent, it works incredibly well. I stitched with the same Glide thread that I used for the Fantastic Fusion project, and knew it would be perfect. You can see the Frixion marks on the back of the project. I can ironing it off now that I've taken this photo.😊
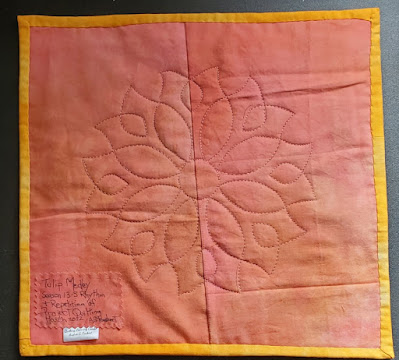
Back of the piece marked with a Frixion pen

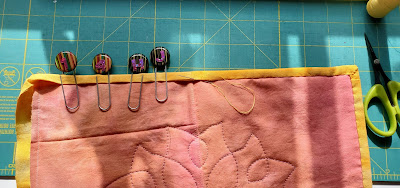
It was difficult to stop at just FMQ the outline of the design but I did want to keep it simple...and quick. Below you see my hack for keeping the binding down while it's being hand-sewn. Instead of very expensive clips, I use large paper clips. These have letters on them since I also used them for keeping bundles of fabric together when I piece. 

Using large paper clips to keep the fabric edge down

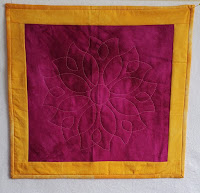
Here is a close up of the free motion quilted stencil. I even buried my threads!

Close up of the free motion quilting

Here are another photo with different lighting.
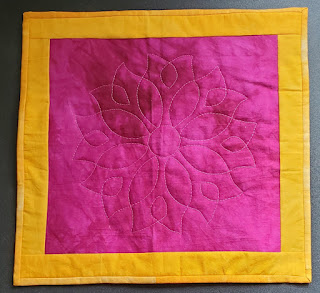
Tulip Medley


Project Quilting 13.3 Kitchen Influence

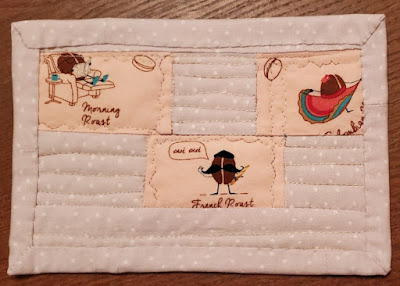
On January 30, 2022, Trish announced the third prompt of the season - Kitchen Influence. I've been wanted to make mug rugs but didn't have much time to make them or write a post about them. Since I've been linking up to the odd linking party through Instagram, that was the perfect solution. I posted in the last hour before it finished, but I made it! 😊 

I took out my favourite coffee fabrics and came up with two designs. On one side, in light blue-green, is Medium Roast on a beach, then Venetian Blend in a gondola and finally French Roast wearing a beret. I love these fabrics and bought them in two colours. The other side is on a pink background with Morning Roast on a lazy chair, a Columbian Roast dancing and another French Roast.
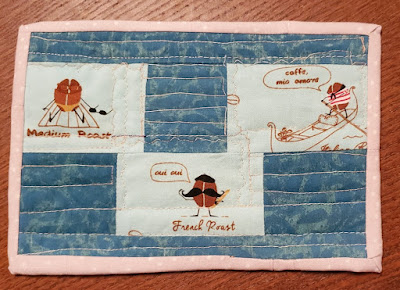
Blue coffee bean novelty fabric

Pink coffee bean novelty fabric


What I learned

  • It was difficult to stop myself from doing more free motion quilting or even adding beads or some trapunto to the piece. It's now done, but maybe one day I can keep playing with a version 2.0 
  • I wish that I had made 2 separate mug rugs with the coffee fabric because no matter how hard I try, I can never get both sides laid out the same. They are cute but the FMQ is a little wonky.

Related links
Linking parties

I'll be linking up to many fun linking parties. Why not check out what's going on out there....and of course check out Project Quilting 13.5, I will also be linking up to Free Motion Mavericks with Muv. Off the Wall Friday, TGIFF, Beauties Pageant, Put your foot down, Peacock Party


Project details


Tulip Medley
Created for Project Quilting 13.5
Materials: hand-dyed fabrics, Frixion pen, Glide thread
Techniques: Free Motion Quilting (FMQ)


Friday, June 30, 2017

Progress

Yikes! June is almost finished - just a few hours left!

Dahlia flower (although I see tulips!)
This is a quick post to prove that progress has been made! My June OMG (One Monthly Goal) was "to do some free motion quilting on my Neutral Lap Quilt - Take 5 Loves Coffee Milk", and I did!

I sandwiched it on the weekend, did some stitching-in-the-ditch around each block and then decided on a few stencils to use.

This quilted block is made from a large dahlia stencil but I'll be adding a little something later so that it fills out the edges of the whole inside block.
Lotus Flowers


This quilted block is from a lotus flower stencil. This was great since it does take up most of the inside block. I just added a leaf on both sides of the middle strip to complete it.


Fanciful Heart Pattern

This third block has a fanciful heart motif. I'll be adding a little something extra so that it takes up the whole space of the inner block.

I now have 13 more blocks to quilt! I'll be using these stencil patterns again as well as one more that I haven't tried out yet.

I also found a great series of Free Motion Quilting (FMQ) sample blocks at ipatchandquilt. I have been practicing Esther's Fantasy block which is part of her FMQ samples - part 13 - orange peel variations. Have a look (see Related Links below) - she is doing some amazing quilting!


Practicing the Stem Stitch

I've been adding to the stem stitch sampler which I started on my trip to Quilt Canada last week. I'm calling it Étude in Stem Stitching.
Étude in Stem Stitching - to date!

Details of Étude in Stem Stitching
I had a great time coming up with different FMQ designs to draw and then stem stitch. I did use a few detached chain and lazy daisy stitches.

The colours aren't always very visible on this background. I'm not sure what I'll do with this after I've finished the embroidery. I think I would like to add beads and maybe even add some paint (that would be very brave of me!)


More details of Étude in Stem Stitching


Isn't is amazing how a photo lets your really "see" your piece? One of the National Juried Show winners at Quilt Canada said that she takes pictures at every step to review how her quilt is coming along. I really want to use this technique.

I'm mentioning this because as I look at the flower here, I see that I should be adding a few more petals in the lower right side to even it out.


Come back tomorrow for Canada Day - Celebrate - Fêtons 150! 

What I learned

  • As I just mentioned, I want to take more photos of my pieces, especially those that I am designing, to get another perspective of the work. This is one lesson I really hope I will remember.
  • It would seem that I don't really do quick posts! I always have something to say about quilting. Thanks for humouring me. :-)


Related Links
Post of the Stem Stitch project
Posts for Neutral Lap Quilt - Take 5 Loves Coffee Milk

Linking Parties: I am linking this post to OMG June Finish Link-up, as well as many others. Please check them out to see what is happening.  Midweek Makers, Needle & Thread Thursday, Off the Wall Friday, Free Motion Mavericks, Finished or Not Friday, Slow Sunday Stitching, MOP Monday,


Tuesday, February 28, 2017

February Finishes

Batik Lap Quilt Top
Batik Lap Quilt Top
Does this look familiar? I finished this quilt lap top on a retreat last May. I used 2 packages of North Country Trail Batiks Charm Pack by Holly Taylor for Moda as well as some 5" squares from my batik stash since I should have bought 3 charm packs!

This was my One Month Goal (OMG) for February with Elm Street Quilts. I also had a few other goals. Let's see how I did:


  1. To FMQ this colourful batik lap quilt for my brother (the one who got me fabric in Paris) - this is my OMG! Finished
  2. To finish embellishing Escape 2: English Garden; Finished
  3. To finish the Northern Lights hexies art quilt. Almost Finished
  4. To make the next block for the Growing Up QAL Finished March 2
Batik Lap Quilt 2

FMQ blocks using templates or patterns
I had a great time FMQ this lap quilt. There are 132 blocks in this quilt and I used all of them to practice my FMQ. I was trying to keep this quilt supple, even with a lot of FMQ. I followed the fabric pattern in many of the blocks. I did FMQ based on Angela Walters' patterns and also used stencils. I made two blocks based on Muv's (of Free Motion Mavericks) tutorials. Check out her oak leaf and rudbeckia designs in the Featured Links below.

Since my brother loves Paris and travels there as often as he can, I FMQ two Paris blocks. One is the Eiffel Tower and the other the Notre-Dame Cathedral. To make these (since I don't draw well), I enlarged a black and white photo and outlined the structure with a fine black Sharpie. Using the light box, I copied the image on freezer paper and cut the image out.

For the Eiffel Tower, I FMQ over the freezer paper. It worked out fine, except for the tiny pieces of paper stuck underneath the thread.
Eiffel Tower freezer paper template
Eiffel Tower FMQ on block


Notre-Dame Cathedral FMQ
For the Notre-Dame Cathedral, I used the same process but used a removable pen to draw the outline around the freezer paper. I then used the picture to fill in the inside lines. I did practice this on paper before FMQ it since it was quite intricate. I'm quite happy with the results.
Chevy (dog) posing in front of Batik Lap Quilt 2
Chevy posing in front of Batik Lap Quilt 2


Escape 2: English Garden Finished


Escape 2: English Garden was finished and the post written on February 19, 2017

Northern Lights hexies art quilt only needs a binding. I'm not going to spoil the surprise.

The next block for the Growing Up QAL has all of the pieces cut up and is ready to be sewn together. I have a couple more days to sew and post it! March 2: Here is my block
Growing Up QAL Block 2
Northern Lights is almost done!

What I learned:
  • The lap quilt is a little stiffer than I would have preferred - there is a lot of FMQ, even if the blocks are not densely quilted. I think it's still fairly supple.
  • Many of the FMQ is not easily seen - it'll be a little bit like a "Find Waldo". I hope my brother will have fun discovering the different blocks - including one with his name and another his cat's name.
  • My block 2 in the Growing Up QAL is not quilt right. The HST are going in a different direction. The correct square looks much better - maybe I'll try again, or maybe not!
  • I was very productive in the last couple of weeks. In part, it's because of the audio books I borrowed from the library - Eragon and Eldest by Christopher Paolini. I read them years ago but have decided to listen to them so that I can read the last two books of the series. I just love being read to!
Featured Links:

Batik Lap Quilt 2


Project Details
Batik Lap Quilt 2
50 ½ " x  47½"
Materials: cotton batiks - North Country Trail Batiks Charm Pack by Holly Taylor for Moda as well as other 5" squares
Techniques: FMQ - freehand as well as templates and stencils


Did you get lots of quilting done in February? Spring with its longer days and fresh air will wake me out of hibernation!

Linky Parties: I will be linking to the One Monthly Goal - February Finish Link-up as well as these other link-ups. Check out what everyone is up to! Monday Making, Main Crush Monday, Moving it Forward Monday, Linky Tuesday, Midweek Makers, Growing Up Quilt-Along, Needle & Thread Thursday, Let's Bee Social, Free Motion Mavericks, Can I get a Whoop Whoop? Off the Wall Friday,

I am linking this post to Sarah Goer's Show Me Something With Squares

Saturday, July 09, 2016

Only 146 blocks to go!

Splashes of Color Quilt
Many years ago I fell in love with the Splashes of Color quilt at allpeoplequilt.com – with a simple pattern of pastel batiks, it looked both soft and yummy! Perfect for sweet dreams. Over the next few months I made the quilt.

When it was finished, I was disappointed. It didn’t look like the quilt that I had fallen in love with. I put it away since I wasn’t ready to quilt it yet. I didn’t have a sewing machine that did FMQ and I was told not to hand-quilt it since batiks are dense and difficult to hand-quilt.

About a year ago I found the batik quilt top. With trepidation, I unfolded it and lay it over my bed. Wow! It was stunning! It may not have been the soft quilt I wanted but I love it! On my king sized bed I noticed that it almost fit. I showed it to my husband who liked it, so I decided to finish this quilt for our bed. At a retreat I made a few more rows so that I wouldn’t have to fight my husband for my share of the quilt as we slept!

I bought some Tula Pink fabric for the backing as well as king-size batting. I was now ready to sandwich this monster. One day when I had the house to myself, I removed all of the furniture from our kitchen eating space, vacuumed and then lay down the batting. It took the whole space!
It's the size of the kitchen eating area!

Chevy, the dog, lying on the quilt back
Chevy in the middle of the action!
It was a rather long and tedious process. I placed the quilt top on the batting, tapped the top to the floor, pinned it and then flipped it over. I did the same to the backing. When it was pinned to my satisfaction, I put the table back, sat down and basted the sandwich together.

I then quilted every block. This helped to stabilize the quilt and I was happy to see that I had done a good job of sandwiching the quilt since there was very little puckering.

I FMQ (free motion quilted) between the blocks using Superior Thread’s Bottom Line in both the bobbin and top. I wasn’t sure what thread to use for the actual FMQ of each block but decided to keep using the Bottom Line. It’s very fine and won’t take attention away from the quilt itself. Besides, every block has different colours – changing and deciding on the colours of the thread to use in each block would have been impossible.

Here are my criteria for choosing the quilting design in each of the 8 inch blocks:

  • Not very small or dense so that the quilt remains supple;
  • Simple enough to FMQ on my home machine (this is a king size quilt!);
  • Experimentation, repetition and learning is encouraged; and
  • It can be a stenciled pattern, a dot-to-dot pattern or anything else that fits the above criteria.

Since there are 169 blocks to FMQ (13 x 13) this will give me plenty of opportunity to practice these designs. Here is a sampling of the 23 blocks that I’ve done so far. The stencils are mostly from The Stencil Company while many of the FMQ comes from Angela Walters' Shape by Shape book. The marking on each block hasn't been ironed off yet.
An old fashion stencil, circa 1850

Dot-to-Dot Fan

More Dot-to-Dot quilting with echoing


Dot-to-Dot


The Stencil Company (Celtic Flower 7")


The Stencil Company (Continuous Teardrop 6")


The back of one block

What I learned:

  • You won't get a soft pastel quilt if your fabrics are dark!
  • Beware of those expectations. Allowing time to pass can help you change your perspective. 
  • I have done some FMQ designs that really don't show well, but it's good practice and they are very lovely from the back (see the picture below).
  • This is an excellent way of practicing my FMQ. The blocks are not perfect, but the overall effect will be stunning I'm sure.
  • These blocks are very time consuming. I've put the quilt away for now so that I can work on other projects.
  • Chevy wants to be included in the pictures - besides, pictures with animals are always popular!

The back of a couple of blocks
The back of a couple of blocks based on Angela Walter's designs

 I will be linking to these Linky Parties. Come see what everyone else is doing! Free Motion Mavericks, Can I get a Whoop Whoop! Off the Wall Friday. I've also linked Chevy's picture to Pets on Quilts 2017. Check out the cute posts 😊


Only 146 blocks left to go!

Sunday, May 15, 2016

Art Quilt Practice Pieces

After last week's whirlwind (a guild quilt show and the Art with Fabric blog hop) I didn't think I'd want to quilt for a few weeks. Well, I stayed away from my quilting for 3 whole days! However, the two little projects I made were pressure-free playing using new techniques or materials.

So far, I've participated in 3 of the Colour Me Positive 2016 Weekly Journal Challenge, by creating mini art quilts that are mostly words with free motion quilting (FMQ). I love seeing everyone's art work on the dedicated Facebook page. The pieces are fun and use all types of art journalling techniques. I didn't even know that this existed until joining them!

Week 18 of the Colour Me Positive Challenge - Healing Art
Week 18 of the Colour Me Positive Challenge - Healing Art (13" x 7.5")
Since I'm also using words in these quilts, I'm now learning to write again with Joanne Sharpe's Whimsical Writing books and videos. Between all of these resources, I've learned about all kinds of neat writing, drawing and art products that are easily adapted to fabric. That's why I couldn't wait to start playing with stamps, markers and stencils.

Week 18 - Healing Art

Details of the tree - coloured and thread painted
I started this piece using the tree stencil and then went a little nuts with some of my daughter's stamps.

I took out my permanent markers and coloured the tree and outlined some of the butterflies and flowers. Since the green of the tree was too intense, I toned it down with some thread painting in browns and darker green.

I then added the "Healing Art" using some cool grungy alphabet stamps. The letters didn't stand out enough so I experimented with my new markers and played around with a colourless blender. Wow! I love the effect it has on the letters - I even used them on the tops of the tulips. It makes them look like water colours. I then added metallic thread through the bobbin and did a little bit of FMQ

As with all of my art, the hardest part is knowing when to stop. I looked at the piece from the perspective of the art theory I've been learning.
Does the piece have:

    • a focus point; 
    • contrast; 
    • balance; and 
    • flow?

I think that the answer is yes. However, since the techniques used on this piece include FMQ, stencils, markers and stamps, I though that I should add appliqué to the mix. That's when I dug into my scrap stash and found two cools cats! Nothing says mellow like cats hanging around :-)

Week 9 - Live like a grownup, play like a child

At the quilt show last weekend, my daughter bought me a couple of hand dyed cheese cloth by local fibre artist Linda Palaisy.

Fantaisie 2 -my creation for Week 9
Fantaisie 2 -my creation for Week 9 (6.5" x  9")
The colours were so lovely I could just taste them! I couldn't wait to try making something fun and whimsical, so here it is - Fantaisie 2, a fibre collage.

I attached the cheese cloth to a blue cotton to lighten it up. In my stash I found three different fabrics - the hollyhock, the faeries and half meter of fabric that had butterflies, hummingbirds and these great borders.
Fantaisie 2 - close up
I attached the fabric using thread painting. It was flimsy and difficult to sew, so I used a minimum of stitching and then quilted it. Since it's just a fun little piece, I decided to leave the borders as is, without binding. I was hoping to use the same technique I had used for Woven Landscape  - to just fold the backing between the batting and the borders, but it didn't work out. Those are the drawbacks to just forging ahead without planning!

What I learned:
  • I should stop when I'm tired - that's when challenges happen.
  • Challenges are not important when playing. Fix it, or just move on :-)
  • To colour or write on cloth, just iron the cloth to freezer paper to make it more stable.
  • The Fantaisie 2 piece is dark, but I think that the borders lighten it up and give it contrast.
  • I love the look that the cheese cloth adds to the piece.
  • In case you're wondering, yes, week 9 should come before week 18, but we're encouraged to add our pieces whenever they're ready. 
I will be linking up to the following parties - check them out!
Oh Scrap!  Let's Bee Social, Needle and Thread Thursday, Free Motion Mavericks, Off the Wall Friday, and Freemotion by the River


Sunday, January 03, 2016

Bali Back Flip Quilt

In September 2013 I went to Philadelphia on a bus trip to see a quilt show and of course, to shop. After the trip, all of the participants made two beige and brown blocks using the Bali Back Flip pattern. Our trip organiser put the quilt together and quilted it for Jay, our bus driver.

After making the two blocks, I decided to make my own version, also using beige and browns. I decided to make it a little more structured by placing the lightest blocks in the middle and the darkest near the edges.
Bali Back Flip Quilt in beiges and browns
Bali Back Flip Quilt in beige and browns
The 6 middle blocks all have a beige that has a fairly prominent light brown pattern in it. For visual interest, I turned these blocks 90 degrees.
One of the middle blocks
I found it difficult to work with beige and brown since there are so many variations of each. Some beige are more cream while others have more yellow in them. The browns range from light to dark and chocolate to taupe. Some have more yellow or orange in them while others are more grey or green. In choosing the fabrics, I tried to stay away from anything too yellow or orange.  I didn't know if these would play nicely together, but they seem to!

This wasn't an easy quilt for me to do because I find neutrals rather dull. Adding structure helped me make it more visually appealing. It's hard for me to work on a quilt when I'm not in love with it - and that's mostly about colour. 
Chevy modeling with the quilt 
I started this quilt over two years ago, but didn't put it together until a few weeks ago. I decided a while back that this would be a perfect gift for my sister-in-law's mother, Kirsten. I know that she loves neutrals and will appreciate it. Since she lives in Denmark, I waited until she came to Canada to give it to her. She is leaving in a few days, so the quilt was finished just in time for her journey. It`s a lap size (48 by 56 inches), perfect for bundling up on the couch to read.

To make the back interesting without too much piecing, I enlarged the Back Flip block while using beige and a brown fabric that has a touch of blue. I had to add colour somewhere :-)
The back is a large version of the block
Quilted block
Quilted block


I wanted to FMQ the lap quilt with something interesting that would also make it soft and cozy. I stitched-in-the-ditch around each block and then used a stencil (SCL-354-06 from The Stencil Company). This time, I followed one of my lessons learned and practiced drawing the pattern before quilting it. It made a big difference in my confidence to quilt the pattern and was well worth the 10 or 15 minutes it took.


This morning, before bringing over the quilt, I made the label. Since I had spent so much time thinking the project through, I wanted a nice label to go with it. I made a 4 inch paper pieced cup from Quilting on the Square's Miniature Collection 2. To receive their free paper piece patterns, just sign up for their newsletter.


What I learned:
  • It's great when I put into practice lessons learned from previous projects, such as drawing the free motion pattern from the stencil before quilting it. It's even better when doing so really pays off.
  • I learned early in my quilting journey that there are many types of pinks. I guess I shouldn't be surprised that there are as many types of beige and browns!
  • If I don't love the colours in the quilt then it's important to find other ways to make the project interesting. 
  • I was tempted to add more colour within the quilt but in the end, it's about the recipient liking the quilt, not me. I just have to like it enough to get it done!
  • The continuous teardrop stencil was perfect for the project. I didn't want anything too complicated since it's not very visible against the fabrics. It's just enough quilting to give it interest without making it stiff.
Here's wishing you the best in the new year!