
Welcome to week 417 of Free Motion Mavericks! I hope that you've had a chance to play since I last posted. When I began this piece, I had no idea that it would end up being free motion quilted (FMQ). I think that the FMQ added a lot to it. I'll let you judge this for yourself.
"Going somewhere..."
This piece began, as many of them do, with a workshop on TextileArtists.org. I haven't had time to do as many workshops as I would like, but this one grabbed my attention. It took me a while to start, but once I did, I couldn't leave it! 😊
 |
| Going somewhere... original orientation |
 |
| Going somewhere... is upside down better? |
It all started with a fat quarter of Kona "School Bus" and some lovely hand-dyed orange-pink fabrics by Elaine Quehl. I also took out my stash of translucent fabric scraps. The workshop, Stitching in the Round, was created by April Sproule. She provided a template of a spiral, but of course, I had to make my own! 😁
Following April Sproule's Further Development video, I created my own template of two connected spirals. To work, the spirals needed obvious negative and positive spaces. I coloured in the negative space and added a couple of extra starting and finishing points to create some interest and clear paths to follow.
 |
| Creating my own spiral template |
I transferred the template to my fabric and started playing. I asked April how she decided where to put the extra fabrics onto her background. She mentioned focal point and colour, but since I was just starting, I wasn't sure what I was doing, so I just added different sheer fabrics in 5 areas, mostly below and to the side, but with one stripe in the middle. Connecting some of that background fabric with the spiral creates unity, so that's what I did on the left side. I had lots of empty space under the smaller spiral, so just create an interesting block underneath it.
 |
| Starting to put it together. |
That interesting block is one of my favourites and I stitched it early on.
 |
| An interesting block |
At the beginning, I spent most of my time on the left side spiral and background. There was a lot of hand stitching!
 |
| Very slowly stitching things up |
I used some beautiful scraps of hand-dyed fabrics as well as sheer fabrics. I also varied my thread, although I tried to use each element a few times in the piece so that it would add consistency. This is what my final stitched piece looked like. I knew that I would have to do something with it - either add a lot of hand stitching around everything, or do some FMQ.
 |
| Finished attaching the appliqué |
Free Motion Quilting (FMQ)
As you can guess, FMQ won out! 😊It was soooo much fun 😁
 |
| FMQ finished - so how do I finish the actual piece? |
You may have noticed in some of the pictures that at the top right corner and the bottom left corner, there were small chunks of fabric missing. My original intention was to trim the fabric, but of course I waited too long and wanted to keep the whole area. I covered these holes with matching fabric and all is good!
I didn't have any more Kona "School bus" fabric for the binding so I came up with (it turned out) a great idea! I used strips of one of the sheer fabrics (it's curtain fabric) to add interest at the top of the piece. Why not ruffles at the top? I based this down and then machine stitched it so that it would stay upright. I worked in sections to make sure that I liked it before continuing.
 |
| Making ruffles for the top |
Adding ruffles was a lot of work and probably would have been too much all around the piece, so I used 1½" strips and attached these like regular binding. I am really happy with the result.😊 I thought that I was finished, but this morning I decided that it needed just a little more stitching. I added a chain stitch in a #12 perle cotton over the machine stitching of the ruffles. I also coiled up the bottom of that hanging sari yarn.
 |
| Going somewhere.... when I thought that it was finished |
Here are some of the details.
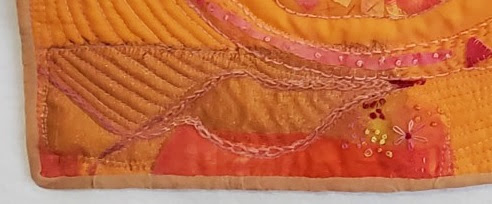 |
| Embroidery and FMQ over very shiny sheer with silk and hand-dyed cotton |
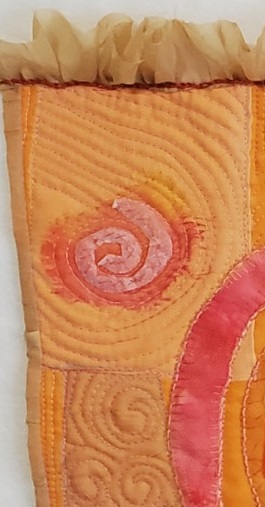 |
| Fancy tissue paper swirl over silk |
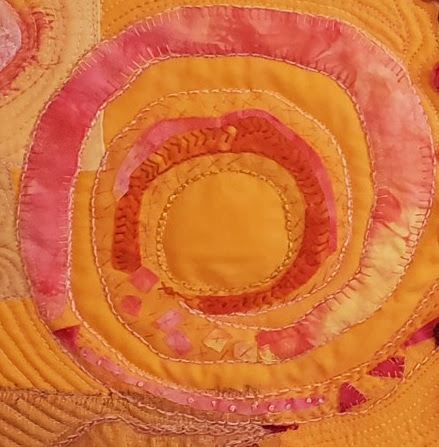 |
| Spiral with embroidered hand-dyed fabric pieces and snippets |
 |
| Sari yarn coil, appliquéd triangles and circles with embroidery |
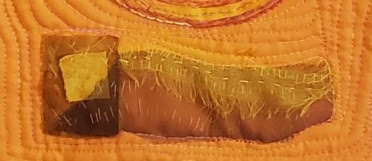 |
| Interesting block of sheer fabric (overlapped to makes it darker), silk and hand-dyed cotton square with simple embroidery |
What I learned
- There was a lot of learning in the last couple of weeks as I worked on this piece.
- The bottom, shiny sheer fabric had a very loose weave so I was glad to FMQ around and into it to add stability. My overcast appliqué stitch was shredding away.
- I worked with some beautiful printed tissue paper that came in a lovely box of chocolates. I added the spiral on the left and used it in some of the triangles. It stitched up really well. I do want to experiment more with stitching on paper.
- The circles of fabric on the smaller spiral were stitched down with blanket stitch circles. They came out very well.
- It's not always easy to figure out when to stitch fabric down before you embroider it, or just to let the embroidery stitch it down. There was only one piece, near the centre of the small spiral that I could have stitched down before I edged it with chain stitches. The chain stitch didn't catch everything, but once it was embroidered, it was easy to stitch a few sections down with thread. This didn't show, so I'm not sure that stitching it down before the embroidery was necessary.
- I loved using sheer fabric for the binding. I will do this again!
- April suggested that we use silk organza (not washed) as a stabilizer behind the piece. I usually use a very lightweight cotton but since I had some silk organza I tried it. It was really lovely to stitch on and did give it a nice stability to the piece. I'm not sure that it's better than my lightweight cotton but it's a great option.
- I curled up the other end of the sari yarn because without it, it looked too much like sperm (not the effect that I was going for) 😲
- In the end I'm happy with the sheer fabric that I added to the background. It's hard when you don't really have a plan, but I thought that the focal point would be the spirals.
- Did I change the focal point when I added the coiled sari yarn, or the darker interesting block? I may have, but I hope that since everything is connected, either physically or though colour and fabric, that it's ok.
- I did want lots of movement, which I think I was successful in doing.
- When I showed my daughter the finished piece, she suggested that I turn it around. I like it but it does change the focus. Do you have a preference? Let me know😊
Related links
- April Sproule: Sproule Studio and Instagram
Linking parties
I'll be linking up to many fun linking parties. You may want to check them out. Tips and Tutorials on the 22nd, Sew & Tell, Design Wall Monday, Midweek Makers, Needle & Thread Thursday, Put your foot down, Off The Wall Friday, Finished (or Not) Friday Can I Get A Whoop Whoop? Beauties Pageant, Peacock Party, TGIFF, Patchwork & Quilts,
Project details
| ||
|
Going somewhere....
Made based on a workshop with April Sproule
17¼" x 12½"
Materials: Kona cotton, sheer fabrics, sari yarn, hand-dyed fabrics, tissue paper, perle cotton and embroidery floss
Techniques: embroidery, FMQ, ruffles
April Sproule
Free Motion Mavericks
Gail from Quilting Gail finished her lovely "Quilt More Worry Less" hanging. If you didn't see it, you may want to check it out! She has also picked a centre block for her SAHRR quilt (Stitch at home round robin). You can see it here.
 |
| "Quilt More Worry Less" hanging by Quilting Gail |
It's now your turn 😊


