Showing posts with label Kona cotton. Show all posts

Thursday, February 22, 2024

Having Fun with Panels on Free Motion Mavericks

Hi and welcome 😊. This is week 570 of the Free Motion Mavericks linking party. I've been busy learning how to create a wall hanging with a couple of companion panels. Let's see how it's going!

Fun with Panels with Cyndi McChesney


Last week, the Common Thread Quilt Guilt (CTQG), had Cyndi McChesney as the virtual guest speaker. A few days later, there was the first of a two-part workshop on Zoom with Cyndi to teach us how to make wonderful quilts with our panels.

Here is the companion panels that I purchased for my husband a few years ago. "Healing Waters" was created by Anishinaabe/Ojibwe artist Mark Anthony Jacobson for Northcott Studios. There was an entire collection, but I just purchased these two amazing panels.

Large panels

Small companion panel


Cyndi McChesney is the author of the book, Fun with Panels. She has another book, Playful Panel Quilts, coming out in the spring. Our course was supposed to be Montages with Panels, which is what her newest book is about, but the panels that the participants had were better suited for her first method. If you're interested, check out Related links below.

When I showed my husband the panels, he absolutely loved them - but I had no idea how to begin putting everything together into a large wall hanging.

The first thing that we did in class was to talk about our panels. We were then put into groups to brainstorm what kind of traditional blocks we could use with out panels. Here were some of the questions we considered:
  • Does the panels have a theme that could translate into some traditional blocks? For example, flying geese would be great for a panel with birds. 
  • Are there visual elements in the panel that could be used for appliqué or be found in traditional blocks?
  • Are there visual elements that could be used for background or complimentary fabric, etc.?
  • Can some of the blocks be cut up and used?
As we brainstormed each of our panels, someone mentioned elongated blocks and improve. That's when I knew that I had found my answer.

Measuring, graphing and cutting 


I knew that I would be cutting up the panels to make the wall hanging. I measured each image and noted where there was extra fabric for the seam allowances and where it would be very tight to get a full image with enough of a seam allowance. 

I cut the individual images based on those measurements. For example, with the image below, I knew that I wanted to keep as much of the image intact as possible, but that the images directly above and below had extra fabric that I could cut into for a larger seam allowance.

Taking extra fabric above and below
the panel for the seam allowances

You may have noticed the masking tape at the top of this panel. I gave each image a number so that they could be easily identified when I created the graph. 

Graph of possible setting

This is my plan so far. I attended our second class this morning and got some positive feedback on my plan to date. You can see my proposed design and some improv strips between the panels.

Panels with improv strips at the top

This is what the improv strips look like between the panels.

Wonky improv strips that will be the background

More improv strips made of Kona solids

I'll be working on this project for a while. At least the improv strips can be sewn up and adjusted as required.

What I learned
  • It's been a very busy week. I didn't intend to take this class but after hearing Cyndi McChesney speak at our guild, I knew that this is what I needed to get the panel wall hanging done.
  • Cyndi is an excellent teacher and had some really great advice. I bought a Kindle version of her book - it really is wonderful and comprehensive. I'm looking forward to seeing her latest book. Her panel collages are very special.
  • I am so glad that we did some brainstorming in groups at the beginning of the class. I'm not sure that I would have thought of improv strips.
  • Between the large panels, I've decided that the improv strips will be at least 2". I think that this will be proportionate to the size of the panels.
  • The wonky improv strips are fun to make. I started off making regular improv piecing but I didn't like the joined strips showing since there is already so much going on. I will probably have to join some strips together at the top since that's the only way to avoid "y seams" but I'll be matching them as much as possible so they won't be too visible.
  • This quilt was on my list for 2024 so I'm glad that it's finally started.
  • I started a cold this week- so I've been pretty out of it the last few days. I sure won't be sewing any of this together until I can think again.
Related links
Linking parties
I'll be linking to many fun linking parties this week. Why not check one out after you've linked up below? Design Wall Monday, Sew & Tell, Midweek Makers, Put your foot down, Needle & Thread Thursday, Off The Wall Friday, Patchwork & Quilts, Oh Scrap!, 15 Minutes to Stitch 2024

Free Motion Mavericks


We had lots of quilting and blogging going on in the last week. Thanks to everyone who linked up 😊

Melva gave new life to a vintage linen runner by attaching it to a lovely batik and then quilting it. What a great way to showcase and keep using it. 

Giving a second life to a vintage linen runner

Donnalee finished an Attic Windows block quilt for her guild's charity group. She quilted it with a serpentine stitch and variegated orange thread. 

A lovely colourful quilt for someone to love!


It's now your turn!

You are invited to the Inlinkz link party!

Click here to enter

Wednesday, September 13, 2023

Update on T-shirt quilt at Free Motion Mavericks

Welcome to week 447 of Free Motion Mavericks. I've started putting together the t-shirt quilt. After doing all of the prep work, I'm finally having fun putting these t-shirts together. A couple more weeks and there'll be some free motion quilting (FMQ) happening. 😊

4 T-shirt blocks made


It's been a slow start. In May, I went through all of the t-shirts and started cutting. My May and June One Monthly Goals (OMG) were to have the t-shirts cut and the fusible interfacing ironed to the back. That didn't happen until a few days ago. 

Anna's Quilt - blocks 1 to 4 

On the weekend, I added the interfacing to all of the t-shirts. It was a long and tedious job, but I was well organised (see What I learned), so it went quite smoothly. This morning, I decided that it was the day!!!  No more procrastination. 😁

Anna's t-shirts

T-shirts getting prepped

This spring, I bought some dark teal Kona solid to use for the quilt. This morning, as I lay the t-shirts down on the fabric, I realised that it wasn't a great colour choice. I went through my Kona stash and found quite a few darker colours that would be much better suited. The Kona fabric used will depend on the t-shirt's colour. I don't have a lot of some colours, but I had enough of the dark pink for my first two blocks.

First block - a signed t-shirt and
the sleeve with the team name

Next I made the second dark pink block. This t-shirt includes the store's logo in the bottom sashing. I used a brown Kona for the next block - it matches the background in the decal.

Second and third block -
with different coloured sashing

This fourth block was interesting. I had to cut around the sleeves, so I ended up adding some fabric in the top corners. They're not the same but it looks fine. The front of the t-shirt in at the bottom and then the shoulder patches are attached next to that. I did forget to add sashing to the front piece at the bottom, so I'll have to figure that out when I attach the t-shirts together.

Fourth block includes the front,
back and sleeve patches.

With 4 t-shirts block done, I have 9 more trimmed blocks to add borders to. Most of these are very straight forward. After that, I have 10 more t-shirts that I could trim down if I need to make them fit with the others. This is where I'll have to figure out the layout of the quilt. I'll be doing these last and I can add borders/sashing as required to make things fit.

All of these will be done by the end of September, so in 17 days. That means an average of 2 blocks per day with a week or so to put everything together. When broken down, it seems quite reasonable. 😓

What I learned
  • I really don't like prepping anything, but I knew that already 😁
  • For the fusible interfacing, I bought a package of Stabili-tee from Connecting Threads. The package contains a 60" x 72" piece of fusible interfacing. This will probably be enough, although I do have some other t-shirt stabilizer from my previous projects. This product is wonderful and I highly recommend it.
  • To make the prepping of the t-shirts a little easier, I first cut all of the t-shirts and figured out what to use on the quilt.
  • After cutting a few of the t-shirts, I figured out that I might want to keep more fabric on the t-shirt and cut away any excess later. It's so hard to tell if I'll have enough t-shirts for a queen sized quilt.
  • Once the t-shirts were roughly cut with scissors, I went back with my rotary cutter and evened everything out.
  • When I started adding the fusible interfacing, I cut a couple of pieces of interfacing and then ironed them on. This proved to be rather inefficient.
  • I decided to cut all of the interfacing to roughly the size of the t-shirts and then lay the t-shirt and interfacing aside in a pile. 
  • This weekend I ironed all of the interfacing to the t-shirts in a few very sweaty sessions. Rough but finally done!
  • I've decided to use a variety of Kona solids for a 2" sashing. 
  • I'll have to decide what to do when I start piecing them together, but for now, I'm concentrating on the t-shirts that can't be trimmed further. They'll get an all-round border that can always be trimmed down. I have 9 more of those to do. 
  • After these, there are 10 more t-shirts that can be trimmed, as well as a few odd and ends. I'll prepare these as I figure out the layout.
Related links
  • Stabili-tee from Connecting Threads
  • I've made two t-shirt quilts to date. Here are the links:
  • Planning 2019 and finishing Charlotte's quilt, December 31, 2018
Linking parties


Free Motion Mavericks

Melva worked on a couple of pieces. The first one is a cover for her husband's table and was quilted with diamond grids. The second one is the beginning of a feather.

Melva's table topper quilted in a diamond grid

The back of the fabric - Melva FMQ a feather
It's now your turn!

You are invited to the Inlinkz link party!

Click here to enter

Tuesday, April 25, 2023

Rainbow Neighbourhood Houses - Blocks 2 to 4

I was falling behind on my Rainbow Neighbourhood QAL so I'm now all caught up. 

A Mauve House


The second house was finished in the middle of last week. It was easier to make the second time around. Of course the star blocks are all different, so there is a learning curve there.

The mauve house with a blue Friendship star!

For the window details, I added a hanging planter and a bird who is visiting out of his cage. Will he go back in? I found a beautiful mosaic type fabric that looks like stained glass, so that's what I used for the window in the door. I also used my fancy machine stitches to hang the planter and make a door knob.

Details of the mauve house

Here are the first two houses.

The blue house has a mauve Evening star
while the mauve house has a blue Friendship star

I placed a sky fabric between the two houses, with some green for a yard and a little tree. I'm trying out a few things to see how I'll be able to place the houses on a quilt. I would like the sashing to act as a yard between the houses. These houses have tiny yards, just like mine! 😊

An Orange House


I finished up the third, orange house. In keeping with the funky lawn, I used some fun fabric to decorate the windows, door and the yard. 

The orange house with the yellow Woven star

Details of the orange house


A Yellow House


The fourth house is yellow. I haven't added anything to the windows yet. I may wait until I get them into the final layout and find more possibilities in my stash (or... add to it with a fat quarter or two 😁).

Yellow house with an Ohio Star 

Yellow and orange houses 😍

What I learned
  • Practice definitely helped me make these houses faster. Making them two at a time helped even more!
  • So far all of the star blocks have worked out well. I also learned that I don't really like making the Ohio star 😒 I made all of the little stars the exact same way and two are smaller than the others! It was also difficult stitching them in a row with all of those seams. There will probably be some repetition of the star blocks, but it won't be that one!!!
  • I made myself a little pattern out of tracing paper for the lawn and walkway. That has been more helpful than just writing the measurements. 
  • As I mentioned, I didn't add anything to the windows of the yellow house yet. I have more fabric that I have to look at to see if I can make something different. I also don't want to over do it because I may have some other fun ideas when I put all the blocks all together. 
  • I'm glad that I didn't have many traditional lawn and garden fabrics. I've had to think outside the box by using more fun and funky green fabrics. I love them!
  • I have run out of the roof and the sky fabric. I'll be finding some alternative fabrics for these. I know that traditionally it's better to plan all of this out, but this is much more fun 😊. That's when happy accidents happen!
  • I'm making this quilt as a large throw for some friends. I think that one of the houses should look a little bit like theirs. Since they live in the country, that could make for a wonderful centre house with a little forest and lake. 
  • It's never to late to start planning the quilt, even in the middle of the project!

Related links

Linking parties
I'll be linking up to many fun linking parties. Why not check them out? Sew & Tell, Midweek Maker, Put your foot downOff The Wall FridayCan I Get A Whoop Whoop?Peacock PartyPatchwork & Quilts


Saturday, April 08, 2023

Block 1 of the Rainbow Neighbourhood QAL

Hi! I hope that you are all well 😊. The winter storm is over and it looks like Spring is finally here 🌞 Yeah!!!

Rainbow Neighbourhood QAL


I can't believe that I'm doing another QAL! I've been looking at Sandra's Rainbow Neighbourhood pattern for a while, so why not join? Who knows, I just might make a whole quilt, now that I've done the first block. Here's hoping 😁

First house - blue!

I chose my fabric for the whole quilt, which is pretty unusual for me. They are mostly Alison Glass fabrics that I bought a few years ago. I'm using the ones with the white drawings over the various colours - her Sun Print collection.

Mostly Alisson Glass fabrics

I must say that I love these huge blocks! It was a little scary cutting up the fabrics for the roofs and sky - I don't think that I'll have enough of these, but I'm sure that I'll be able to find others. I'm really going to try to make the whole quilt from my stash. We'll see how that goes!

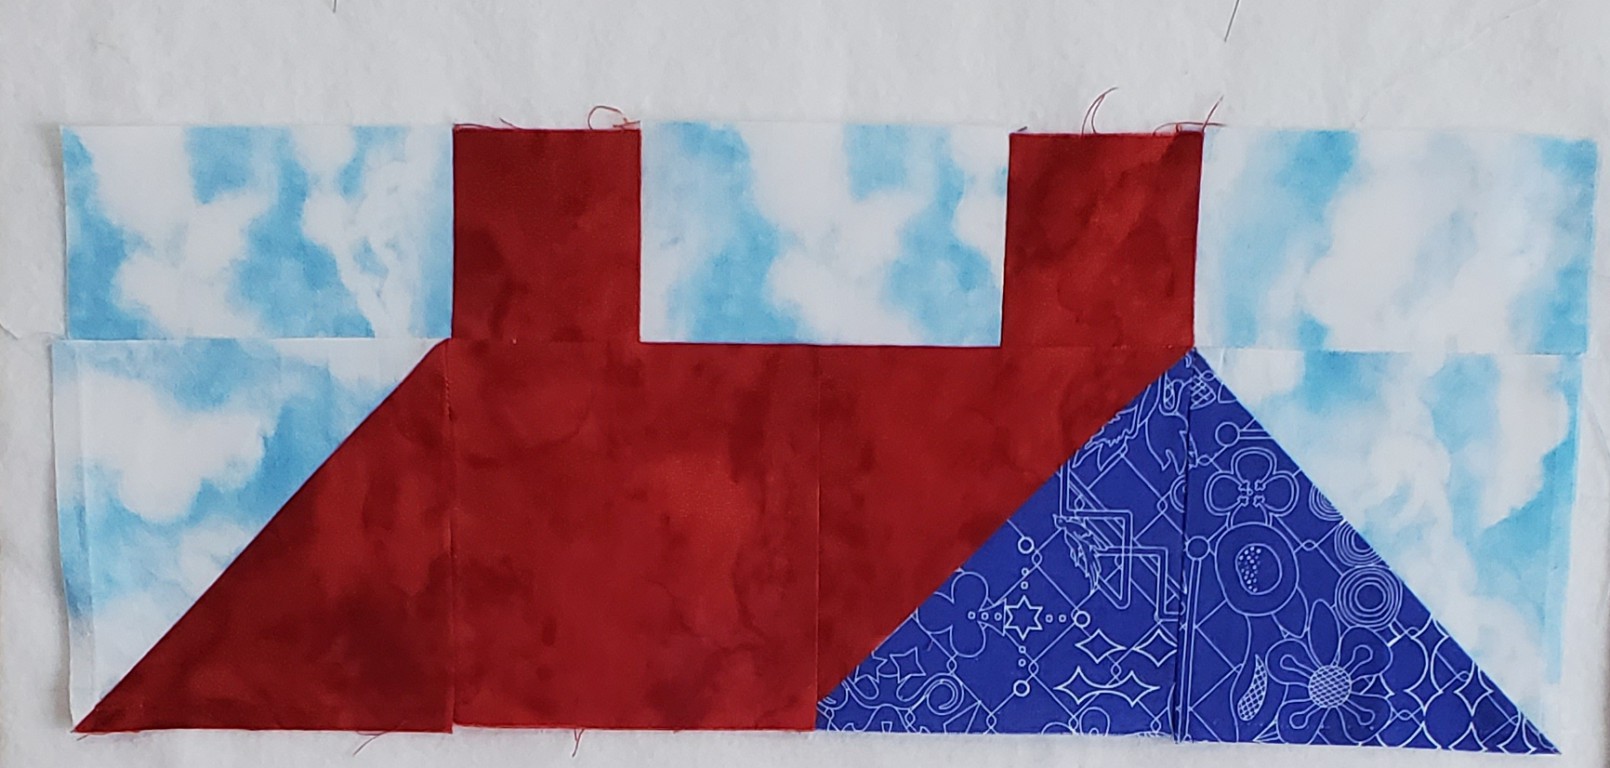
This is the finished roof section

This was my first attempt at putting the roof together....oops!

If I'm going to make this whole quilt, I have to find ways to amuse myself, so I've decided to have fun with the windows and the grass. I'll be using hand-dyed fabric for all of the doors and windows. I also want to add something in each window - probably something whimsical like these.

Going for a whimsical feel 😍

For the grass in front of each house, I'm going for an interesting lawn or garden. For the first block I've added some garden fabric and a path leading up to the door.

Each house will have it's own grass or garden in front.

What I learned
  • I'm really not used to quilting this big. The whole house block is 16½" square! For me, that's huge!!!
  • I mentioned in my last SAHRR post that working with larger blocks seems to be easier....and many of you agreed with me. Well I now have the proof! This could be the beginning of a new era for me, as far as traditional quilting goes.
  • I've decided to use a matching Kona cotton for the star blocks. I'd be very surprised if I don't have something that will match all of the house fabrics.
  • You probably saw my one big oops moment above. Next time I need to look at the block before I stitch two parts together! I was so concerned about accuracy that I didn't notice that they were in the wrong place....but my seams were accurate 😁😂!
  • It took me most of the day yesterday to make one block! I'm hoping that each block will be faster to make. 
  • To help me along, I originally cut 2 of the sky and roof pieces. After I finished the first house yesterday, I took the time to cut out the pieces for the second house. It will be sort of the reverse of this first house, so the house will be plum and the star will be blue. I wrote myself a lot of notes so that I'll be able to, hopefully, whip it up, and prepare a couple more blocks next week.
  • I'm thinking of making a variation of Sandra's larger quilt, but with yards or fences between the houses. At this time the plan is to make as many houses as I can, and then figure out how to put them together.
Sandra's twin size quilt - isn't it gorgeous?

Related links

Linking parties


Thursday, January 26, 2023

Going somewhere is Finished on Free Motion Mavericks

Welcome to week 417 of Free Motion Mavericks! I hope that you've had a chance to play since I last posted. When I began this piece, I had no idea that it would end up being free motion quilted (FMQ). I think that the FMQ added a lot to it. I'll let you judge this for yourself.

"Going somewhere..."


This piece began, as many of them do, with a workshop on TextileArtists.org. I haven't had time to do as many workshops as I would like, but this one grabbed my attention. It took me a while to start, but once I did, I couldn't leave it! 😊

Going somewhere... original orientation

Going somewhere... is upside down better?

It all started with a fat quarter of Kona "School Bus" and some lovely hand-dyed orange-pink fabrics by Elaine Quehl. I also took out my stash of translucent fabric scraps. The workshop, Stitching in the Round, was created by April Sproule. She provided a template of a spiral, but of course, I had to make my own! 😁 

Following April Sproule's Further Development video, I created my own template of two connected spirals. To work, the spirals needed obvious negative and positive spaces. I coloured in the negative space and added a couple of extra starting and finishing points to create some interest and clear paths to follow. 

Creating my own spiral template

I transferred the template to my fabric and started playing. I asked April how she decided where to put the extra fabrics onto her background. She mentioned focal point and colour, but since I was just starting, I wasn't sure what I was doing, so I just added different sheer fabrics in 5 areas, mostly below and to the side, but with one stripe in the middle. Connecting some of that background fabric with the spiral creates unity, so that's what I did on the left side. I had lots of empty space under the smaller spiral, so just create an interesting block underneath it. 

Starting to put it together.


That interesting block is one of my favourites and I stitched it early on.

An interesting block

At the beginning, I spent most of my time on the left side spiral and background. There was a lot of hand stitching! 

Very slowly stitching things up

I used some beautiful scraps of hand-dyed fabrics as well as sheer fabrics. I also varied my thread, although I tried to use each element a few times in the piece so that it would add consistency. This is what my final stitched piece looked like. I knew that I would have to do something with it - either add a lot of hand stitching around everything, or do some FMQ.

Finished attaching the appliqué

Free Motion Quilting (FMQ)


As  you can guess, FMQ won out! 😊It was soooo much fun 😁

FMQ finished - so how do I finish the actual piece?

You may have noticed in some of the pictures that at the top right corner and the bottom left corner, there were small chunks of fabric missing. My original intention was to trim the fabric, but of course I waited too long and wanted to keep the whole area. I covered these holes with matching fabric and all is good!

I didn't have any more Kona "School bus" fabric for the binding so I came up with (it turned out) a great idea! I used strips of one of the sheer fabrics (it's curtain fabric) to add interest at the top of the piece. Why not ruffles at the top? I based this down and then machine stitched it so that it would stay upright. I worked in sections to make sure that I liked it before continuing.

Making ruffles for the top

Adding ruffles was a lot of work and probably would have been too much all around the piece, so I used 1½" strips and attached these like regular binding. I am really happy with the result.😊 I thought that I was finished, but this morning I decided that it needed just a little more stitching. I added a chain stitch in a #12 perle cotton over the machine stitching of the ruffles. I also coiled up the bottom of that hanging sari yarn. 

Going somewhere.... when I thought that it was finished

Here are some of the details.

Embroidery and FMQ over very shiny sheer
with silk and hand-dyed cotton

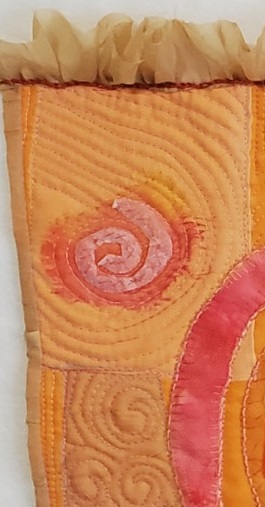
Fancy tissue paper swirl
over silk


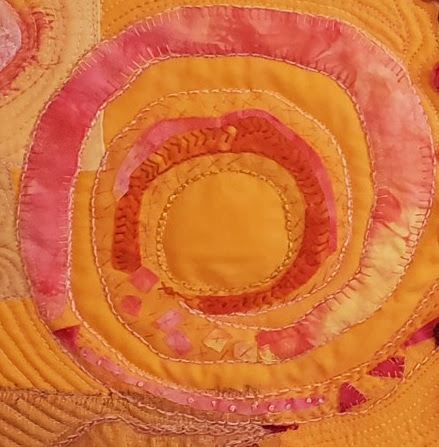
Spiral with embroidered hand-dyed
fabric pieces and snippets


Sari yarn coil, appliquéd triangles and circles
 with embroidery

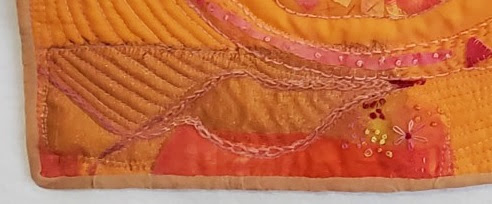
Interesting block of sheer fabric (overlapped to makes it darker),
silk and hand-dyed cotton square with simple embroidery


What I learned
  • There was a lot of learning in the last couple of weeks as I worked on this piece.
  • The bottom, shiny sheer fabric had a very loose weave so I was glad to FMQ around and into it to add stability. My overcast appliqué stitch was shredding away.
  • I worked with some beautiful printed tissue paper that came in a lovely box of chocolates. I added the spiral on the left and used it in some of the triangles. It stitched up really well. I do want to experiment more with stitching on paper.
  • The circles of fabric on the smaller spiral were stitched down with blanket stitch circles. They came out very well.
  • It's not always easy to figure out when to stitch fabric down before you embroider it, or just to let the embroidery stitch it down. There was only one piece, near the centre of the small spiral that I could have stitched down before I edged it with chain stitches. The chain stitch didn't catch everything, but once it was embroidered, it was easy to stitch a few sections down with thread. This didn't show, so I'm not sure that stitching it down before the embroidery was necessary. 
  • I loved using sheer fabric for the binding. I will do this again!
  • April suggested that we use silk organza (not washed) as a stabilizer behind the piece. I usually use a very lightweight cotton but since I had some silk organza I tried it. It was really lovely to stitch on and did give it a nice stability to the piece. I'm not sure that it's better than my lightweight cotton but it's a great option.
  • I curled up the other end of the sari yarn because without it, it looked too much like sperm (not the effect that I was going for) 😲
  • In the end I'm happy with the sheer fabric that I added to the background. It's hard when you don't really have a plan, but I thought that the focal point would be the spirals.
  • Did I change the focal point when I added the coiled sari yarn, or the darker interesting block? I may have, but I hope that since everything is connected, either physically or though colour and fabric, that it's ok. 
  • I did want lots of movement, which I think I was successful in doing.
  • When I showed my daughter the finished piece, she suggested that I turn it around. I like it but it does change the focus. Do you have a preference? Let me know😊
Related links
Linking parties

Project details


Going somewhere....
Made based on a workshop with April Sproule
17¼" x 12½"
Materials: Kona cotton, sheer fabrics, sari yarn, hand-dyed fabrics, tissue paper, perle cotton and embroidery floss
Techniques: embroidery, FMQ, ruffles 
April Sproule


Free Motion Mavericks


Gail from Quilting Gail finished her lovely "Quilt More Worry Less" hanging. If you didn't see it, you may want to check it out! She has also picked a centre block for her SAHRR quilt (Stitch at home round robin). You can see it here.  

"Quilt More Worry Less" hanging by Quilting Gail

It's now your turn 😊

You are invited to the Inlinkz link party!

Click here to enter