Showing posts with label art. Show all posts

Wednesday, November 29, 2023

Diversions on Free Motion Mavericks

Welcome to week 458 of Free Motion Mavericks. While travelling, we were able to go to the McMichael Canadian Art Collection. It's one of my favourite art galleries, located in a beautiful wooded area in the northern part of Toronto. I have a few photos to share as well as some lovely photos taken at the Toronto Zoo, which was open and not busy - my kind of place!

McMichael Canadian Art Collection


We took a tour of their latest exhibition, Conversations. It was very interesting. My daughter took photos of the David Milne (1882-1953) art for me. I love his winter landscapes and one day I want to explore making something like them with textile. I'm sorry that I don't have the correct titles for you.

A winter landscape by David Milne

Another winter landscape by David Milne   

A cabin in winter by David Milne

There was also an exhibition on Cobalt, Ontario. Yvonne McKague Housser (1897-1996) is an artist who painted quite a few pieces of Cobalt in the 1930s. Some of her paintings were of the French Canadian settlement in Cobalt, where my grandparents probably lived. 

Every time I go to the National Gallery of Canada in Ottawa, I visit another of her Cobalt paintings.

Summer scene of Cobalt Ontario by Yvonne McKague Housser
\
Winter scene of Cobalt Ontario by Yvonne McKague Housser

Toronto Zoo


My daughter took a few fun pictures at the zoo. 

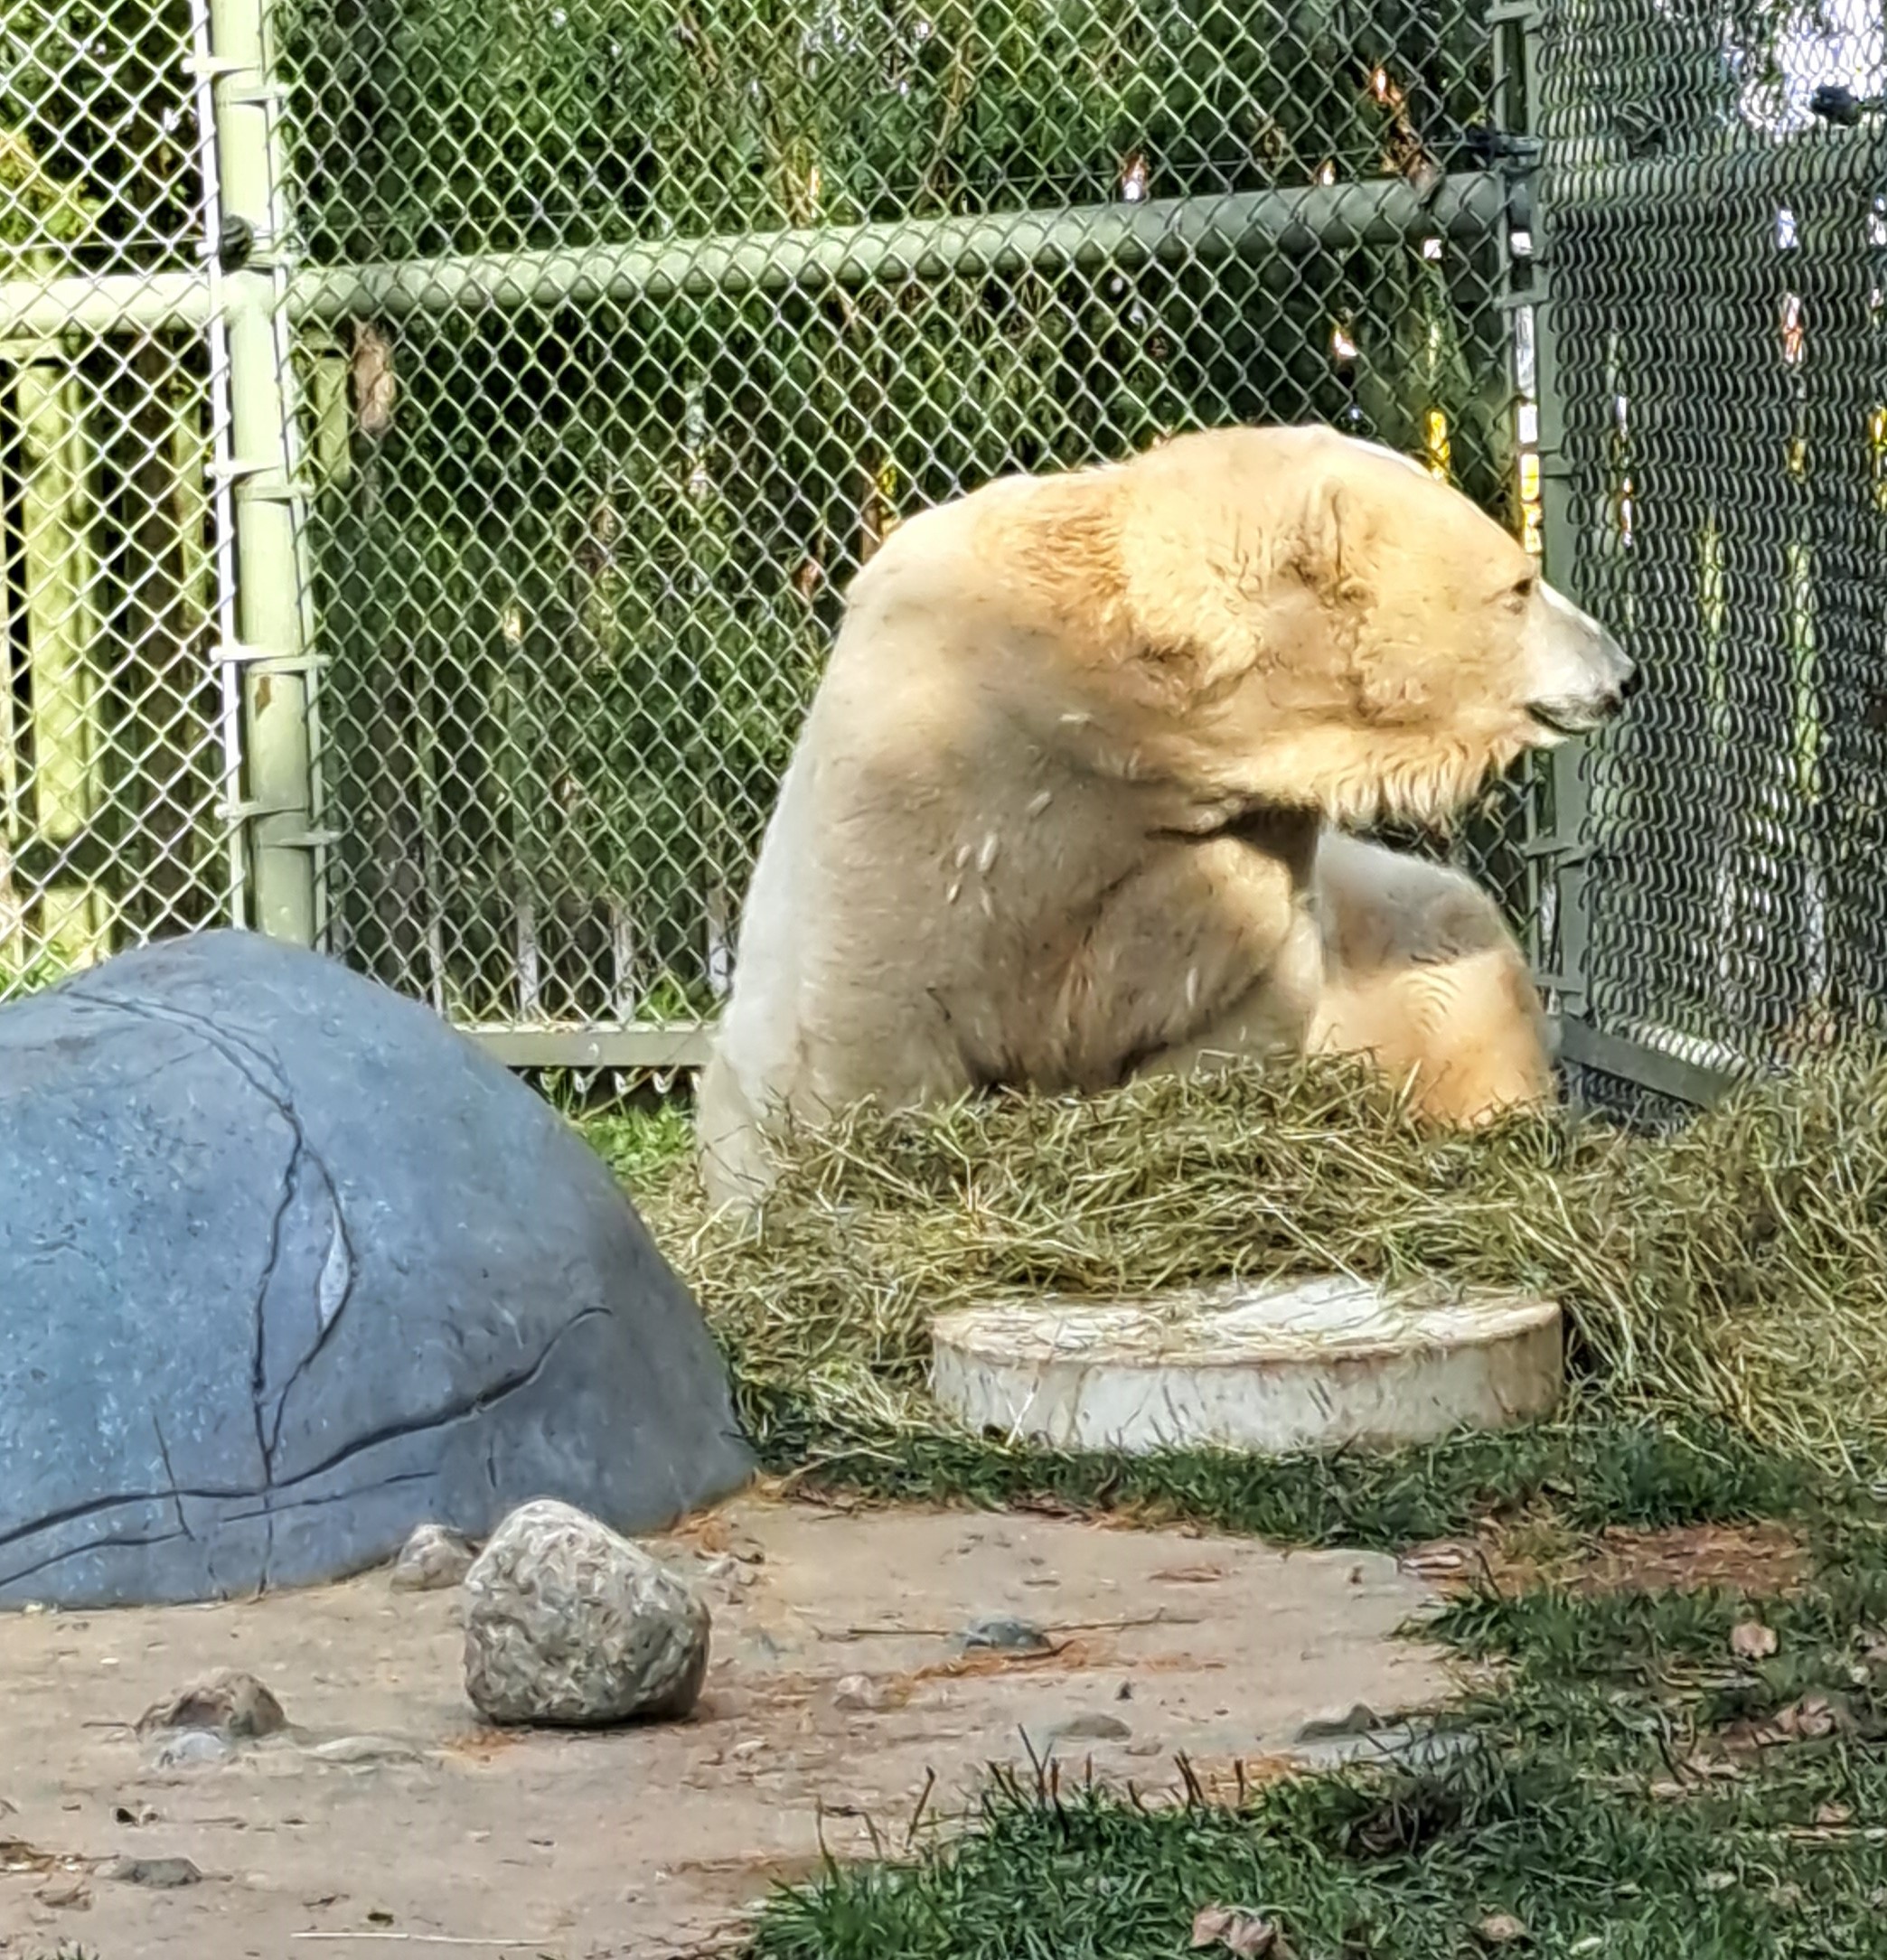
Polar bear, in need of a good bath!

Polar Bear chilling in her space

Apparently the Komodo dragon had been zooming around before we got there - you can see the tracks all around him. He was resting while we visited!

Komodo dragon at the Toronto Zoo

There were two golden lion tamarins. A plush version of this little guy came home with us 😊


Golden lion tamarin at the Toronto Zoo

We just had to take a picture of this goat in his play area! 

Goat posing for us at the Toronto Zoo

One Monthly Goal

My December's One Monthly Goal is to finish up my niece's t-shirt quilt. Hopefully I'll get back on track very soon! 😎 

My niece's t-shirt quilt is my December OMG


What I learned
  • I am so happy that we got to visit both the McMichael Canadian Art Collection and the Toronto Zoo. We were able to take our time and visit at our own pace in both these amazing spaces. The volunteers were wonderful.
  • Art and animals - they always make me happy 😊 
  • After these visits, it was good to spend the rest of the week resting and recuperating. 
  • My husband, daughter and son were amazing. Thanks!
  • I want to thank all of the doctors, nurses and staff at the Princess Margaret Hospital for their amazing care.
  • I'm so looking forward to going home at the end of the week. With any luck, I'll be able to resume my art work soon!
Related links
Linking parties
I'll be linking up to many fun linking parties. Why not check them out after you link up below? Put Your Foot Down, Patchwork & Quilts, Peacock Party

Free Motion Mavericks


Gail of Quilting Gail has created many wonderful projects using Island Batiks' Wild Blooms fabric line. Nova was in McCall's May/June issue while the Stepping Out quilts were made using two different backgrounds fabrics. Check out the FMQ on these lovelies!

Nova quilt in McCall's Quilting
   
Stepping Out in a light background

Stepping Out in a dark background

It's now your turn!

You are invited to the Inlinkz link party!

Click here to enter

Sunday, April 11, 2021

Week 2 of #AtoZchallenge2021Quilt (Art)

I've managed to stay organised and on time for week 2 of the #AtoZchallenge2021Quilt (Art). My next challenge is to do the same for week 3 😊 I want to say thank you to Frédérique for hosting this wonderful challenge.💝 If you didn't catch my posts on Instagram or through Frédérique's daily linking parties, here is the recap with bonus material.

D is for Dyeing fabric and thread

The first image is of all the perle cotton (#8 and #12) that I dyed in the last year. The very bright pink (there are technically 2 different shades but I can't really tell them apart), was dyed last July. You can access the posts in Related links below.  

The gray was done a month later while the other colours were dyed in two different batches in February of this year, but I haven't posted about those yet.

Perle Cotton dyed in the last year

The purple cotton was also dyed in February. There was no fancy tying, just rolling it up and tying where I could with hair ties. I just love the effect. Of course I have to idea what I'll be doing with it, but I'm sure that it will be perfect for a project one day!

Lovely purple dyed fabric

In the second batch of dying that I did in February, I dyed a white bamboo fitted sheet for my daughter. If this doesn't make for happy dreams, I don't know what will!

Bamboo fitted sheet for great dreams

E is for Embroidery Stitches

These are my three favourite meditation blocks on the Traveller’s Blanket (so far). There is a house, seascape, a rose block and lots of different embroidery stitches. The embroidery included blanket stitch, cording, cross stitch, French knots, back stitch, chain stitch, stem stitch, satin stitch and fly stitch. 

For the house block, I appliquéd the house onto some hand-dyed fabric. I had a lot of fun embroidering the block itself and then around it on the blanket. I forgot to add the Palestrina stitch on my list of stitches. It's the outside border stitch that looks like lace. It's time consuming but super easy to do. 

The house block - love the Palestrina stitch

This one is called the Shining rose block. Once upon a time I had stitched a rose on a napkin, but obviously never got around to making the whole set. At some point, I dyed the napkin and then cut it up to make this meditation block. I added shiny ribbon that I save up when I buy things and used metallic floss.

The Shining Rose block surrounded by chain stitch

I made this block after making the seashell container (see G for Grommet below). I used dyed cheese cloth over a piece of dyed cloth. I added the seashells and lots of stitching. The seashells come from a necklace that I purchased on a trip. That's how I get a lot of my lovely beads, stones and shells!

The seascape block with variations of the fly stitch

F is for Free Motion Quilting (FMQ)

The piece is Lone Tree 2: Tired or Overachiever?  It was part of the Colour Unboxed Exhibition with the Out Of The Box fibre artists group (OOTB). I learned a lot when making this piece, especially about the importance of value in design.

Lone Tree 2: Tired or Overachiever?
It features tons of free motion quilting

G is for Grommet

The piece is a Seashell Container made during a workshop with Debbie Lyddon through the TextileArtist.org's Stitch Club. It was the first time that I hand-stitched a grommet. 

Seashell Container with hand-stitched grommets

Inside the Seashell Container
Front of Seashell Container

H is for Hexies

This piece is Sweet Memories: Northern Lights It was the first time that I did English Paper Piecing (EPP) and it was love at first try! It's also about the night that I was speaking on the phone to my mother, who was about 600 km (350 miles) away. I was looking out the north facing window and saw the Northern Lights. I told my mother this and she went to her office window and we watched them together. It was indeed a sweet memory. 

Sweet Memories: Northern Lights
featuring English Paper Pieced hexies

I is for Improv Piecing

The piece is Exit Strategy 1. It’s all about trying out new techniques on a foundation of improv pieced batik fabric.

Exit Strategy - made on an improv pieced background

I learned many techniques while making Exit Strategy and it took me over a year to finish. If you want to read about it, see the link to the Exit Strategy page in Related links.

What I learned

  • I have finally mastered the art of copying and pasting my information and adding one or two images in Instagram. You see, practice does help 😊 I've also gotten much better at linking my Instagram post to Frédérique's linking party. Yeah me!!!
  • I haven't mastered the art of getting up early to post though. Let's face it, it doesn't really matter what time I post as long as it's within the day. One night I couldn't sleep and it was posted at 4 am. Hopefully that won't happen again!
  • My secret to participating is being organised. It was easy to write the post for week 1 since it was only three days. This post took me much longer. However, since I included all of the blog posts in my working document, it did make it easier.
  • I'm now going to start getting ready for week 3. Although I have my words figured out, it will start getting more difficult to find examples of work that I haven't previously used.
Related links

Linking parties
I will be linking up to Frédérique's Patchwork & Quilts as well as Free Motion Mavericks with Muv (I'll be hosting on Thursday). Slow Sunday Stitching, Oh Scrap!, Can I Get A Whoop Whoop?, Peacock Party, Off The Wall Friday, Monday Making, Design Wall Monday


Saturday, April 03, 2021

Week 1 of #AtoZchallenge2021Quilt (Art)

The #AtoZchallenge2021Quilt started April 1 and I posted my first three letters on Instagram. If you didn't catch them, here is a recap.

A is for Art appliqué 

The piece is A White History of Art and the image that I used to illustrate Art Appliqué is the close-up of the representation of The White Girl by Whistler.

It was created for Art with Fabric Blog Hop, Fall 2018. It is based on a BBC series called History of Art in Three Colours. This piece is an interpretation of the White episode and the picture below portrays  The White Girl by Whistler.

Representation of a Symphony in White, No. 1:
The White Girl by Whistler

Here is an image of the entire piece. If you're interested in reading more about it, see Related links below.

A White History of Art

B is for Batik

The piece is called Peek-a-boo Red. It's totally hand-stitched with embroidery and beading. Peeking out from behind the curtain, you can see the batik hexies.

It's one of four mini art quilts that I create for the Summer Fibrations Art Show by the Out of the Box (OOTB) Artists Group which was held at the Mississippi Valley Textile Museum in Almonte Ontario in June - July 2019.

Peek-a-boo Red with Batik Hexies peeking out from the curtain

C is for Couching and Cording

The piece is called BIG Mandala to Help Heal the World. It was created for the Project Quilting Quarantine 2020. I made my own cording and then couched it down between the different parts of the Mandala. 

Hand-made cording that is couched down

BIG Mandala to help heal the world - PQQ 2020


What I learned

  • I am very impressed that I was really organised and ready to post all of these without too much effort. 
  • I don't generally like to post on Instagram because I have to write all of the information, including # tags on my phone. It's a really pain. It's not perfected yet but I wrote all three posts in a Word document and copied the wording for all three in an email. I was then able to go back to the email, copy the text and post it in Instagram.
  • I'm actually getting better on my phone, switching from one window to the other....that always made me nervous but I'm better at it now.
  • Posting from Instagram to the #AtoZchallenge2021Quilt linking party with Frédérique at Quilting, Patchwork, Appliqué using my phone was more of a challenge. I don't think that the problem is with InLinkz (who were very helpful) but with Instagram. Even now I'm wouldn't know that it was linked if not for going on the computer to check. 
  • It's definitely a learning process and I expect to be an expert by the end of April 😊 
  • I'm really glad that it's a really long weekend so that I'll have time to prepare for next week, and maybe even more!

Related links

Linking parties
I will be linking up to lots of fun linking parties. Be sure to check them out if you get a chance! Patchwork & QuiltsPut Your Foot DownOff the Wall FridaysCan I Get A Whoop Whoop?Peacock Party, Oh Scrap!, Monday Making, Design Wall Monday


Monday, June 08, 2020

More hand-stitching fun

As you may  have read previously, I've been doing a lot of slower stitching - hand stitching, mediation stitching, embroidery and other fun stuff. I'm having a blast and learning so much.

Making a seashell container


I've enrolled in the TextileArtist.org Stitch Club. It's essentially the same concept as their original Stitch Challenge, but for a fee. After all that they have given to the stitching community this spring, I wanted to keep playing and learning as well as support their great initiative.

The first artist, at the end of May, was Debbie Lyddon. She makes very cool textile art. Since she lives near the sea, a lot of her imagery and techniques come from there. For example, she adds grommets to a lot of her work. These are hand done and are used a lot in sailing boats. Our assignment was to make three containers to hold something special to us or our environment.

I'm going to start with the second container that I made since it's much more like the work that Debbie showed us how to make.

Embroidered sea shell container
Hand-stitched seashell container 

I started by painting the fabric, a white on white cotton that came out really well. For this second container, I learned from the Q & A sessions at the end of the week that Debbie dilutes her acrylic paint quite a bit. I hadn't done that for the first piece and so the fabric was very stiff and a little difficult to sew by hand. The darker blue fabric pieces that have Sea and Shells written on them (with markers) are from the first batch of fabric. I could never have embroidered the words on there 😊

Seashell container with lots of embroidery
Other side of the seashell container

I embroidered the bag before I stitched it together. I love using the feather stitch when I don't have to be accurate and follow a line. This stitch is perfect for making sea weeds.

On this side, you can see that the grommets are smaller. I actually used half of a twist tie to make each of them. On the back of the fabric, I drew the circle around the twist tie. I then cut into the hole, leaving most of the fabric there and stitched very densely around the tie. I used a buttonhole wheel stitch to  highlight the grommets. Inside of the small grommets, I stitched a small piece of netting - the stuff that comes from a bag of potatoes.  
stitching on the inside the bag
One the inside with the cheese
 cloth covering the grommets

On the inside of the bag, with the
netting over the small grommets


For the side of the bag with the large grommets (top image), I used a whole twist tie for each grommet. I did it the same way as the small ones but removed some of the excess fabric from the middle. I then put a layer of blue hand-dyed cheese cloth over the holes - one dark and the other lighter blue.


Open bag with seashells
A peak inside!

For the top of the container, I stitched down a long piece of wire (that I use for hanging frames). I had about ½" of fabric on the inside so I added a row of stem stitching right under the stitching for the wire and then about a ¼" from there, a row of chain stitch keeps the seam down on the inside.

A container to display an arrowhead 


container displaying an arrow head
This container is used to display
rather than contain

This was the first container that I made. It was much more complicated than my second one since I wanted to use it to display rather than contain the arrowhead within it.

The prototype for the bottom of the container

I started by painting the fabrics and then made a prototype for the bottom of the container. Since it worked out, I ended up painting it instead of making another one. After that, I sewed three different fabrics together, the brown, green and blue and then stitched them into a tube. My fabric was stiff but not stiff enough to hold the arrowhead, so I inserted a roll of toilet paper inside to strengthen it.

container displaying the arrowhead
Displaying the arrowhead on a shelf

The arrowhead comes from Northern Ontario. I found it near the swamp at the cottage where I spent all of my summers when growing up. This was probably part of the hunting territory of my husband's community. I only realised this as I was making this display container. On the outside, I used markers to draw the tree with deep roots, and birds. Around the top, I stitched on some beads and feather charms in the four directions.

Inside the container I added a stone from the area as well as cedar, sweet grass and sage. These are not the traditional things that you would put inside a pouch but I didn't have any tobacco. I made this container for my children, who are also part of this community.  

What I learned
  • I am really enjoying learning about all of these techniques, but more importantly, I love expanding my knowledge and appreciation of textile art. Some of it can be pretty out there - and I may not be quite there yet, but I'm loving the journey.
  • The art that the other participants are making is sometimes quite intimidating. However, I'm not letting myself be too hard on my work - I haven't been doing this for very long and we all have our paths to work on. I make sure to save many of the work that I would like to learn from. Sometimes it's just a little detail that I might never have thought about but that's how we expand as artists and makers.
  • I used Perle Cotton size 8 for all of the stitching in these projects. I hadn't used it much previously and really love it.
  • The arrowhead container was quite difficult to make because I had no idea what I was doing!😊 I'm really happy with the way both of them came out.
Related links
Linking parties
I'll be linking up to many fun linking parties. I hope that you'll join me to see what else is going on out there! Monday Making, What I Made Monday, Design Wall MondayColour & Inspiration TuesdayMidweek MakersNeedle & Thread Thursday Off the Wall Friday, Friday Foto Fun, Beauties Pageant, Oh Scrap!, Favorite Finish - June 2020 

Sunday, February 24, 2019

Travel, Art and a DrEAMi!

This week I traveled to Montreal by train to see some great art, eat wonderful food and spend some quality time with my daughter.

Kent Monkman
Shame and Prejudice
A Story of Resilience

On Thursday, we saw Kent Monkman's exhibit, Shame and Prejudice - A Story of Resilience, at the McCord Museum. Kent Monkman is an amazing First Nation artist and storyteller. His work is funny, sad, colourful, provocative and socially relevant. I went through the exhibit twice - first by myself and then with my daughter, who answered my questions. It was great to be able to discuss this exhibit with her. If you're interested, check out Kent Monkman and the exhibit in the Related links below.

Montreal Museum of Fine Arts

Wire Mobile by
Alexander Calder
The next day we spent several hours at the Montreal Museum of Fine Arts. I've been there before to see special exhibits, but this was the first time that I took the time to go through the rest of the museum. 

The special exhibit was on Alexander Calder: Radical Inventor. Alexander Calder was an American artist who had a degree in mechanical engineering. He went to Paris during the 1920's and hung out with all of the artists, writers and musicians of the time. 
Calder metal mobile with a blue wooden background
A fun and colourful fish mobile
made of wire and glass by Calder


Silkscreen printed fabric by Alexander Calder (1949)

He was very versatile and worked with all kinds of materials, especially metal. He is well know for his circus pieces as well as the creator of mobiles

Calder even made jewelry and designed fabric. This is one of two silkscreen printed fabrics that he designed in 1949. The motif reflects his mobiles as well as the shapes that he used in his work. 

Isn't that fabric wonderful? It looks like a retro pattern from the 60s! His work may not seem like a big deal today, but he was a man ahead of his time.


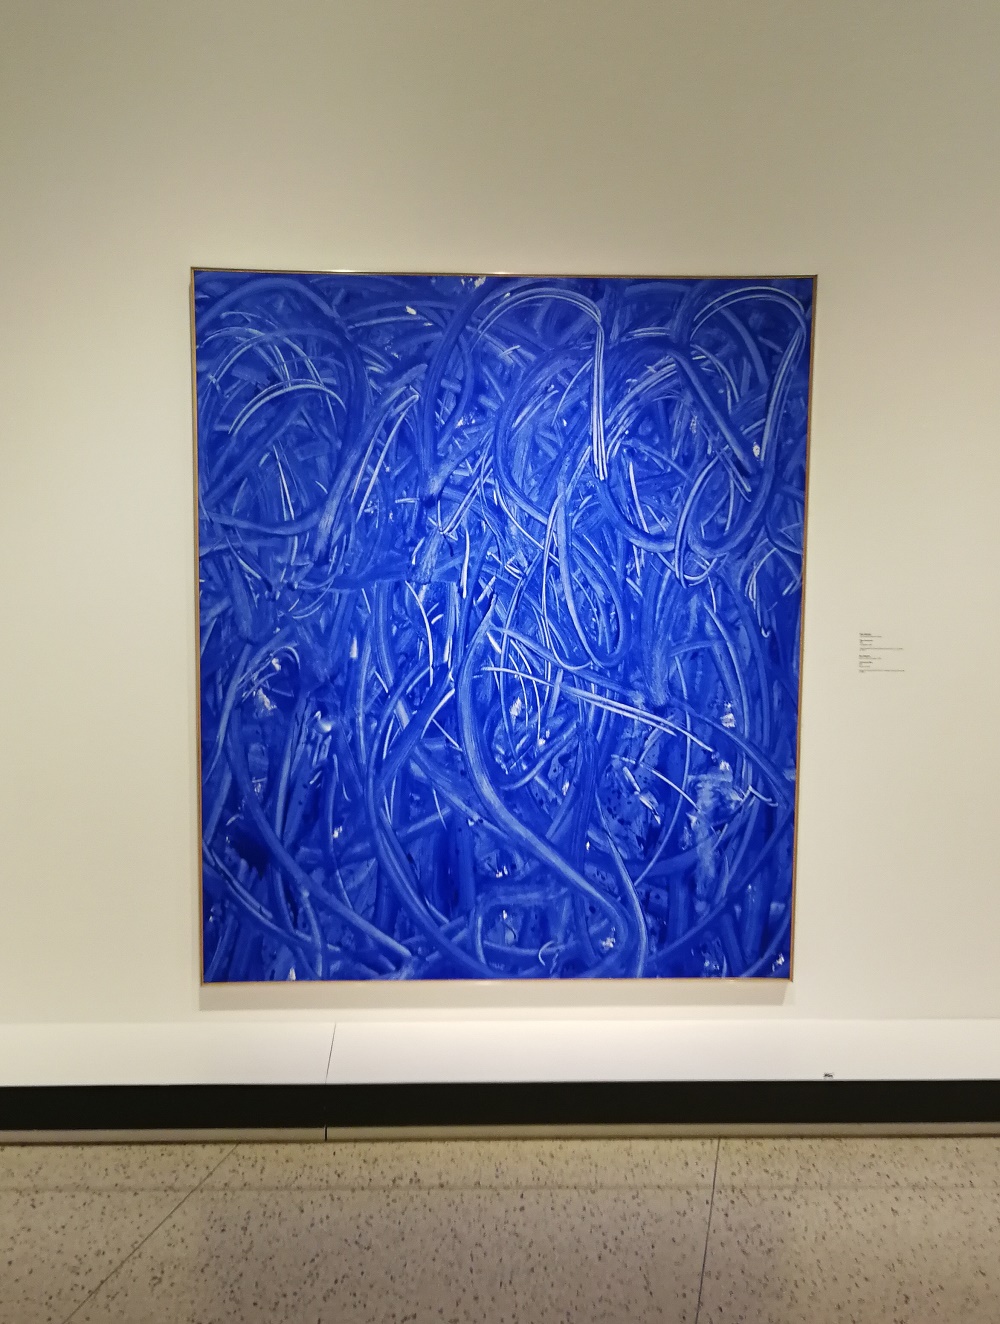
Ultramarine Blue by Ron Martin

Ultramarine Blue at the
Montreal Museum of Fine Arts
There was some very cool art but the piece that intrigued me the most was Ultramarine Blue by Ron Martin. Ron Martin in a Canadian artist living in Toronto. This piece, acrylic on canvas, was created in 1971. He explored working with one colour for ten years, from 1971 to 1981.  It started with Ultramarine blue and bright red and then he spent many years working with black.

Although I'm not often attracted to monochromatic pieces, I just love the variations of the blue as well as the mouvement. It makes me feel happy and free. As usual with art that I like, I started wondering if I could use textile to create the same kind of effects.
Ultramarine Blue by Ron Martin
My Blue Painting

I started by trying to create these lines of mouvement  with thread. I used darker thread to make lines and swirls for the background. I created many parallel lines to get the impression of brush strokes.  
Creating the background mouvement using dark blue thread
I added lines of lighter thread but it became obvious that using parallel lines of thread just isn't the same since the brush strokes are full of paint, not empty. So now what?
Adding  lighter blue thread
I went to my stash and made wider brush strokes using bits of tulle and gauze. Again, I started with the darker background and then added the lighter fabric. I think that it's starting to look more like brush strokes. Unfortunately this is as far as I can go since I only had a little bit of light blue tulle. 
My Blue Painting so far
What I learned
  • I love looking at art, but it's becoming clear to me that I'm always looking at it through my own textile lens. 
  • For example, I liked the Alexander Calder exhibit but all I wanted to do was add bits of streaming fibres on those lovely mobiles. 
  • It was great learning more about Ron Martin - turns out my daughter knew who he was! It's funny but as I looked at some of his work, there is definitely a textile vibe there, even if he works with paint.
  • My Blue Painting is my DrEAMi! project this month - as in DRop Everything And Make It!, the linky party hosted by Sandra at mmm! Quilts. I've missed the last couple of link-ups, so I'm glad that I'm on time for this one :-)
  • This week, between the Funky Square Flower Mola and My Blue Painting, I have two more WIPs to finish! I think that UFOs and WIPs are much easier to make than finishes 😊
Related links
Linking parties
I will be linking up to DrEAMi!, with Sandra at mmm! Quilts and Free Motion Mavericks with Muv.  Don't forget to check the out as well as these other fun link-ups. Monday Making, Design Wall MondayMoving it Forward, What I Made Monday, Wandering Camera, Tuesday Colour Linky Party, Midweek Makers, Off the Wall Friday, Finished or Not Friday, Friday Foto Fun, Can I Get A Whoop Whoop?