Showing posts with label bookbinding. Show all posts

Thursday, March 23, 2023

Making Journals on Free Motion Mavericks

Welcome! I can't believe that it's already time for Free Motion Mavericks! I doesn't help that I posted a day late last week. This week I'm on time but no FMQ (free motion quilting) to share. 

Upcycled Traveller's Journal 


This week there is an exciting free event going on - Sketchbook Revival 2023. There are loads for really cool teachers presenting various things related to art, sketchbooks, colour and creativity. Before the week began, Ali Manning of Vintage Page Designs and the Handmade Book Club (of which I'm a member!) showed us how to use an old book binding to make a traveller's journal with separate journals that can be added or removed from the cover. It's so cool!

I used an rescued book cover whose book was falling apart. It's not the prettiest book cover (9¼ " x 6") but perfect for learning how to make this journal. I glued a piece of cloth over the spine area. Since the inside of the book cover wasn't pretty, I added a pretty piece of craft paper to the front and back. 

Book cover and first journal

I prepared 4 journal to fit into the cover. Each journal has craft paper as a cover. 

First and second journals

Each journal is stitched and then attached to the book cover using stretch lace elastic. 

Each journal can be removed from the book

Washi Tape Journal


The bonus course from Ali is a fun washi tape journal.

Washi tape journal
This small journal (5¾ " x 4½ ") was super simple and quick to make. It consisted of 2 signatures of 10 photocopy pages each, folded in half to make 20 pages.

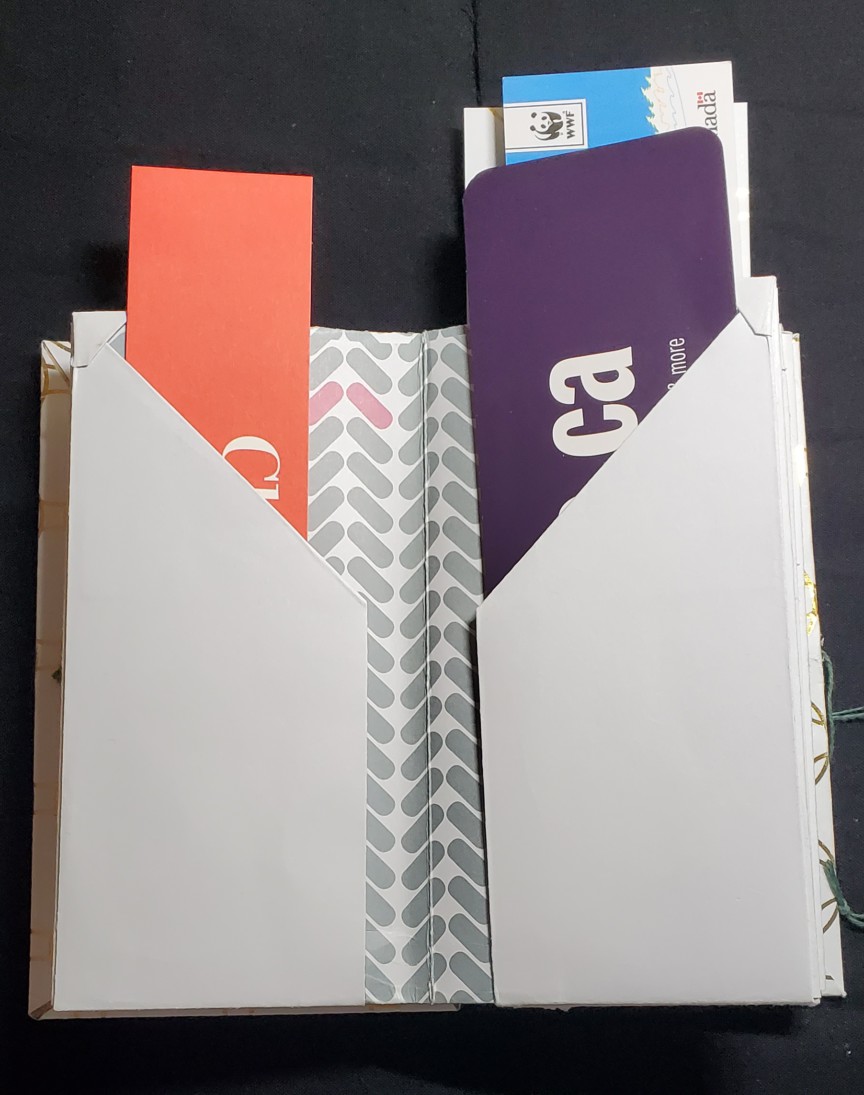
Two covers are made using a legal size folder. We covered them with washi tape but they could be decorated in any way. Since the legal size folder is long, you can add pockets on the inside and middle of the journal. My pockets are attached with paper clips until I buy some narrow 2-sided tape to keep them down.

Journal with a pocket on the inside cover

The second cover ends up in the middle of the journal, where additional pockets can be added.

A smaller pocket in the middle of the journal.


A larger pocket, also in the middle of the journal.

This is one of my favourite journals - so easy and simple to make but very versatile. You can use all kinds of paper for the signatures and decorate it any way you want.

A lovely slim journal that can fit anywhere.


Update on my SAHRR baby quilt


Just a quick note to say that I've completed the first step of making the pinwheel blocks by make batches of half-square triangles. 

Next step in the SAHRR baby quilt

What I learned
  • I'm happy to say that making journals is getting easier. 
  • I should have cut my paper for the Upcycled Traveller's Journal by about a ¼ " shorter. This would have made it easier to put the journals in the elastics. Next time 😊!
  • Old washi tape doesn't stick as well as new stuff, so I may have to glue some of it down. 
  • The narrow two-sided tape will be great to keep the pockets down. I love adding pockets to my journals, so it will be a good investment.
  • I'd like to make more washi tape journals but experiment with fabric. Mod Podge would affix the fabric to the cardboard and make it stiffer (and help keep it clean).
  • I also have many nicer book covers that I'd like to use to make more Upcycled Traveller's Journals. 
  • I also want to make larger journals (the size of a duo tang) with lots of pockets to hold my travel souvenirs, notes, etc. The cover is not a problem but getting paper that large can be.
Related links

Linking parties


Free Motion Mavericks


Welcome to week 423 of Free Motion Mavericks. Did you have time to do any FMQ? Either way, we'd love to see what you're working on 😊.

Since we didn't have any FMQ, here's what Donnalee, Melva and Joy are working on!

Donnalee is making a second runner with some lovely Spring colours.

Spring runner by Donnalee

Melva was on her eleventh mini, but I want to show you number ten, Angel on the Shore.

Angel on the Shore, a mini by Melva


Joy linked up her Split Back Star blocks for a QOV quilt. Welcome Joy!

Split Back Star blocks for a QOV quilt by Joy

It's now your turn.

You are invited to the Inlinkz link party!

Click here to enter

Thursday, October 13, 2022

Pocket Journals

Hi! I hope that you had a wonderful Canadian Thanksgiving. I took a train trip to the middle of the Northern Ontario bush - it was amazing. 😊 Since coming home, I've also made two pocket journals as part of the October Challenge for the Handmade Book Club. 

Quilty Recycled Pocket Journal

This first journal is all made of recycled materials. Our teacher encouraged us to make a sample signature (the pages that make up the book) out of photocopy paper. I had so much fun with it that I made 4 signatures and finally a cover. 

A very quilty pocket journal

The images are all from the Connecting Threads' October catalogue. The whole thing is covered with lovely quilting fabric and quilts. You can see the pockets on both side. The book is also reversible.

Second signature with pockets

This is the cover of the journal as well as the last two signatures. It was so much fun cutting and gluing the images on those pages.

Many quilty lovelies on these pages.

The journal also stands up. These are the front four signatures. 

Front four signatures of the journal

These are the signatures as seen from the back of the journal.

Back four signatures of the journal

Finally, this is the back cover. 

Back cover of the recycled pocket journal


Bookmark Pocket Journal

This second pocket journal will be a birthday gift for my husband. He really liked my Accordion book with pockets and I said that I would make him one for his bookmarks. 

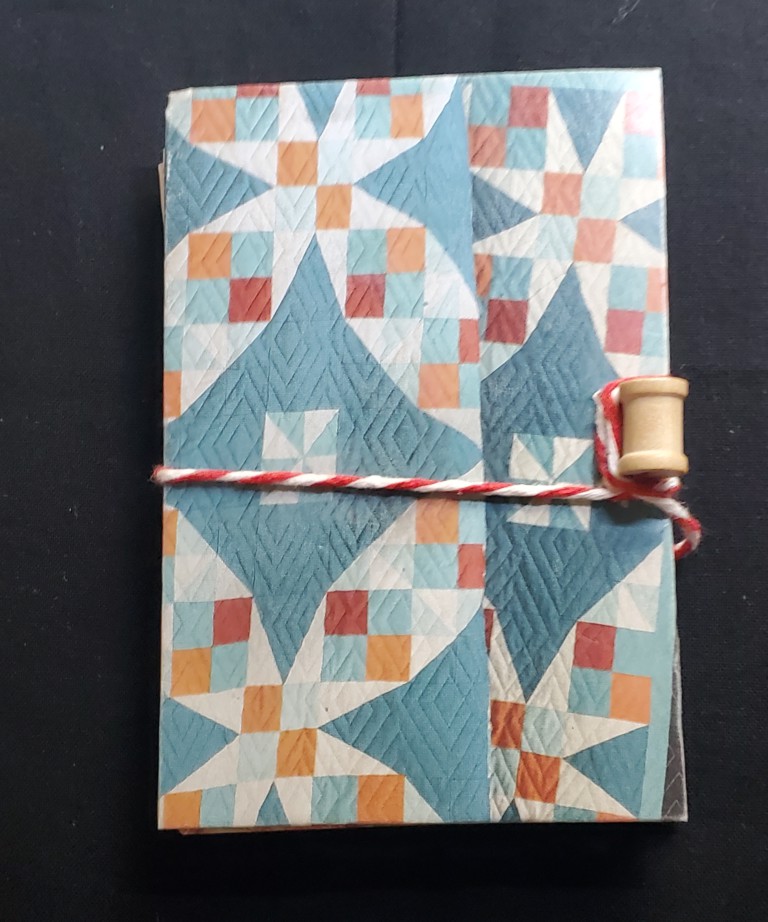
Front of the Bookmark Pocket Journal

I made this one using scrapbooking paper. It was a little thicker than recommended but it turned out well.

Bookmarks in the pockets


Closed Pocket Journal with the bookmarks

What I learned
  • It was great doing the sample journal before the "real" one, although I managed to make the same errors on both of them!😁
  • The signatures were fairly simple to make, as well as the book cover. It was finishing up the journal with a button and string that got me!
  • My cord on my first journal was too thin and didn't go all around the journal. When I changed it, I managed to put the signatures upside down.
  • I figured out the hard way, why the cord needs to be wrapped around the journal. If you don't, since the journal is reversible, it just opens up from the back!!!
  • For my bookmark pocket journal, I got carried away and stuck the cover to the front signature before putting the button in place. I was able to put the button close to the edge and did the same thing with the back, so it doesn't really show. I did cover the front pocket with more cardboard since I managed to get blood on it. The hazards of working with needles (which we know all about right?)
  • I'm looking forward to picking up a couple more bookmarks for the journal. Hopefully I can wait for his birthday before I give it to him 😊
  • I hope to write a post this weekend to share pictures of our trip. Stay tuned!

Related links

Linking parties
I'll be linking up to several linking parties. Why not see what's going on out there? Peacock PartyTGIFF, Beauties Pageant, Off The Wall Friday, Patchwork & Quilts, 15 Minutes to Stitch


Project Details


Quilty recycled pocket journal 
Size: 4½ " x 3"
Materials: photocopy paper, magazine images, cardboard, button and cord


Bookmark pocket journal 
Size: 5¾ " x 3½"
Materials: scrapbooking paper, cardboard, button and cord


Monday, September 05, 2022

More books with fabric

I seem to be flitting around these days with many short, fun projects. Here are a couple more 😊 

Book with a woven binding

I used to weave, many moons ago, so when I saw this project in the easy section of the Handmade Book Club, I couldn't resist. Anything woven catches my interest.

Hand-made book with woven binding

If you follow my blog, you will have seen a few posts on accordion books since July. I bought the accordion book challenge and made three of them (a fourth one is partially finished). Making books won't become my next passion but it's been amazing to learn and play with fun paper and fabric.

I did sign up for the Handmade Book Club. For a monthly fee, you have access to all of their many years' worth of archives. The videos are very well made and everything is super organised. I'm hoping, at least for the next few months to keep playing and learning to make books.

I wanted funky fabric on my cover. These two fabrics are from a former colleague's mom's stash. Thanks Judy, these are great!

I was so engrossed in making this book that I forgot to take pictures 😮. Here is the back of the book.

Back of the book with the woven binding 

I did have quite a few learning moments making this one but I'm thrilled with how it came out! 

Fabric Meditation Book in progress

This project is from a Handmade Book Club workshop with Emma Freeman. Since I've been doing lots of meditation stitching I had to check it out! The whole book is made of fabric pieces and made in the traditional Japanese aesthetics of wabi-sabi. I'll be reading up on this and will share at a late date.


Couching on the front of my fabric meditation book

I ripped up 5 pieces of hand-dyed fabric from the scraps that my friend Elaine gifted me. The ripping adds such lovely texture.  There really isn't any rules for making these books except to try to make them in a slow, mindful manner. The front page has couched strands of some sari yarn.

Keeping the pages simple is probably my biggest challenge. I'm not sure that I won't go back and add a little something but it won't be my usual more is best. 😊 The second page has some organic slow stitching using some of Mirjam Gielen's embroidery techniques. 

Organic stitching

This next page has a wonderful small piece of embroidery that I cut out. I'm not sure what my plans were for it but since I only got this far, I ripped the embroidered piece out to attach here. I also love pieces from the selvage edge.

Repurposing a small piece of embroidery

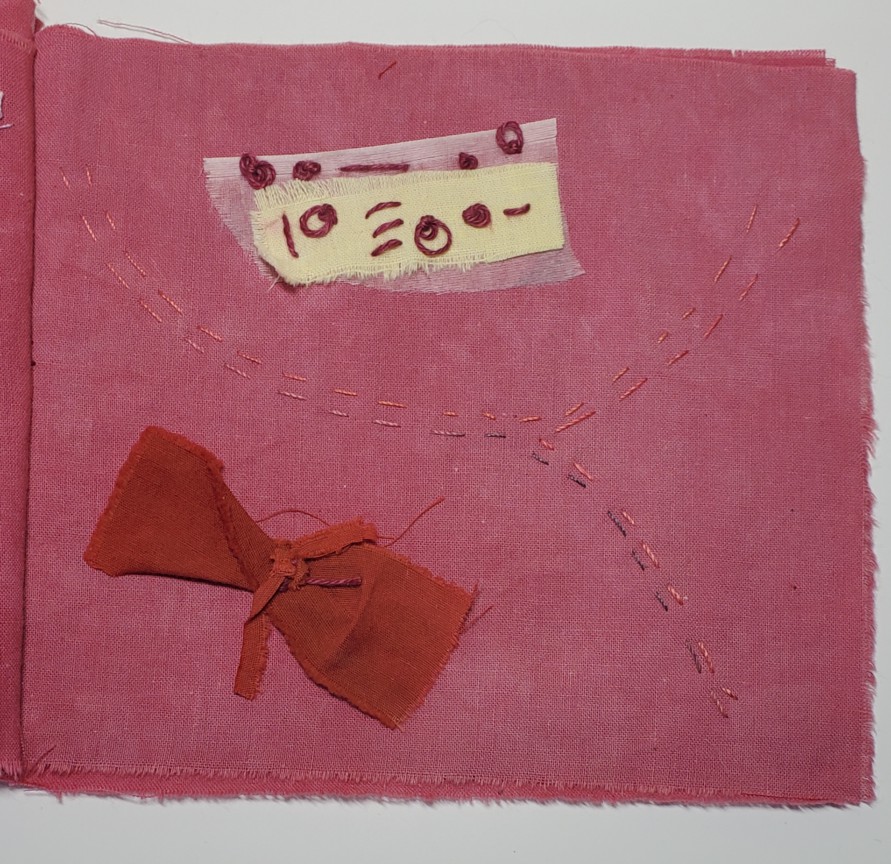
I'm also working with layers. This one has a piece of organza topped with a tiny scrap of hand-dyed fabric. I love the marks here - they almost look like their own language. Below it is another tiny piece of fabric that is folded like a bow.
Layering and stitching

I still have one final blank page. Maybe it's actually finished and the last page represents future possibilities! 😊

Thanks so much for accompanying me on my crazy learning journey. Here is what I learned from these wonderful projects.

What I learned
  • The pages in the book are called signatures. I learned the hard way that we are supposed to trim the pages before you bind them....yup, makes lots of sense in hindsight 😊
  • I had watched the video on making the signatures but I should have watched it a second time. You may wonder why the back fabric isn't the front since it's so "me" but the pages sticking out of the bottom will give you a clue.
  • It's fun trying different aesthetics - from in your face colourful to subtle. I'm rather surprised that the calm, minimalist stitching of the fabric book really appeals to me!

September's OMG
I really need to spend some time free motion quilting (FMQ) on Version 2.0 My One Monthly goal will be to complete two more areas of Stéphane's quilt. It's going to get cold soon and he'll need his quilt to keep him warm 😊

Related links

Linking parties

I'll be linking up to many fun parties this week. Why not check them out...and remember to visit Muv on Free Motion Mavericks! You can also come back on Thursday for my turn at Free Motion Mavericks! September's OMG, Slow Stitching Sunday, Design Wall Mondays, Oh Scrap!, Patchwork and Quilts, Off The Wall Friday, Put Your Foot Down, TGIFF, Peacock Party, Beauties Pageant,  


Sunday, November 15, 2020

Creating a stitcher's journal with paper and fabric

I'm back to making hand-stitched projects based on our latest workshop at TextileArtist.org's 2020 Stitch Club. This week's teacher is Ali Ferguson who showed us how to make a stitcher's sketchbook or journal with paper, and then to cover and embellish it with fabrics.

Making the Journal

This is the first workshop that I finished the project only a few days after it had started. I was hooked! I couldn't leave it. 

My new stitching journal

For my paper, I chose some printing paper (one with a gardening motif that I bought years ago, some brightly coloured paper, as well as the normal white stuff). I also found some lovely writing paper that I got as a gift when I was in my teens. It has my name (maiden back then) printed at the top. It was smaller than the other papers but I added them in separately and adjusted the holes. My book is made up of 4 signatures - those are the folded sheets of paper that make up each section. Once the signatures are complete, they are bound into the journal.

For the front cover, I used part of a panel that I created during Gregory T. Wilkins' workshop in July (see Related links below). For the back piece, I used fabric that I painted using a plastic fork and blue Colour Vie paint. The book spine tabs were printed using a print block that I made during a virtual workshop with Christine Chester, as part of the Birmingham Quilt Festival. I just coloured them using Sharpie markers and then sewed on some fun buttons.

Printing block made with
Häagen-Dazs sticks
Making marks with a plastic fork


The fun really started when I embellished the journal.

I started by using only batik fabrics, but then I got even more creative and took out all of those sheer scraps from making my last two sheer projects.

One the inside cover, I covered up the button stitches by gluing on some pieces from a cute scrapbooking sheet. I stitched a diagonal border on the opposite page and stitched the bottom of the page to the next one to create a pouch. I even attached an upside down label 😊.

Inside cover with a pouch for keepsakes

My journal has 58 pages, so I won't show you pictures of each one of them! All of the pages have some stitching on them, but I will show you my favourites.

I made this one this morning. I stitched the fish to the background fabric with a running stitch and then added some French knots. I practiced my "writing" skills based on Joanne Sharpe's The Art of Whimsical Lettering book. I haven't practiced this in a long while but I now have an excuse if I write in this book!

"So long, and thanks for all the fish" Douglas Adams quote
with stitched fish

The fish (above) and the purple batik and organza piece below are on the back of my personalized writing paper. You can see the printing flower paper on the other side.

Using batik and silk organza scraps. They are attached
using embroidery stitches

This is one of my favourite pages. I drew around an oak leaf from my neighbour's yard and then stitched it with this amazing yarn made from Tencel (some type of pulp fibre). The colours are amazing and it's made locally by Trail Head Yarns (see Related links). 


Oak leaf outline with stitching using Tencel yarn.

For one of the signatures, I used a piece of scrapbook paper instead of my personalized writing paper. It's just too cute!
Adding scrapbooking paper in one of the signatures.

My first embellishments were rather simple but as I got going, they became more layered and creative. 

Starting to get the hang of layered embellishments.

As I mentioned, I made the fish this morning as well as this one. I love adding the sheer fabrics. This one has lots of texture which may get flattened a bit when the journal is closed, but that's fine. 😊

Adding more stitching and using sheer fabrics

What I learned
  • In this journal, I want to experiment with stitched layers and then place the pieces in the journal. I would like to use more interesting embroidery stitches but this needs to be done separately and then attached to the journal. 
  • You may have noticed in the image above that the page is getting pretty crumpled. That's what happens when the paper is handled too much. I've figured out that the best way to add the stitching is to put the piece together first and then stitch it on or even better just tack it on with a few stitches.
  • I tried to do the button hole stitch on the paper but just couldn't hold the paper properly. 
  • In the end though, the crumpled paper won't show since I'll be filling this journal up with lots of pretty stitched pieces!
  • BTW, I've actually finished my Marks & Stitches piece - it's even framed! I'll write a post soon...
Related links
Linking parties

I will be linking up to all kinds of fun stitching and quilting link-ups. Let's see what's happening in Blog Land! Colour & Inspiration TuesdayPatchwork & QuiltsOff The Wall Friday, Beauties Pageant, Slow Sunday Stitching, Oh Scrap!Monday Making, Midweek Makers, TGIFF with Storied Quilts, Free Motion Mavericks with Muv, Needle & Thread Thursday, Put Your Foot Down, Finished or Not Finished Friday, Can I Get A Whoop Whoop?

I'm also linking up to Meadow Mist Designs' Favorite Finish Monthly linkup as well as Sandra of mmm quilts' DrEAMi - if this isn't a squirrel, nothing is!