Thursday, June 25, 2020

Embroidering with plastic and Free Motion Mavericks

Hi. Welcome to week 286 of Free Motion Mavericks. Although I'm in the middle of setting up my new studio, I had planned on doing some free motion quilting (FMQ) today on the Pinwheels and Stars Baby Quilt - but I didn't find my supplies until it was too late - so you're going to see how last week, I embroidered using plastic bags 😊

Sampler embroidered with plastic


Susie Vickery hosted the third workshop of Stitch Club 2020 at textileartist.org. Susie showed us how to make an embroidery sampler incorporating plastics. It was really fun. Here is my finished piece.

Embroidered piece with plastic strips
Sampler stitched with plastic strips

For my background I used a piece of an old chenille throw. I love the colour and texture and the weave was loose enough to easily stitch through, even with plastic strips. 

I found different coloured plastic bags and mesh. Until recently many grocery stores wouldn't let us bring our own re-useable bags, so I'm sorry to say that I've accumulated lots of plastic bags. I cut a few of them into roughly one inch strips.

I started by couching the purple strips. It was slow going because the plastic was only purple on one side. I then used a piece of yellow mesh behind the flower and then couched each line. I really liked the effect of fanning the plastic at the top.

Making the flower with couched plastic
Using couched purple plastic

It took me a couple of tries to get the leaf stitched. I finally embroidered a feather stitch with perle cotton and then stitching over it with the yellow plastic strip. I then added some green to fill it in. The other feather was outlined in a back stitch in green and then filled in with a satin stitch.

Close-up of the stitched design
Playing with different stitches using plastic strips,
 mesh and perle cotton

I stitched the three leaves over mesh and then added seed stitches with embroidery thread. I also wanted to try to stitch with the purple plastic so I added those curly bits.
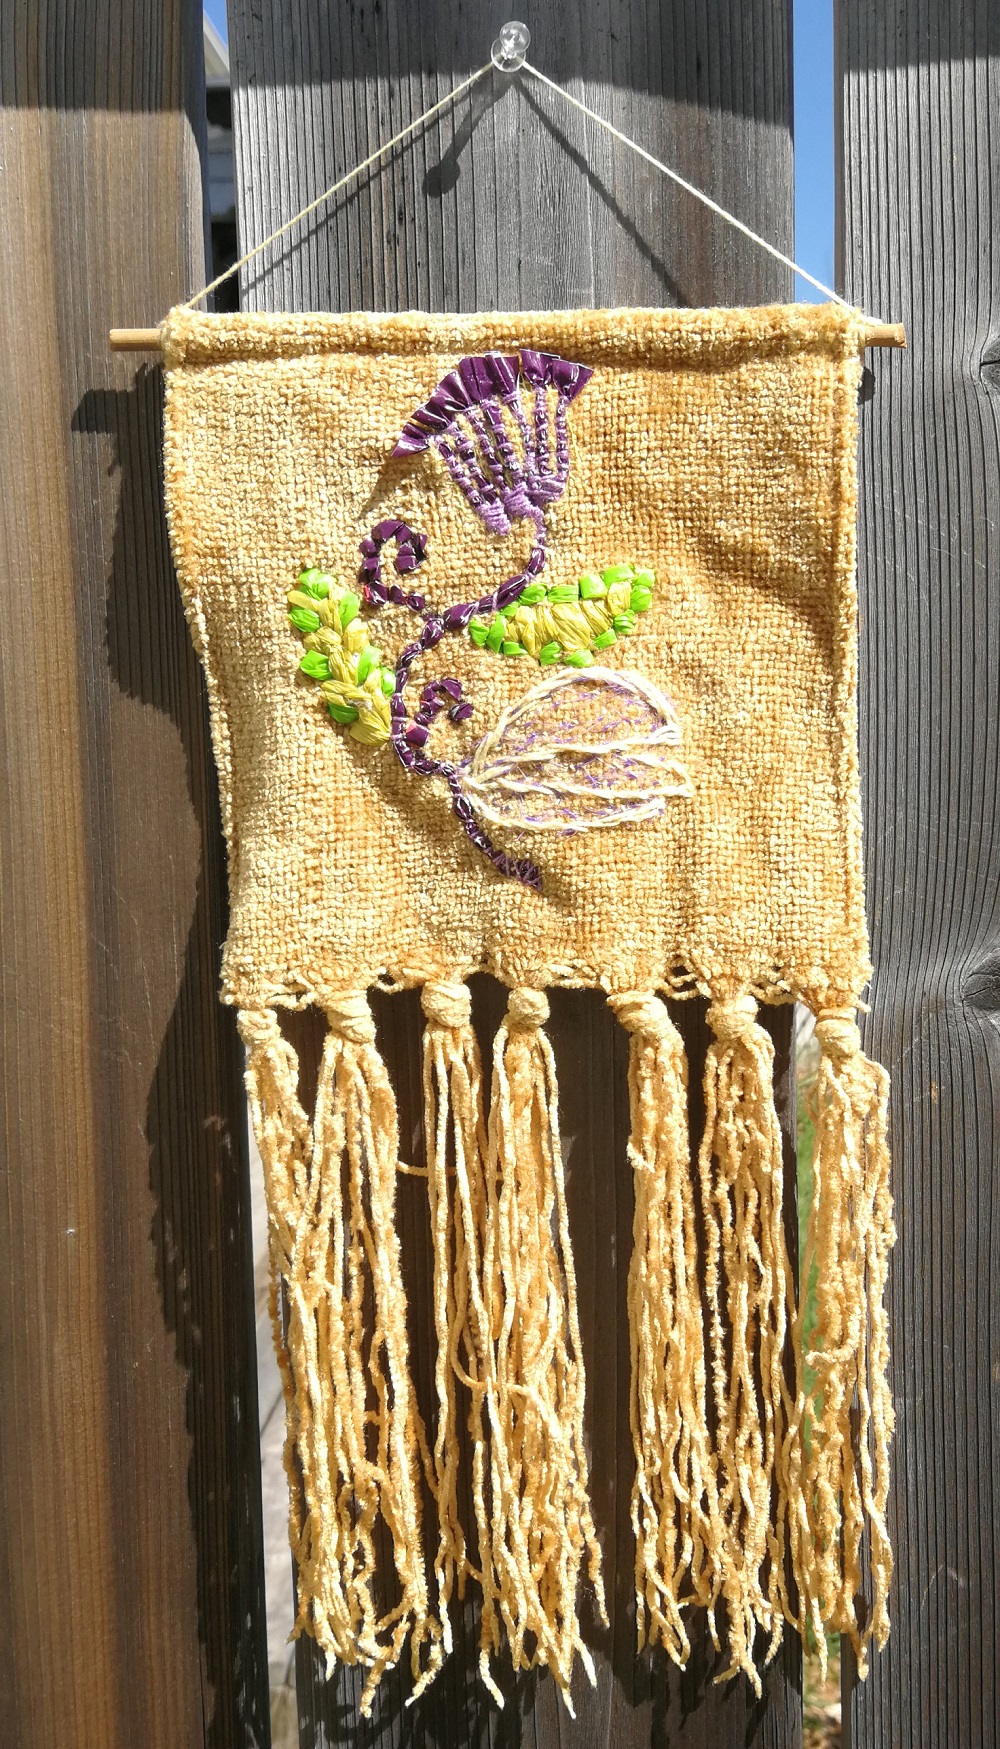

Finished sampler stitched using plastic
Finished stitched sampler

What I learned
  • Although I don't want to spend the rest of my artistic life cutting up plastic bags (they leave a gritty film on your hands!), I really do want to continue experimenting with these types of products. 
  • I never thought that plastic strips could be used as thread to embroider but it gave a really different look to the stitches. Most of the plastics had a bit of a shiny finish to them. 
  • Now, not only am I stashing bits of mesh, string and ribbon, I'm also keeping interesting coloured plastic bags!
Related links
  • Susie Vickery is a wonderful artist who works in many mediums. Check out her Citizen Botanist - a puppet with the most incredible costumes! I encourage you to check out the animations and collections tabs on her website. 
Linking parties


Flower sampler embroidered with plastic
6" x 6" with 6"fringe
Materials: chenille fabric, strips cut from plastic bags, mesh, perle cotton and embroidery floss.
Techniques: embroidery stitches: couching, feather, seed, satin and back 


Free Motion Mavericks


It was a quiet week last time. Thanks to Denise and Dione for taking the time to link up. Since both projects are very cool, I thought that I would feature them both!

Here is Denise of For the Love of Geese's Red and White quilt. She was able to salvage her previously cut blocks using her AccuQuilt machine. Check out her free motion quilting!

Denise's Red and White quilt


Dione of Clever Chameleon has been doing some free motion appliqué on her Lunarcy quilt. Check out her Rabbit block!

Dione's Rabbit block from her Lunarcy quilt
Now it's your turn!

You are invited to the Inlinkz link party!

Click here to enter

Thursday, June 11, 2020

Trying more FMQ designs with Free Motion Mavericks

Welcome to week 284 of Free Motion Mavericks. I'm trying more free motion quilting (FMQ) designs for the Pinwheels and Stars Baby Quilt. 

FMQ more pinwheel blocks


Here are two more pinwheel blocks, FMQ using different designs.

pinwheel blocks quilted with triangles
Echoing the triangle in the background fabric


Pinwheel block with borders and inside petals
These blocks have inside borders and
flower petals in the middle

Here is an image of the designs that I had presented when I was planning the FMQ.

Various FMQ designs for the pinwheel blocks
Blocks 1 and 2 were quilted for the last post.
Today I quilted variations of 3 and 4.

What I learned
  • I am really tired today - and I still have to do my FMQ for this post. I am so grateful that I have those drawn quilting options for the pinwheels. It made it fairly easy to choose the design - what ever looked easiest!
  • Since I have to be careful with my FMQ when I'm tired, I only quilted the echoing in the background triangles. If it looks sparse, I can always go back and add the echoing to the other blocks. However, I suspect that I will leave it since not having any quilting on the printed fabric makes the pinwheels pop.
  • Have you noticed that the flower petals are all slightly different in each block? Let's just call that a design element and leave it at that 😊 
Related links
  • Pinwheels on Free Motion Mavericks, May 27, 2020
  • Baby Quilt at Free Motion Mavericks, May 13, 2020
  • I found the magazine that was the original inspiration for this quilt. The pattern was called Make A Wish. It was designed by Karen DuMont and appeared in the Quilt Almanac 2011. I'm sure that it was the cheerful fabrics that attracted me.
Linking parties
I will be linking up to many fun linking parties. Make sure to link up what ever you're working on below! Midweek Makers, Colour & Inspiration Tuesday, Needle & Thread ThursdayFriday Foto FunOh Scrap!, Monday Making, Design Wall Monday, What I Made Monday, 


Free Motion Mavericks


We had a good turnout last time. Thanks so much for taking the time to link up, with FMQ projects or anything else. You make the party worthwhile! Today I want to feature Rebecca Grace at Cheeky Cognoscenti for her special "Happy Birthday to Me! 47 Is Gonna Be My Year of Fearless Free-Motion and Ruler Work Quilting". We have to celebrate her spirit of fearlessness because she's finally loving to FMQ on her longarm. If you didn't read it, go check out her post!

See the Cheeky Cognoscenti's post
Now it's your turn!

You are invited to the Inlinkz link party!

Click here to enter

Monday, June 08, 2020

More hand-stitching fun

As you may  have read previously, I've been doing a lot of slower stitching - hand stitching, mediation stitching, embroidery and other fun stuff. I'm having a blast and learning so much.

Making a seashell container


I've enrolled in the TextileArtist.org Stitch Club. It's essentially the same concept as their original Stitch Challenge, but for a fee. After all that they have given to the stitching community this spring, I wanted to keep playing and learning as well as support their great initiative.

The first artist, at the end of May, was Debbie Lyddon. She makes very cool textile art. Since she lives near the sea, a lot of her imagery and techniques come from there. For example, she adds grommets to a lot of her work. These are hand done and are used a lot in sailing boats. Our assignment was to make three containers to hold something special to us or our environment.

I'm going to start with the second container that I made since it's much more like the work that Debbie showed us how to make.

Embroidered sea shell container
Hand-stitched seashell container 

I started by painting the fabric, a white on white cotton that came out really well. For this second container, I learned from the Q & A sessions at the end of the week that Debbie dilutes her acrylic paint quite a bit. I hadn't done that for the first piece and so the fabric was very stiff and a little difficult to sew by hand. The darker blue fabric pieces that have Sea and Shells written on them (with markers) are from the first batch of fabric. I could never have embroidered the words on there 😊

Seashell container with lots of embroidery
Other side of the seashell container

I embroidered the bag before I stitched it together. I love using the feather stitch when I don't have to be accurate and follow a line. This stitch is perfect for making sea weeds.

On this side, you can see that the grommets are smaller. I actually used half of a twist tie to make each of them. On the back of the fabric, I drew the circle around the twist tie. I then cut into the hole, leaving most of the fabric there and stitched very densely around the tie. I used a buttonhole wheel stitch to  highlight the grommets. Inside of the small grommets, I stitched a small piece of netting - the stuff that comes from a bag of potatoes.  
stitching on the inside the bag
One the inside with the cheese
 cloth covering the grommets

On the inside of the bag, with the
netting over the small grommets


For the side of the bag with the large grommets (top image), I used a whole twist tie for each grommet. I did it the same way as the small ones but removed some of the excess fabric from the middle. I then put a layer of blue hand-dyed cheese cloth over the holes - one dark and the other lighter blue.


Open bag with seashells
A peak inside!

For the top of the container, I stitched down a long piece of wire (that I use for hanging frames). I had about ½" of fabric on the inside so I added a row of stem stitching right under the stitching for the wire and then about a ¼" from there, a row of chain stitch keeps the seam down on the inside.

A container to display an arrowhead 


container displaying an arrow head
This container is used to display
rather than contain

This was the first container that I made. It was much more complicated than my second one since I wanted to use it to display rather than contain the arrowhead within it.

The prototype for the bottom of the container

I started by painting the fabrics and then made a prototype for the bottom of the container. Since it worked out, I ended up painting it instead of making another one. After that, I sewed three different fabrics together, the brown, green and blue and then stitched them into a tube. My fabric was stiff but not stiff enough to hold the arrowhead, so I inserted a roll of toilet paper inside to strengthen it.

container displaying the arrowhead
Displaying the arrowhead on a shelf

The arrowhead comes from Northern Ontario. I found it near the swamp at the cottage where I spent all of my summers when growing up. This was probably part of the hunting territory of my husband's community. I only realised this as I was making this display container. On the outside, I used markers to draw the tree with deep roots, and birds. Around the top, I stitched on some beads and feather charms in the four directions.

Inside the container I added a stone from the area as well as cedar, sweet grass and sage. These are not the traditional things that you would put inside a pouch but I didn't have any tobacco. I made this container for my children, who are also part of this community.  

What I learned
  • I am really enjoying learning about all of these techniques, but more importantly, I love expanding my knowledge and appreciation of textile art. Some of it can be pretty out there - and I may not be quite there yet, but I'm loving the journey.
  • The art that the other participants are making is sometimes quite intimidating. However, I'm not letting myself be too hard on my work - I haven't been doing this for very long and we all have our paths to work on. I make sure to save many of the work that I would like to learn from. Sometimes it's just a little detail that I might never have thought about but that's how we expand as artists and makers.
  • I used Perle Cotton size 8 for all of the stitching in these projects. I hadn't used it much previously and really love it.
  • The arrowhead container was quite difficult to make because I had no idea what I was doing!😊 I'm really happy with the way both of them came out.
Related links
Linking parties
I'll be linking up to many fun linking parties. I hope that you'll join me to see what else is going on out there! Monday Making, What I Made Monday, Design Wall MondayColour & Inspiration TuesdayMidweek MakersNeedle & Thread Thursday Off the Wall Friday, Friday Foto Fun, Beauties Pageant, Oh Scrap!, Favorite Finish - June 2020 

Sunday, June 07, 2020

UFOs and June's OMG

Welcome to this beautiful sunny but not hot day. 😊
Chevy keeps me company as I play in the yard

A very lush section
of the garden

These pictures were actually taken yesterday, before it got too hot. As you can see, I did a little bit of yard work. It takes me 3 or 4 sessions to mow the back yard lawn, not because it's huge but because I want to keep it as play, not hard work!

The garden has become very lush. Thank goodness I did a lot of work this spring before it got green. Now there's just some minor weeding to do - all manageable if it keeps cool for a few days (as was promised).


I love flowers 😊 
Now to some quilty things!

Completed UFOs to date & June's OMG

As you may remember, at the beginning of the year, I was optimistic out of my mind and listed my favourite 12 UFOs that I would like to finish. Since I'm following Quilting Gail's PHD rules - I can finish other UFOs that will count for the original 12.
June's OMG - finishing the first section of this quilt's
Version 2.0 Loved-to-death quilt

The only UFO project that I actually started from my original list is my son's quilt. I did a little more after my original post in February, but I am about half-way from finishing the first section (circled in blue in the photo).

Finishing this first section is my June One Monthly Goal (OMG). My son has moved out this weekend, so the new quilt should be ready sooner rather than later!

On the plus side, I did finish 3 other smaller projects that were officially UFO since they were begun in 2019. If you want to check them out, the links are in Related links below.
Fantastical book block


Mon Jardin book block


Exit Strategy


Sneak peak at my new art studio


As I mentioned, my son is in the process of moving out. By Monday, everything will be cleared from his room. I am really happy for him and thankful that he is only living 20 minutes away by car. To make me feel better, I started moving in. 😊

Here is the first picture of the art studio - just claiming my space!

Moving my Jag (sewing machine) into my new space
There is a lot more to do but that's for another post.
Have a great week and stay safe, healthy and sane😊

What I learned
  • It's obvious that I like and need to play - that's why when a project feels like work, I tend to procrastinate. I hope that the OMG will help me play with Stéphane's quilt.
  • I also feel that way about playing in the garden - so wish me luck with the cool weather and getting my hands dirty! 

Related links

Linking parties
I'll be linking up to June's One Monthly Goal (OMG) with Patty of Elm Street Quilts. I will also be linking up to Free Motion Mavericks where Muv is knitting a really cool baby blanket. Make sure that you go link up with her this week. There are always great linkups. Let's see what's going on. Friday Foto Fun, Can I Get A Whoop Whoop?, Monday Making, To-Do Tuesday, Colour & Inspiration Tuesday, Midweek Makers

Have a great week and stay safe, healthy and sane😊

Sunday, May 31, 2020

A big hexie squirrel

About a month ago I made a squirrel - that is a little (or sometimes big) project that just insists on getting done, right NOW. I knew that this would be my May DrEAMi (Drop Everything And Make it), a link up that's always a lot of fun, and hosted by Sandra at mmm! quilts.

The Big Hexie Experiment


Big Hexie Experiment
I bought the Better Homes & Gardens "Handwork happiness" magazine a while back (see Related links). I was intrigued by the way that the little table mat "Hex Marks the Spot" was finished.

Last year my lovely neighbour made me some large 2" hexie templates. Then, in the fall, I was gifted some very bright scraps by a quilting friend.  With all of these supplies, I thought that I would try the finishing technique of this project.  
Handwork happiness magazine

2" hexies


Since I was gifted both the templates and the fabric, I gave this one to my lovely neighbour. She loves orange so it was perfect for her.


I've made small hexie projects in the past, and the hardest part is the finishing of the pieced. In this project, the seam allowance of the hexies on the edge of the piece are ironed to the outside. The batting, which is the same size and shape as the top (with its edges ironed out), is place on the bottom. You then put the hexie top face up and then place your backing on top of your top, facing right side down. At this point, you very carefully sew ¼" along the edge, leaving an opening a couple of inches wide. You flip the fabric inside out and then stitch the little opening. This technique is sometimes called the pillowcase technique for finishing a quilt. In Related links, I have linked to a YouTube video to explains the technique.

My lovely neighbour sent me these pictures after I had forgotten to take some of the finished cosy.
Being useful as a wine cosy :-)

Finished hexie cosy


The back of the cosy


What I learned
  • The technique worked very well. 
  • I did have a bit of a problem pulling the edges of the hexies to the outside since I must have sewn parts of it down when I sewed the hexies together. Next time, I'll try to be more careful with my starting or finishing stitches.
  • I also had to trim the edges to ¼" since my edges under the hexies are not very consistent.
  • As I wrote this post, I realised that I hadn't taken a picture of the finished hexie cosy. Oh well....but as usual, my neighbour came through. 😊
Related links
Linking parties
I'm linking up to Sandra's DrEAMi! link up as well other fun linky parties, Slow Sunday Stitching, Oh Scrap!, Can I Get A Whoop Whoop?, Finished or Not Friday, Put Your Foot Down, Colour & Inspiration Tuesday, Monday Making,


Have a great week and stay safe, healthy and sane😊

Wednesday, May 27, 2020

Pinwheels on Free Motion Mavericks

Welcome to week 282 of Free Motion Mavericks. I'm now in the process of free motion quilting (FMQ) my Pinwheels and Stars Baby Quilt.

Pinwheels and Stars Baby Quilt


On my last Free Motion Mavericks post, I had just been doing some stitching-in-the-ditch around all of the blocks. I took my time and since the background fabric is white, there was usually white fabric to stitch around so that the thread didn't show up too much. I know that I could use invisible thread but I really want to learn to get better, not just hide my mistakes. Overall, I'm quite happy with the results of this FMQ so far.

Quilting-in-the-ditch to outline the star

Quilting-in-the-ditch is done
and it's ready to FMQ
Picking a FMQ design 

Now comes the hard part - what design to use?

My first question is: do I want the FMQ to be circular /curvy, or angular / straight? Since the piecing of both the pinwheels and stars is angular with half square triangles (HST), do I want to emphasize this or create contrast by adding curves? I can, of course do both but it would need to be consistent throughout the quilt.

My second question, applies to the pinwheel blocks: do I use a separate design for each HST or an overall design?

I guess my third consideration is purely practical - how much effort and time do I want to take to FMQ the pinwheel blocks, given that they will be secondary to the centre piece.

I quickly looked at my FMQ journal but decided that I would check the internet for "fmq designs for pinwheel blocks". I got an interesting variety of images. I drew variations of some of my favourites:

FMQ curves within the block

Assortment of FMQ lines that could be used in the block

Overall designs that can be used
Choosing just one design is beyond me at this time (fuzzy brains don't like making decisions).
Since there are 7 sets of pinwheel blocks within the baby quilt, I could FMQ each set of blocks differently. I think that as long as each pinwheel is treated the same within each block, that this should give it enough cohesiveness. I can only hope 😊 Let's face it, no matter what, it's bound to be a cute baby quilt - so I'm going for the practicing with variety option.

Here are the two sets of pinwheels that I FMQ this evening.

I chose to FMQ spirals around this first batch of pinwheels, mostly because they are the worse constructed ones. My problem at the time wasn't piecing bur rather trimming. I'm hoping that the spirals won't accent the problem.
FMQ spirals in each pinwheel block
This second design is from Angela Walter's video, Three Ways to Machine Quilt Pinwheel Blocks. In this block, she creates a tiny pinwheel in the white background fabric and then adds extra lines to highlight the mini pinwheels. In the coloured triangles she uses a dot-to-dot design to add two wedges inside them.
Mini pinwheel shape in the background triangles
Adding a mini pinwheel shape in the background triangles
What's on for the week
  • I've signed up for the TextileArtist.org Stitch Club and have just accessed the Facebook page. I haven't done this week's workshop yet, so I'm hoping to get that going so that I don't fall behind.
  • I also want to work on my Traveller's Blanket. Here is my last post. I've done a little bit of work on it, including making a couple more meditation stitched blocks.
  • Finally if the fuzzy brain lifts a little, I have a niece who is waiting for her curtains 😊
What I learned
  • Am I over thinking the design for the pinwheels? Probably. On the other hand these images will be pasted into my FMQ journal so that I'll have a number of choices for the next time.
  • Full disclosure (as they say), one of the reasons I'm going with a variety is that the design I like the best is the one that I almost always choose....so I'm going to try out other things. When I've tried them out, we'll see how they turn out and if my favourite is still the same😊.
Related links
Linking parties
I'll be linking up to many fun parties. Let's see what's going on out there! Midweek MakersNeedle & Thread ThursdayPut Your Foot Down, Finished or Not Finished Friday, Friday Foto Finish, Can I Get A Whoop Whoop?, Peacock Party, Monthly Favourite Finish with Meadow Mist DesignsMonday Making, What I Made Monday, Design Wall Monday, To Do Tuesday, Colour & Inspiration Tuesday,


Free Motion Mavericks


The party wasn't big last week but we had some wonderful link-ups. Thank you! As the instructions for the link-up states, the first person who links up from a new country gets a special mention and their country is added to the list. So, a big welcome to Turid from Norway. She finished a FMQ dinosaurs quilt for her grandson. As you can imagine, he was thrilled! If you didn't catch the post last time, here's the link!

Dinosaurs Quilt by Turid
It's your turn now!


You are invited to the Inlinkz link party!
Click here to enter

Tuesday, May 19, 2020

More learning with the Traveller's Blanket

Monday was a long weekend in Canada and I happily spent most of the afternoon doing some slow stitching with my daughter. She was embroidering and listening to video essays while I was working on my Traveller's Blanket and listening in on the programs. It was so peaceful and pleasant. I wish that I could spend all of my afternoons like that😊

Traveller's Blanket


So what it a Traveller's Blanket? If you google it, you will find links to Dejanne Cevaal's work. Dejanne has made a number of Traveller's Blankets - blankets that might have been made by travellers to depict what they had seen during their travels. I follow Dejanne on Instagram and saw that she was offering an online course. Since I've really enjoyed meditation stitching, I thought that this would be a great way to display them.

I'm using a very fine piece of cotton that I dyed a couple of years ago. I love the colours and I'm sure that it will make a great background to my small meditation stitched blocks.

My dyed background piece (39" x 25") 
The idea is then to attach pieces of fabric to the background and to embroider them on and around them.
First block stitched down with a blanket stitch
and then adding seed stitches
I finished the first block and then attached the second block last night. I also pinned an embroidered hexie that will be stitched down next.

Two blocks stitched down and the hexie pinned
For the online course, so far Dejanne has sent us a couple of PDF lessons and we are sharing on a private Facebook group. It's a lovely group of ladies from around the world.

Here are some of my favourite meditation stitching.
Impressions of Dried Flowers

Star Light


Web in the Flower of Life

Orange, Pink & a feather


Pretty Moon & Stars; Angles; Green & Blue with Bark; and Shining Rose
Here are some of the hexies that I embroidered. The spring bulbs have now gone but they were lovely a few weeks ago.

Embroidered hexies in the spring garden

Close-up of embroidered hexies
What I learned
  • In the first meditation stitched block that I attached, I ran out of the pink embroidery floss that I was using for the outside chain stitch. As I was posting my pictures on Facebook, I realised that I could leave the chain stitch open and have a few seed stitches spilling out of the open frame.
  • I'm not a big Facebook fan but this is a lovely small group so things can easily be found.
  • It's really fun to see other participants' work. The fabrics that are being attached to the blankets tell a story. Either they were acquired while travelling , hand-dyed, etc.
  • I have quite a few meditation stitched pieces done but will be making more to add to the blanket. 
  • I want to stitch a border around each block. It's fun that I can add more stitching to the borders later.
  • I'm looking forward to seeing how my hexies look when interspersed around the blocks.
Related links
Linking parties
I will be linking this post to many fun linky parties. Let's see what's happening out there! Oh Scrap!, 15 Minutes to Stitch 2020, Monday Making, Colour & Inspiration Tuesday, Free Motion Mavericks, Off the Wall Friday, Foto Fun Friday, Can I Get A Whoop Whoop?, Peacock Party, Slow Sunday Stitching, Midweek Makers, Needle & Thread Thursday, Put Your Foot Down,