Showing posts with label free motion embroidery. Show all posts

Saturday, March 15, 2025

Reclaiming Fallen Feathers

Hi and welcome! Today is a special post for Project Quilting (PQ) 16.5, "Follow Your Arrow". This little FMQ (free motion quilted) piece recalls Icarus' flight.

Free Motion Mavericks for March 20th
Please note that I'm not able to host Free Motion Mavericks this week, so the linking party is below.  Hubby was operated but is doing quite well. Thanks!

Note: It would seem that I'm still having problems with dates and time 😒- the PQ 16.5 closed last week! So please enjoy this post. I did link up to the Project Quilting Facebook page. 

Reclaiming Fallen Feathers


The PQ challenge theme was "Follow Your Arrow" and the Table Scraps Challenge colour for March is yellow. My thought process: arrow → feathers → bird → Icarus

Reclaiming Fallen Feathers

On a very bright piece of yellow hand-dyed fabric, I used a FriXion pen to draw the bird and the fallen feathers. Then I thought of Icarus and drew in the sun. Finally I added the arrow. 

Reclaiming Fallen Feathers on my outdoor carpet

I took out the black thread and free motion embroidered the bird, filling in the area with black. Then came the feathers. I FMQ tiny feathers in the shape. I did the same with the arrow.

Switching thread, I used a lovely variegated orange to pink King Tut thread for the sun. Yellow wouldn't have shown up!

Another view of Reclaiming Fallen Feathers

It was then time to finish it off. I repurposed a scrap strip of blue backing and batting left over from my blue scrappy quilt and used the pillowcase method. Once turned right-side out, I stitched the edge with a very light yellow thread and to FMQ around the embroidered sections. I added some vertical waves to highlight the falling feathers and then an arrow head pattern to give the arrow mouvement.

Note: The prompt this month for the Table Scraps Challenge was a song. I didn't start with a song but did find one that suits and which I love. It's by Calexico - Falling from the Sky. Here is part of the lyrics: "What do you feel when you're all alone? It's a song that circles round and around like a bird lost inside the cloud, cut off from the stars and they're guided in the light, not sure which way is up or down anymore..."

What I learned
  • I wanted this piece to be as easy as possible. I had all kinds of complicated ideas and gave them a firm pass! Yay for me 😃
  • I found the yellow fabric, checked out pictures of flying birds and discarded most of them as too difficult for me to FMQ. I then settled on the image of a flying gull, something that even I can draw!
  • This was probably one of the fastest pieces that I made, mostly following my intuition. Thanks intuition! 😍
  • Once I started the piece, I was done in a couple of hours. Wow!
  • I must admit that after I finished drawing the piece, I went on Wikipedia to make sure that I had the story straight. I'm happy to say that I remembered correctly (well at least one version of it!)
  • It's funny how I usually start with complicated ideas that I often (but not often enough!) simplify.
Related links
Linking parties
I'll be linking up this post to many fun linking parties, including Project Quilting Facebook page, Free Motion Mavericks and the March Table Scraps Challenge when it opens as well as my Favorite Finish for March. You may want to check some of these out! Put your foot downOff The Wall FridayFinished (Or Not) FridayBeauties Pageant, TGIFF, Patchwork & Quilts,

Project details

Reclaiming Fallen Feathers
created for Project Quilting 16.5, Follow your arrow
Size: 6½" x 5½"
Material: hand-dyed fabric, thread
Techniques: free motion embroidery and free motion quilting


Free Motion Mavericks

Next week I'll do a recap of the last two weeks. Please link up below.


You are invited to the Inlinkz link party!

Click here to enter

Thursday, December 12, 2024

A FM stitched portrait finish on Free Motion Mavericks

Hi and welcome 😊. I'm so happy that you can join me today. We are experiencing snow, drizzle, rain and freezing rain. It's quite the combination but since I bought some salt and a new shovel, we are prepared! Today I am sharing a project that I seem to have forgotten to post about. Now that it's finished, it's time. 

Free Motion Stitched Portrait


It all began in August with a TextileArtist.org class with artist Rosie James. Her work is wonderfully illustrative and done with FM stitching. Since many of her portraits are of the back of people, it feels doable if you're not comfortable drawing or stitching faces (like me!). They also incorporate colour as she uses fabric for the clothing. 

Hubby photographing scenery

It took me a while to choose the photo. I have many images like this one since we are often waiting for Hubby, off somewhere taking pictures.

Original photo taken this Spring in Alaska

After printing up the photo, I drew the important parts on tracing paper. I used coloured Sharpie markers to highlight the sections that would be covered in fabric.

Template on tissue paper of the original photo

From the template, I used the lightbox to trace the patterns of the jacket, backpack and pants and then cut the fabric.

Making the pattern on the lightbox

I used a FriXion pen to draw the entire scene on a white cotton background and then used free motion stitching to outline the scene. The most difficult part was to place the cut fabric patterns onto the piece. To ensure that they were in the correct place, I stitched over the tracing paper. That's why you see me picking out the paper below with tweezers.

Using the tweezers and magnifying glass to clean up the piece

The piece was mostly finished weeks ago but it took me that long to finish mounting it on the canvas. I first used tacks to mount it but didn't really like it. Finally I untacked the piece, added a layer of cotton batting between the canvas and the fabric and then tacked it permanently with staples. That's when I used my amazing new light with the magnifying glass to remove the paper and extra thread.

Finished piece, mounted on a canvas

What I learned
  • Making this project brought many learning opportunities. The first one is to check that you don't reverse the image between tracing the pattern and sewing it!
  • I tried to add free motion stitched grass beside the pants but it was horrible. Thank goodness that I was able to remove the stitching without damaging the piece.
  • I also learned that if you're going to mount the piece, that it would be best to be more accurate about the free motion stitched edges.
  • I'm very happy with the piece, now that it has batting underneath it. Without the batting where were a lot of puckering of the fabric. This smoothed out most of it.
  • I'm going to be doing a smaller piece incorporating this technique as part of a wedding present for my brother and sister-in-law. My SIL is an amazing seamstress and she kept me a piece of fabric from her wedding dress. The picture has the bride and groom from the side, so hopefully I'll be able to stitch their faces properly.
  • If you check out Rosie James' work, you will see that she loves to keep dangling threads on her work. I didn't keep them because that's not the look that I was going for in this piece, but one day I will try it!
  • BTW, I love my new desk lamp. It's very bright and as you can see, the magnifying glass came in handy.
  • I was really worried last week as I was using the new lamp and still couldn't see my FMQ properly. It turned out that I was wearing my regular glasses and not my reading glasses! The proper glasses solved the problem!😲
Related links
Linking parties 
I'll be linking up to many fun linking parties. Why not check some of them out...after you link up below! Monday Musings, Design Wall Monday, Sew & Tell, Midweek Makers, Put your foot down, Off The Wall Friday, Finished (Or Not) Friday, Beauties Pageant, TGIFFPatchwork & Quilts, 15 Minutes to Stitch 2024,

This post was my December's Favorite Finish! 

Free Motion Mavericks


Welcome to week 510 of Free Motion Mavericks! It was a productive week! Thanks for linking up. Here are the projects from last week that included FMQ, ruler work or walking foot quilting. 

Melva has two quilts that she's been FMQ. Her first is a finish of Sticks and Stones 2. Check out her post to see how she decided to quilt it.

Melva's Sticks and Stones 2

Melva has finished her Pieces of my Life, a quilt-as-you-go quilt

Melva's finished Pieces of My Life

One of the section of Melva's quilt-as-you-go quilt

Here is Brenda, of Songbird Design's quilt from the Virtual Christmas Cookie Exchange. This year it's a gorgeous table topper.

Brenda's gorgeous Christmas table topper

It's now your turn.

You are invited to the Inlinkz link party!

Click here to enter

Sunday, March 17, 2024

2 Colour Mystery Quilt and Updates

Hi and welcome. I hope that you're having a great weekend. I've been working on a few of my ongoing projects. Thanks for letting me share these with you. 😊 

Making HSTs (half-square triangles)


This week's clue for the Mystery Quilt was to create HST. Amazingly enough, it's one of the blocks that I'm pretty good at. I make them two at a time, and because there's always a little bit of wiggle room to square them up, they usually come out pretty accurately. 😁

That's a LOT of half-square triangles (48 and 24!)

Blocks and HSTs made, with a couple of extra cut pieces


I've never participated in a mystery quilt before, and I wondered how they would keep the finished piece a mystery. After all, once you make a block or two, you're bound to have an idea of what the quilt will look like. So, instead of making blocks, the mystery is prolonged by getting you to put minor things together like partial blocks and HST. It makes use of the production line concept.

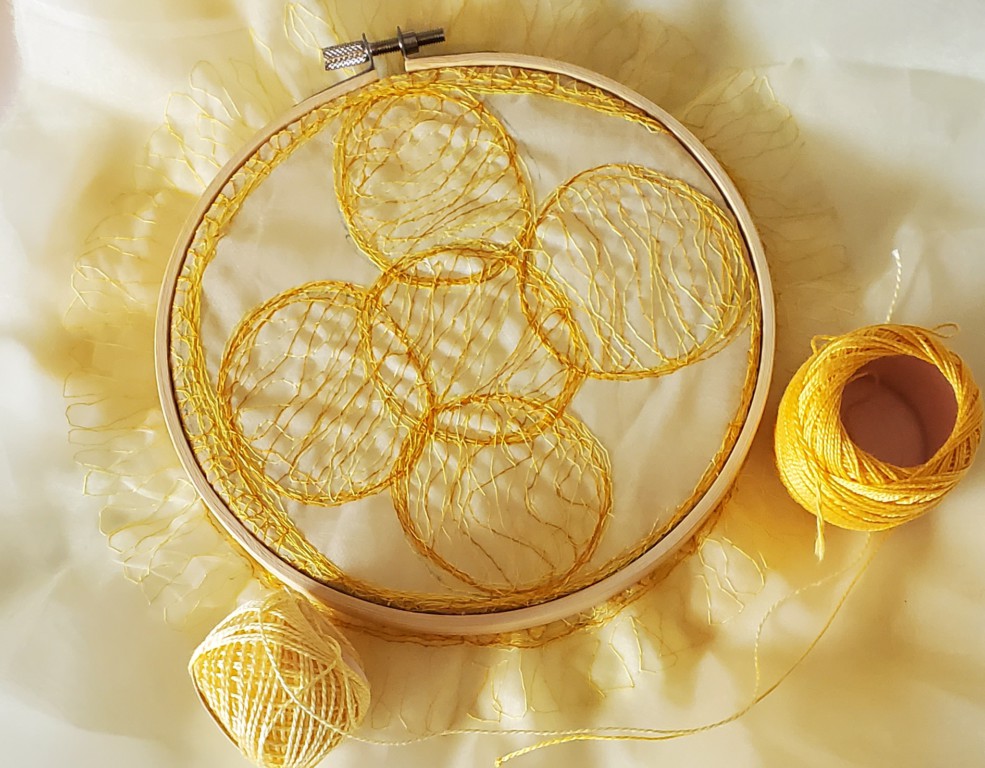
FM Embroidering the Noon Sun


Making the second Sun for my hanging outdoor piece was much easier once I'd made the sunrise sun (see Related links below). The Sunrise Sun isn't quite finished but the FM embroidering is done. For the Noon Sun, instead of using a scarf, I used a long piece of yellow organza folded in half with a layer of yellow tulle in the middle.

Noon Sun free motion embroidered in 2 shades of yellow

I couldn't help it, I ended up embroidering past the 6" border. When I finished embroidering, I tried out an 8" hoop since it fit into it.

Trying the piece in an 8" hoop

I then placed it in the 6" hoop and loved the effect that the extra stitching has outside of the hoop. 

I love how the stitching looks on the outside of the centre

I'm not thrilled with the inside of the hoop, but I'll add some hand-embroidery with 2 shades of yellow perle cotton to give it more texture and interest. I may also add some beads to make it twinkle outside. At this time, I'm thinking that cutting the sheer fabric outside of the hoop to make it move in the wind, could be cool 😎


I'll be embroidering the centre with perle cotton and possibly adding beads

What I learned
  • I'm thrilled that the production line of the HSTs went well.
  • It's funny how some quilting blocks are easy and other not so much. I think that I have a lot of experience making those HST.
  • I've also been playing with the embroidery hoop of Sunrise. I'll share this with you when I get it right - it's been an interesting journey!
  • I'm looking forward to embroidering the Noon Sun. I'll be linking this post on Slow Sunday Stitching and hope to play with it today.
  • I can't wait to start those clouds and birds, which is the next level of the hanging piece. That's going to take some ingenuity. 
  • Next week I want to start sewing together some of the panels for Hubby's panel quilt. Hopefully that will go well. 
Related links
Linking parties
I'll be linking up to many fun linking parties, including Slow Sunday Stitching and Free Motion Mavericks😀. Why not check them out if you get a chance. Off The Wall Friday, Put Your Foot DownPatchwork & Quilts, 15 Minutes to Stitch 2024


Thursday, March 14, 2024

Creating a sunrise on Free Motion Mavericks

Hi and welcome to week 573 of Free Motion Mavericks. It feels like Spring, especially after the coming of daylight saving time and that wonderful daylight. I always remember my great-aunt at this time. She would joke that she was tired all summer, after missing her hour of sleep. That's how I remember that we loose an hour in the Spring. Thanks matante Marie! 😁 

FMQ a sunrise


I've started on my outdoor hanging sculpture for our Fibre 15 Outdoor "Impermanent" Summer exhibit. 

In progress - Dawn Sun

You may recall that I want to make a hanging piece based on the mindful stitching below. The Dawn Sun is the first. I tried using 2 strands of wire around my first version but it was flimsier than I expected. Because the suns are round, I was able to place this first one in an embroidery hoop, which I'll be able to paint. 

A Nod to the Great Pottery Throw Down (Season 1)

Top half of my plan - I still have to figure out the rest

I found many sunrise images on the Internet. It's not always easy to tell a sunrise from a sunset. Often the sunrise is softer and can be surrounded by pink and/or orange. Below you can see some yellow organza in front of Dawn Sun. I'll have to work with other colours and see what I get. Hopefully with the organza and the painted hoop, it will look like a sun rising at dawn.

Dawn Sun - adding organza will help make it look like a sunrise

Here are a couple of process pictures. Since I'm making 2 more suns, you'll probably see a few more 😀. I used an old scarf to free motion embroider on. I placed the scarf in a 10" hoop and then used a smaller 6" embroidery hoop to outline the circle. 

This first image is my first attempt. I free motion embroidered it and then added two 22 gage wire around it. I attached it to the small basket in front of my sewing machine as a guide for making the second one.

First attempt at a sun, using wire to keep it round(ish)

Marked scarf in the embroidery hoop

Free motion embroidering the outline, adding sun rays and
then stitching the inside of the circle

Some of the scarves and organza that I'll be using


2-Colour Mystery Quilt


In case you missed the post, I'm working on Canuck Quilting Designs' 2-Colour Mystery Quilt-Along. I learned a lot - mostly to check many times before cutting and sewing! I'm sure that it will go better this week - I just got the latest instructions in my inbox!

First blocks finished!


What I learned
  • I'm glad that I've started this project because there's going to be a lot of technical things to figure out as I go along.
  • One obvious thing that came to me is that if I use glue, it has to be waterproof or else things will fall apart. 
  • For example, I want to use Solvy water soluble products but if the glue completely leaves the piece because of rain, the end piece will become droopy. I can still use Solvy but I'll also have to use wire to keep the shapes.
  • I'll be using old scarves that I have or that I've bought as well as my stash of organza and other translucent fabrics to create all of these pieces. I'll be playing a lot to see what works best.
  • I just got the next clue for the mystery quilt - we're making HST. I think this might be easier - wish me luck!
Related links
Linking parties
I'll be linking up to many fun linking parties. Why not check them out, after you link up below? Sew & Tell, Needle & Thread Thursday, Put Your Foot DownOff The Wall Friday,

Free Motion Mavericks


Did you know that Preeti has a new pattern out and that her testers all posted their version on the same day? Preeti's newest pattern is called Rainbow Parade. I just love the placement of her colours. It's a really sweet quilt.
New pattern at Sew Preeti Quilts - Rainbow Parade

Frédérique of Quilting Patchwork Appliqué made a very different quilt - yes, it's the same pattern but the colours are so different! What a great way to show off this pattern's possibilities!

Frédérique's version - Parade

Denise at A Quiltery created another amazing quilt! For the Butterfly Garden-Log Cabin Blog Hop, her quilt background features log cabin blocks in a very pale batik. Add to that the yard light/birdfeeder, flowers, sun and butterflies and you have a real gem of a quilt. I won the pattern on Denise's site when it came out. I really want to make this quilt!😊 

Denise's Butterfly Garden quilt with log cabin blocks

It's now your turn!

You are invited to the Inlinkz link party!

Click here to enter