Showing posts with label journal. Show all posts

Thursday, May 25, 2023

A Large Experimental Sketchbook on Free Motion Mavericks

Hi, I hope that you are well and spent more time stitching that I did! More sorting in my studio meant that there were no surfaces left to work on - so I've been slow stitching in the living room but don't have much to show for it....it's very SLOW! 😊

Large Experimental Sketchbook


Two weeks ago, after finishing my first experimental sketchbook/journal (see Related links below), I decided to make a second larger journal. I just had to make a second book to try out the separate spine technique that Jennifer Collier demonstrated. I learned a lot, which I'll share with you.

Large experimental sketchbook
with a separate spine

In case you don't remember, here are both sketchbooks/journals. The first sketchbook had a flexible cover made from a donut box! This second sketchbook is made of stiffer scrapbook cardboard on one side and covered with decorated kraft paper on the inside. 

Two experimental sketchbooks/journals 

So far, the journals that I've made have spines that are part of the cover, like the one in the smaller book above. You can see in the image below that the signatures (groups of pages) in this book are attached only to the spine of the cover. This enables you to add whatever type of cover you want, without having to make holes in it. 
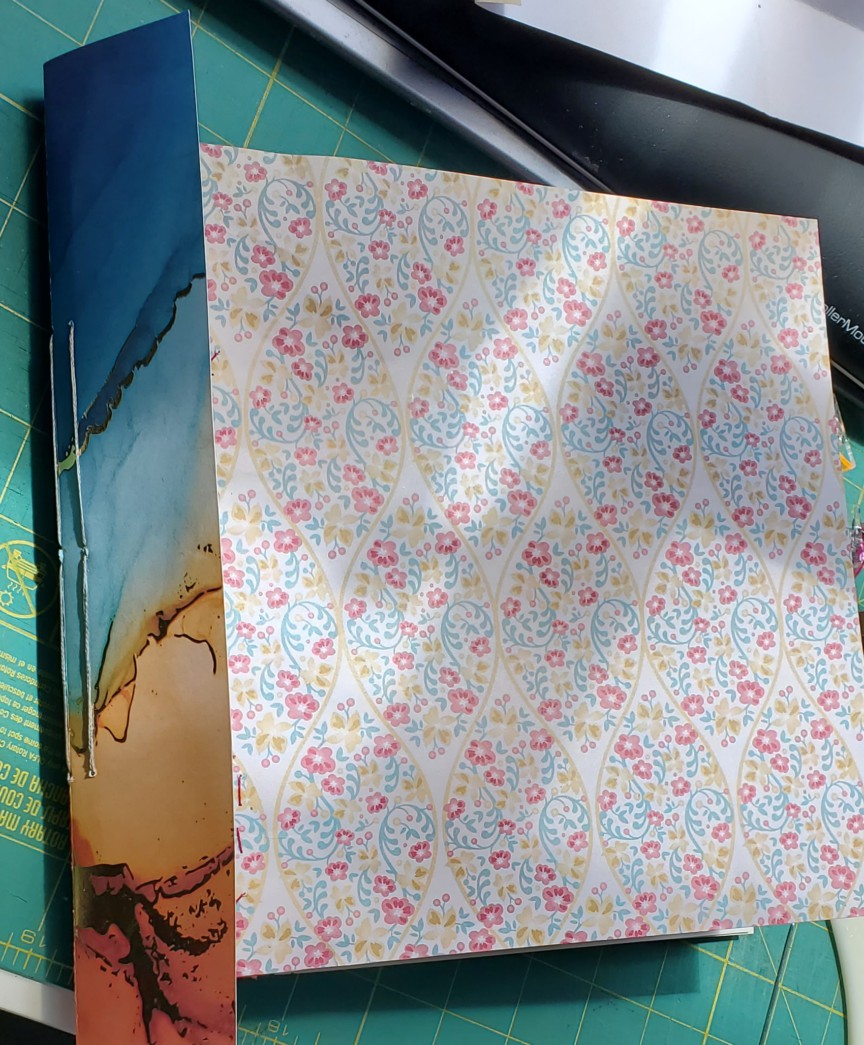
Signatures (or groups of pages) added to the spine

In this image, you can see the spine as well as the front and back covers. I attached the covers to the spine with glue. It works very well!
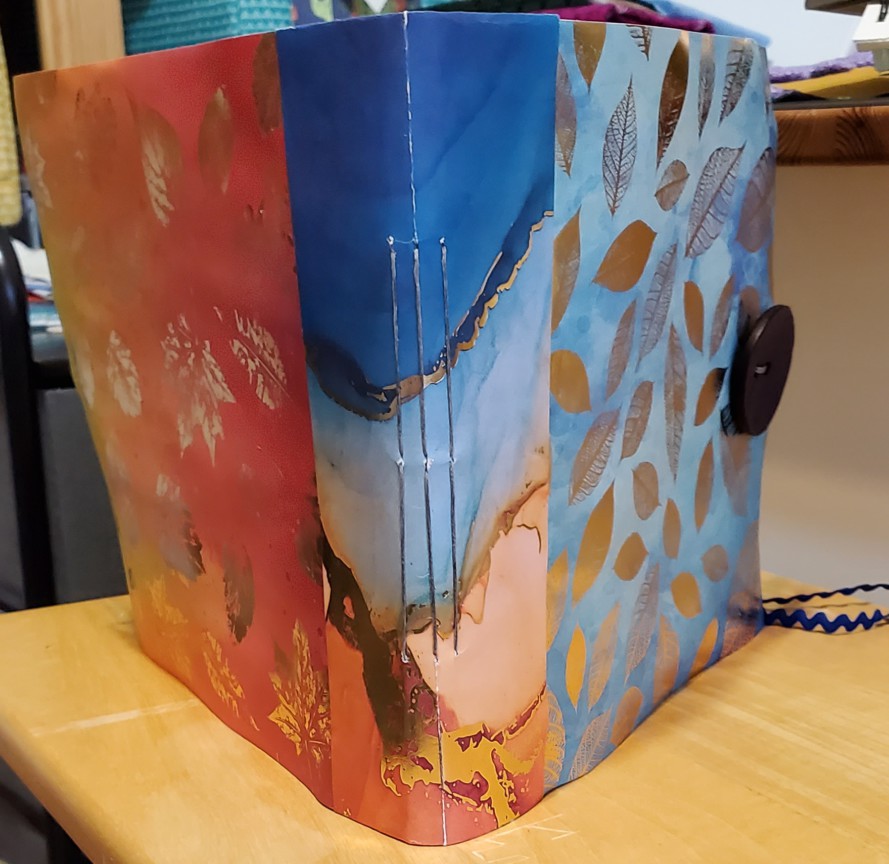
The spine with the covers glued to it

To make the journal closure, I used a great big button that I bought on sale at a yarn store. It's probably for a shawl or wrap. Isn't it gorgeous? I don't think that it's leather but it looks like it. I used a piece of blue ribbon to close it.

A big beautiful button to keep the book closed

On the inside of the book, I was a little less creative than in my first sketchbook. That's because I spent most of my time having to create all of the pages since the papers I had were all too small for the size of the journal. 

When making signatures, you generally fold the paper in half, so that you can attach the pages to the spine at the fold. Since you can't do that if the paper is not big enough to fold in half, I had to fold and then glue pages together. Sometimes the folds of both papers overlapped at the spine, like those below. 

Two smaller pages attached together, with stitching to cover 
part of the glued sections.

On other pages, I attached the paper to one side to make the second page. In the page below, there is one larger paper that is folded, to attach to the spine, while the other smaller page is glued on. I used pretty paper to decorate the glued part on the left, and just added another piece on the right.

Smaller paper attached to one side of the larger paper

On the page below, I attached a photocopy of found music sheet and covered the glued part with more pretty paper. I also added some washi tape as embellishment.

Found sheet music attached to a larger piece of paper

In two instances, I glued and stitched ribbon to cover the glued sections.
 
Ribbon added as embellishment
and to keep the pages together

On this page, I glued the first ribbon down and then stitched a second ribbon on top.  You can also see that I added tabs at the front of each of the three signatures. To keep the tabs secure, I glued them on and then added a few stitches. On the other side, I glued a piece of paper over the stitching. 
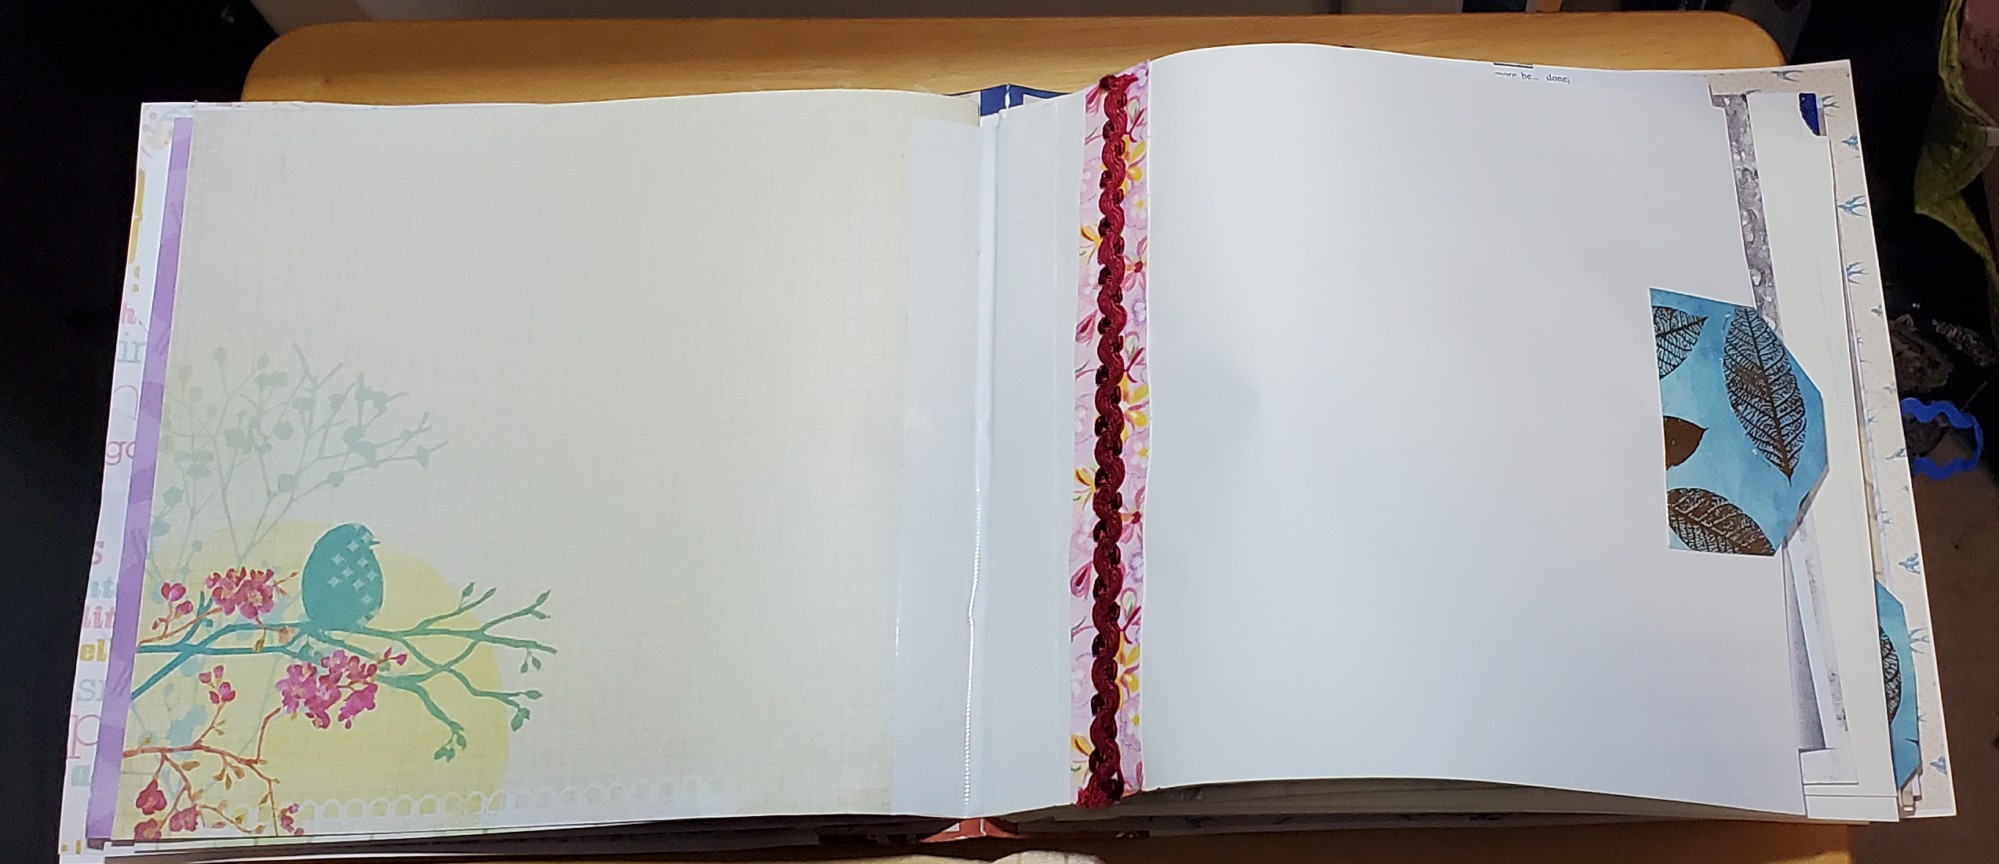
Two layers of ribbon, glued and stitched.
A tab added for each signature.

I also added different types of pockets to add things. The pages below contain two pockets - one made of sewing pattern paper while the other one is made of a scrapbook page folded and then glued. This page is the only one that is smaller than the rest.

Pockets made with sewing pattern paper and scrapbook paper


This is the other side of the scrapbook pocket. I've included a flyer of the Out of the Box (OOTB) Fibre Fling 2023 show as well as a paperclip that I added picot stitch to. 

Pocket

Here is a closeup of the paperclip with picot stitch. Isn't it cute?

Closeup of the paperclip with picot stitch


Finally, here is the page that was originally supposed to be the cover. It's from a sparkly gift bag! I didn't use it because it was much flimsier than the scrapbook paper. It does make a lovely adding to the journal.

Gift bag was too flimsy to use as a cover for this journal


What I learned
  • I've been experimenting with the larger format in the hopes of making one for my trip to Antarctica.
  • I don't think that I want to spend all of my time gluing more pages together. It's more fun decorating pages than it is creating them, even if they include embellishments! 
  • I did make a larger Stitchers' journal, a couple of years ago, using large kraft paper. I just reviewed that post (see link below) and I had used washi tape to make larger pages. I think that very larger paper bags might be the solution for my trip journal.
  • This time I watched the video again and prepared the spine properly (not too many holes!) It works so much better when you follow the instructions 😊
  • I discovered that one of the papers that I was using for the signatures doesn't fold well when not on the grain. I had some ripping where the stitches were, so I added small strips of book tape. That stuff really is wonderful. 
  • I'll have to be more careful to fold on the grain when I can. It does make a difference.
  • My only real issue when making this book was gluing on the decorative paper on the other side of the cover. It's very difficult to glue that much paper without getting air bubbles. I think that practice will help.

Related links
Linking parties


Free Motion Mavericks


We had some wonderful FMQ quilts last time, by experienced and new quilters. How wonderful! 😍

Donnalee finished quilting her second large quilt, Butterfly. What a beauty. She did a wonderful job and even had extra panels for a runner. Way to go!

Donnalee's lovely Butterfly finish

Margo of MY Quilts and Crafts finished her Pantone Challenge quilt. It really is a beautiful modern quilt and quite large at 42.5" x 52". If you haven't read about it, head right over there!

The Pantone Challenge quilt by Margo

Melva has finished the eighth and last quilt for her client - it's a lovely "Ribbon, Lace and Fancy" quilt. You can check out a close-up here or her post here. Melva has done an amazing job with all of the quilts.
"Ribbon, Lace and Fancy" quilted by Melva

And last but not least, Gail of Quilting Gail made a wonderful quilt with the “Sandalwood” collection, designed by Kathy Engle for Kari Nichols of Quilting Renditions and the Wedge Star Tool. That must be one h... of a tool 😁. It's really a gorgeous quilt! Click here to see the back of the quilt and Gail's FMQ.

What Quilting Gail made with the “Sandalwood” collection
and the Wedge Star Tool

It's now your turn!

You are invited to the Inlinkz link party!

Click here to enter

Friday, May 12, 2023

Making an Experimental Sketchbook

Hi, I hope that Spring has finally shown up in your part of the world (on the top side of the equator). Otherwise, I hope that you're enjoying your Fall weather 😊

Making an Experimental Sketchbook


Before this year, I had no idea how many ways there were to bind and make a book, journal or sketchbook. What a fascinating world! This sketchbook was made following a workshop through TextileArtist.org, with Jennifer Collier, an amazing textile artist who does incredible things with paper. 

The cover of the sketchbook is made from the top of a SusyQ doughnut box. The donuts were awesome and their box was too cool for the recycling bin!

Front of the Experimental Sketchbook

I learned a lot through this workshop - including paying more attention to the instructions! 😁

For the signature pages, Jennifer encourages us to use all types of old papers, envelopes, etc. I did use one envelope to make a pocket. I also had some glossy magazine pages that I had tried to make photo transfers with. That project wasn't a success, but it was great to be adding them to the sketchbook. 

Two altered magazine pages glued and stitched together

I used some found music photocopies to create a page. Since the edges of the photocopies were black, I glued on some washi tape to cover them.

Recycling music sheets with washi tape

I also used scraps from other book making projects to decorate the pages. These are pieces of scrapbooking paper used as an accent and a book tab. I glued the book tab and then stitched it. I also used some pretty printing paper that I've been collecting for years.

I used a strip of bookbinding tape between the signatures. I recently bought a few bookbinding tools and love them!  

Using scraps of other projects to decorate the pages.

For the inside of the sketchbook, I glued a lovely piece of craft paper instead of gluing the first page to the book cover. I did this mostly because my cover was a bit larger than my pages. 

The inside of the cover

Of course I had to chase a squirrel within my squirrel! I made this page using a thick scrapbooking paper. You can see in the next picture that on the inside I glued a couple of pages from an old book. Since I didn't feel like taking out my paints, I added tule over a part of the page and stitched it down following the pattern of the scrapbooking paper. I really love the effect.

Stitching following the pattern on the page

The real squirrel is the circle in the middle of the page. On a scrap of hand-painted fabric I attached a piece of tule that is cut into strips at one end. This allowed me to weave tule, wool and rope. I then stitched around the piece to keep it together. 


Woven piece with tule

Finally, for something different, I glued tissue paper to one of the pages. I love the texture that it created.

Tissue paper glued onto a page

This is the sketchbook cover. The binding of the signatures is in the middle (for the middle signature) and then on each side for the other two signatures. This is very cool 😎.

Sketchbook cover with stitching for each signature

What I learned
  • When I saw Jennifer Collier's first workshop in 2020 with TextileArtist.org, I didn't think that paper was for me. It's incredible how time and experience has changed my opinion and practice. Fabric may be me first love, but paper is pretty impressive!
  • Using the altered magazine pages was a great idea, but they shouldn't be placed in the middle of a signature since that is where the pages are tied. These were too fragile for that.
  • Old Washi tape tends to loose its stickiness. After learning this from making my washi tape journal, this time I glued the tape down.
  • I also learned that spreading glue down with a brush seems to work better than using a glue stick. 
  • It's great to use what you have to make books but I don't ever want to use a needle in a cork instead of an awl. What a difference using the real tools makes!
  • I love to experiment. Gluing the tissue paper to the page is a great way to add texture. It could even be cool to write on it 😎
  • I've also been experimenting with layering in my art. The pages with the text, tule and weaving is part of that effort.
  • I should have re-listened to the video before I started making holes and stitching the book together. Other than extra holes everywhere, the damage was minimal...so I didn't have to buy more donuts...unless I make another book 😋
Related links
Linking parties
I'll be linking to many fun linking parties. Let's see what's going on out there! Put your foot downCan I Get A Whoop Whoop?Peacock PartyOff The Wall Friday, Sew & Tell, Patchwork & Quilts, Slow Sunday Stitching


Thursday, March 23, 2023

Making Journals on Free Motion Mavericks

Welcome! I can't believe that it's already time for Free Motion Mavericks! I doesn't help that I posted a day late last week. This week I'm on time but no FMQ (free motion quilting) to share. 

Upcycled Traveller's Journal 


This week there is an exciting free event going on - Sketchbook Revival 2023. There are loads for really cool teachers presenting various things related to art, sketchbooks, colour and creativity. Before the week began, Ali Manning of Vintage Page Designs and the Handmade Book Club (of which I'm a member!) showed us how to use an old book binding to make a traveller's journal with separate journals that can be added or removed from the cover. It's so cool!

I used an rescued book cover whose book was falling apart. It's not the prettiest book cover (9¼ " x 6") but perfect for learning how to make this journal. I glued a piece of cloth over the spine area. Since the inside of the book cover wasn't pretty, I added a pretty piece of craft paper to the front and back. 

Book cover and first journal

I prepared 4 journal to fit into the cover. Each journal has craft paper as a cover. 

First and second journals

Each journal is stitched and then attached to the book cover using stretch lace elastic. 

Each journal can be removed from the book

Washi Tape Journal


The bonus course from Ali is a fun washi tape journal.

Washi tape journal
This small journal (5¾ " x 4½ ") was super simple and quick to make. It consisted of 2 signatures of 10 photocopy pages each, folded in half to make 20 pages.

Two covers are made using a legal size folder. We covered them with washi tape but they could be decorated in any way. Since the legal size folder is long, you can add pockets on the inside and middle of the journal. My pockets are attached with paper clips until I buy some narrow 2-sided tape to keep them down.

Journal with a pocket on the inside cover

The second cover ends up in the middle of the journal, where additional pockets can be added.

A smaller pocket in the middle of the journal.


A larger pocket, also in the middle of the journal.

This is one of my favourite journals - so easy and simple to make but very versatile. You can use all kinds of paper for the signatures and decorate it any way you want.

A lovely slim journal that can fit anywhere.


Update on my SAHRR baby quilt


Just a quick note to say that I've completed the first step of making the pinwheel blocks by make batches of half-square triangles. 

Next step in the SAHRR baby quilt

What I learned
  • I'm happy to say that making journals is getting easier. 
  • I should have cut my paper for the Upcycled Traveller's Journal by about a ¼ " shorter. This would have made it easier to put the journals in the elastics. Next time 😊!
  • Old washi tape doesn't stick as well as new stuff, so I may have to glue some of it down. 
  • The narrow two-sided tape will be great to keep the pockets down. I love adding pockets to my journals, so it will be a good investment.
  • I'd like to make more washi tape journals but experiment with fabric. Mod Podge would affix the fabric to the cardboard and make it stiffer (and help keep it clean).
  • I also have many nicer book covers that I'd like to use to make more Upcycled Traveller's Journals. 
  • I also want to make larger journals (the size of a duo tang) with lots of pockets to hold my travel souvenirs, notes, etc. The cover is not a problem but getting paper that large can be.
Related links

Linking parties


Free Motion Mavericks


Welcome to week 423 of Free Motion Mavericks. Did you have time to do any FMQ? Either way, we'd love to see what you're working on 😊.

Since we didn't have any FMQ, here's what Donnalee, Melva and Joy are working on!

Donnalee is making a second runner with some lovely Spring colours.

Spring runner by Donnalee

Melva was on her eleventh mini, but I want to show you number ten, Angel on the Shore.

Angel on the Shore, a mini by Melva


Joy linked up her Split Back Star blocks for a QOV quilt. Welcome Joy!

Split Back Star blocks for a QOV quilt by Joy

It's now your turn.

You are invited to the Inlinkz link party!

Click here to enter