Hi and welcome! I have a very Spring-like finish this week. My 3D Spring Tulips 🌷is finished! This was my April One Monthly Goal (OMG) and the piece is due to be dropped off on April 30th for the Fibre Fling Show this weekend. No pressure 😁!
Spring Tulips is finished!
I wasn't sure what to expect when I was inspired to do this piece, but it sure is cool and I learned so much! It was all about playing and trying things out to see what worked. I love the problem solving aspect of these types of projects.
 |
| Spring Tulips is finished! |
Let me quickly take you through the process of making Spring Tulips 🌷.
Background and Vase
I made a couple of sketches from tulips I had bought. It was mostly to get a perspective of tulips in front and behind, as opposed to little soldiers in a row.
 |
| Drawing tulips in a vase for perspective |
I made the tulips, first trying out templates but quickly just winging it (as usual). Once the tulips, stems and leaves were affixed to my background fabric, I cut out a paper shape of the potential vase. This helped guide the making of a translucent vase using Sulky Solvy water soluble stabilizer.
 |
| Vase outline in paper |
To make the vase, I used a layer of thicker Solvy topped with hand-dyed pink silk organza. On this, I added thread, snippets of cotton, organza, etc. I covered this with a layer of very light Solvy and free motion quilted it (FMQ). The thread choice is very important here since it's what really shows up.
 |
| Layers of silk organza and snippets stitched over Sulky Solvy |
 |
On of the side
pieces |
FMQ over such a large piece worked well, but I did figure out that on smaller pieces, the regular sewing foot was better.
To make the vase wide enough to contain tulips, I ended up stitching 2 pieces to attach to the sides of the vase. I sure used up a lot of thread on this project!
Once I washed off the glue from the Solvy, I sewed on the sides and then attached the vase to the background. I didn't sew down the bottom of the vase until almost the end since frankly I had not idea how I would do it!
Here is the vase with the background tulips after they were FMQ.
 |
Attached vase, FMQ background tulips and
playing around to make tulips. |
FMQ the Background and Making the Tulips
It took me a couple of attempts to figure out how to make the free standing tulips. I found some tutorials on YouTube but didn't want just quilted tulips, You can read more about this in my last post (see Related links below).
 |
| Getting organized to make the 3D tulips with petals, stems and leaves |
I finally remembered to take a couple of process pictures while making my final tulip. Three of the tulips have hand-dyed cotton as a background while the other two are stitched on the silk organza.
 |
| Making the tulips on layers of Solvy, fabric, snippets and thread |
After stitching them, I separated each petal and removed the glue from the Solvy in warm water and hung them to dry.
 |
| Drying petals for the last three tulips |
Yesterday I put all of the tulips together by hand-stitching. There was a lot of pricking by the needle to make these but there is no blood on the tulips - promise!😁
While I was doing all that, I faced the background and then FMQ it. I was also wondering how to finish the bottom of the vase since I didn't want it to be floating in the background. I was inspired to attach the bottom of a doily under the vase.
 |
FMQ the background and
adding a doily for the vase to sit on. |
This is when I added an extra leaf to the background to hide some white space without adding extra tulips.
 |
Adding an extra leaf to the background
|
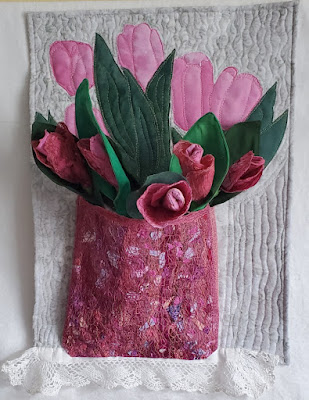
Here is the final piece. It's so cool that the tulips can be re-arranged! 😎
 |
| Spring Tulips 🌷 |
 |
| Spring Tulips 🌷 |
 |
| Spring Tulips 🌷 |
What I learned
- This piece was an incredible amount of work. I wanted to create a 3D piece and I did it!
- I love being able to blend different techniques in a piece, from stitching on the Solvy, to appliquéing tulips in the background to making a vase with tulips in it!
- I prefer not using an embroidery hoop when working with the Solvy. It's fine FMQ on a larger piece but it's very difficult on smaller pieces. When the stitching isn't as obvious, using a regular sewing foot worked much better.
- I only FMQ the background after the vase was attached. In hindsight, it would have been a little easier doing it before! I just didn't know what to expect and it turned out fine.
- Making each tulip was the most time consuming part. I got pretty good at pulling the stems and the leaves inside out. I stuffed the stems with small strips of batting (about ¼" wide). It was great to use up those scraps since I generally throw them out.
- I used different methods to make the centre of the tulip. At first I added batting to it but ended up doing the last three without the batting. I'm not sure which technique was better.
- Making these tulips showed me that there are many ways of making them and the final result is all good.
- BTW, I just realised that there is only 30 days in April, so it's already the end of the month. Yikes!
The Out of the Box's Fibre Fling Show is on this weekend. If you're in the Ottawa area, please come and say hi! I'll be at the membership table for the two days. 😊 Spring Tulips and
Home to Feed will be there too!
 |
| My 2 pieces at Fibre Fling 2024 |
Related links
Linking parties
Project details
Spring Tulips
Made for OOTB Fibre Fling Show
Size: 19" x 13" x 5"
Material: hand-dyed cotton and organza, commercial cotton, doily, Sulky Solvy water soluble stabilizer, cotton batting, fabric snippets and thread
Techniques: appliqué, free motion quilting (FMQ), sculptural stitching.
Free Motion Mavericks
Welcome to week 480 of Free Motion Mavericks! My post is early because I just figured out that it's the last day of April and I need to show you my One Monthly Goal!
Last week we had a wonderful linking party! Thanks to everyone who linked up 😍. Here are the projects from last week that included FMQ, ruler work or walking foot quilting.
Vicki of Vicki's Crafts and Quilting shared her gorgeous
butterflies runner. Look at that lovely
FMQ and the ruler work in her background and borders.
Gail of Quilting Gail has been busy adding hanging sleeves for her guild's quilt show this weekend. She also managed to create a cute
baby quilt using Dr. Seuss fabric. She used black thread to help highlight the blocks.
Finally, Chris of Chrisknitssews made this lovely
Flying Geese quilt. I love her ghost Flying Geese that she ended up FMQ within them to ensure that the quilt had an even consistency. It's really great!
It's now your turn!


Oh my, your 3-D tulips are so cute!!!
ReplyDeleteThanks so much Nancy. I've also entered them in my local quilt show.
DeleteWhat a beautiful, three-dimensional, piece of art! Thanks for linking up with Favorite Finish.
ReplyDeleteThanks so much Yvonne.
DeleteWow on your tulip finish! So creative and time consuming, nicely done!
ReplyDeleteThanks Vicki. They turned out well!
DeleteI love that the front tulips can be re-arranged. So much creativity!
ReplyDeleteThanks Judy. 😊
DeleteThis is the most amazing thing I've seen in a long time. The composition is lovely and I really enjoyed learning how you made those fabrics with the solvy, snippets and threads. Thank you for your detailed description :)
ReplyDeleteThanks Janine. They were quite the endeavor!
DeleteWow! Very pretty and definitely awesome. Such a fun piece.
ReplyDeleteThanks so much Kate 😊
DeleteOh bravo !! J'adore tes tulipes, et la finition du vase. On dirait vraiment qu'il est posé sur un napperon. Superbe !
ReplyDeleteMerci beaucoup Frédérique. Je suis heureuse du résultat mais il n'y aura probablement pas de série !
Delete