Hi, welcome to the first day of the Blog Hop, "Dust off a Quilt Book". This event is hosted by Beaquilter. Thanks Bea for organising this fun blog hop, and for Frédérique for offering to make it a linking party!
Trying out a new technique
It took me over a month to decide what book and what project to do - and even then, it didn't turn out as planned. I sure did learn a lot 😊. When I was in University, a few years ago (lol), I had a poster that said: "Experience is what you get, when you didn't get what you wanted" So, this project was an Experience! This post is about how I got there.
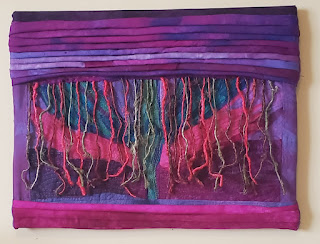
Update: As the piece was on my wall, it finally came to me what I could do to actually like it! Here is the final version. More below.
 |
| The Light Beyond |
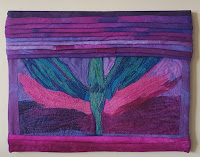 |
Light (before the change)
|
The books
I really wanted to choose an OLD book and rummaged through my mother's quilting magazines and books. I knew that I didn't want to make anything traditional - so there were few options. I did find Missy Powell's Art Deco Quilt - a king size quilt that Missy made in 3 DAYS!
 |
| Art Deco Quilt made by Missy Powell |
 |
Quilt World August 1984
Front Cover - Missy Powell working on
a traditional quilt
|
 |
The Art of Manipulating Fabric by
Colette Wolff |
I had a difficult time understanding the instructions, so I found this technique in another relatively old book: The Art of Manipulating Fabric by Colette Wolff (1996). It's an excellent book and I found what I was looking for under Filled Reliefs - Stuffing - Connected Rolls.
The fabrics and the plan
My artist friend, Elaine Quehl gave me a huge bag of her hand-dyed fabric scraps. As you can imagine, the day I got these I felt like a kid, playing, looking and touching all of this fine fabric. Elaine use to bring these fabrics to her classes for students to use, so there were bigger and smaller pieces. Yum! 😊
This is the colour palette that I chose when I started the project. The plan was to make rolls in some kind of gradation.
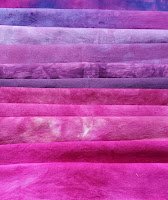 |
| Original colour palette |
 |
| Giving up after making 10 connected rolls |
As you can see, I started with darker fabrics and was going to make my way to lighter ones when I decided that making connected rolls was not my idea of fun!!!
Alternate idea
So now what? Well, it sort of looked like a sky. Should I make a sun set or maybe some northern lights? I decided that the northern lights would be great on this background. At this point, I really should have started looking a photos of northern lights, but I didn't 😞. I started playing around with some fabric that I thought would look like the northern lights.
From this picture, you can see how the idea evolved. I started off with wisps of fabric, sewed them down and then, on the other side, covered them with my hand-dyed silk organza....one wisp at a time! The bottom two rolls in this image was part of my original plan, to go from the dark to the lighter colours.
 |
| Not sea weed but lights 😞 |
When I got to covering the second set of wispy fabrics, I just covered the whole area with the organza.
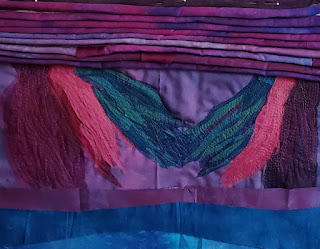 |
No longer looking like sea weed but
not really northern lights... |
This is where I was when my son and his girlfriend, Sarah, came for supper Sunday evening. I told them about my project and asked them to see if they had any ideas. They both agreed that it didn't really look like northern lights. When I told her that one way or another I would finish it, and probably just cut it up later to make something else, Sarah suggested that I might want to cut it up now and re-arrange it.
Before cutting it up, I cropped the photo into two and put it back together in PowerPoint (I don't have any fancy software, but it did the trick). I wasn't sure that it would work, but at this point, I had nothing to loose.
Re-arranging the puzzle
I played with it like a puzzle. This was what we had originally thought - not so great.
 |
| First try |
Then I turned them upside down. I wasn't thrilled but this was the best that I could do. I did look at some images of the northern lights and this was starting to resemble them...a little bit.
 |
| Turning the pieces upside down |
So that was my new technique experience! It's not at all what I envisioned but it's done. I added borders and attached it to a 14" x 11" canvas.
 |
| Previous version of "Light" |
I am rarely really disappointed in a piece - but I really didn't like this one. As I was looking at it today (the day of the post being published), for some reason I got a flash of insight - "beyond the vail". For me, that's how my intuition and my creativity works. I don't always listen...but this time I did, and I'm very happy with the final result.
 |
The Light Beyond
|
My curtain of sari silk strands are perfect for creating an aura of mystery to the lights behind it. I hope that you like this version better. I know that I do!
What I learned
- This was an interesting experience! It would have helped a lot if I had looked at images of northern lights before starting to play with wisps of fabric.😊
- It was a great exercise in problem solving. It wasn't a piece that I even liked but I am glad that I persevered. The irony is that I didn't plan enough for this project, but the other project that I was going to do, a sewing machine cover, was planned so much that I didn't feel like making it.
- There is a lot to be learned about undertaking a project when I'm not in a good place - I couldn't make up my mind, and my decision making skills were far from optimal.
- It is amazing fabric and I am very grateful to Elaine for giving them to me.
- I'm so glad that my intuition came to me...and not too long after the posting of this blog post. I'm leaving you in a much happier state.
Linking parties & blog hop schedule
I will be linking up to many fun linking parties.
Monday Making,
Midweek Maker,
Free Motion Mavericks (with Muv this week),
Put your foot down,
Needle & Thread Thursday, Finished or Not Finished Friday,
Off the Wall Friday,
TGIFF,
Beauties Pageant,
Peacock Party,
As well, here is the list and links to the blog hop participants:
Tuesday March 1st
Quilting & Learning - What a Combo (You are here!)
Project details
The Light Beyond
Attached to a 14" x 11" canvas
Materials: hand-dyed cotton and organza, sari silk yarn, Kimono Silk Thread, cotton batting
Techniques: Stuffed connected rolls, Free Motion Quilting (FMQ)



It’s funny how our projects evolve. It turned out beautiful even if it isn’t what you envisioned.
ReplyDeleteThanks Rebecca. I'm just glad that this one is over. I'm looking forward to seeing your creation.
DeleteHi Rebecca, just wanted to let you know that I worked on my project and made some significant changes...and I actually like it now. You may want to have a second look :-)
DeleteFun project. How big is it? Thanks for participating!
ReplyDeleteHi Bea, it's attached to a 11" x 14" canvas. I actually made some significant changes since you first saw it - please come back to see it. I actually like it now :-) Thanks
DeleteFun little piece of art! J'aime bien le résultat final, et ces tissus sont absolument magnifiques ! Bravo pour le dépoussiérage de vieux livres !
ReplyDeleteBonjour Frédérique, je n'aimais vraiment pas le résultat final. J'espère que tu reviendras pour le revoir. Je l'aime beaucoup maintenant. Merci pour tes mots d'encouragements.
DeleteWell done on trying a new technique even though it did not end up as imagined.
ReplyDeleteThanks Karen. They don't always turn out the way we want to - and life is to short to not have fun, hence not making another 30 or 40 stuffed rolled tubes!
DeleteIt really is an interesting piece and a great learning project. I have a bin full of projects I don't like. Maybe cutting them up is the way to go.
ReplyDeleteHi Carla, we all have "failed" projects but I'm sure that you could do something with some of them. If they are traditional blocks, cutting them up can make for really neat improve blocks.
DeleteI am just going to start off by saying you have gorgeous fabrics to play with. I love what you came up with, and the process to get there. I think it turned out fabulous.
ReplyDeleteThank you so much. I love the fabric and have a whole box full, so more projects to come! I just couldn't let go of the project and am so glad that I figured something out - I hate having projects that I really don't like!
DeleteI love how you processed through it and created something beautiful. I love the colors and the final design!
ReplyDeleteThank you Carol. I'm really happy with the result...finally! Looking forward to seeing your project!
DeleteHi,
ReplyDeleteGreat learning process for you, thanks for sharing all the info with us. And your Beyond the Lights quilt is Awesome! Have a great day!
Thanks so much Sherrie. I'm really happy with how it turned out...eventually! Have a great weekend!
DeleteHow fun to dig out an old book - but even better - the experience. Your final project is beautiful!
ReplyDeleteThanks so much Alycia. It really was an experience and I'm so happy that it turned out well in the end...as all good stories and experiences should :-)
DeleteYour journey was fascinating and the project ended in a lovely state.
ReplyDeleteThanks so much Nancy. I'm so relieved that it did turn out well. Have a great weekend!
DeleteThe finished piece is so cool, Andree! I'm glad you kept working on it, exploring possibilities and open to changing direction when your original idea fell short of what you'd envisioned. And thanks for reminding me of that Art of Manipulating Fabric book, because I know I have it on my (bulging, overflowing) bookshelves and I haven't looked through it in quite some time!
ReplyDeleteThanks so much Rebecca. I'm really glad that I did keep at it. I really dislike making something that I don't like. I'm just glad that I got inspired. I'm actually going to put it into our Fibre Fling show :-) Enjoy the Art of Manipulating Fabric book. One could work through it for years!
DeleteHello Andrée, I always love your stories of your creative process, so hit and miss! I love the feeling of mystery with the curtain. You definitely won in the end.
ReplyDeleteThanks Muv, this was definitely a hit and miss. I'm so glad that it had a happy ending :-)
Delete