Showing posts with label Sue Stone. Show all posts

Tuesday, February 21, 2023

Off the Grid Sampler is finished

Welcome! I'm very happy to share this finish with you 😊 It's been a fun project but it's nice to see it finished so that I now have a few less projects on the go, or I can start another one! 😁

Finishing up "Off the Grid"


Since I kept track of all of my different stitches, I can tell you that there were 44 different area to stitch. In some of those areas, I even managed to use a combination of more than one stitch.

"Off the Grid" Sampler finished and mounted

I don't usually track all of this but a sampler that doesn't include a record of the stitches used is difficult to learn from. Sometimes I can tell which stitches I used, but at other time, I don't have a clue!

This is my sampler - I did miss two areas, between 23 and 24, and then on the other side of 23. 

A drawing of the sampler

These are the stitches that I used the most, in several places: 
In case you're interested, I linked the stitches above to Sharon Boggon's Pentangle Stitch Dictionary. 

Here are a few more images of stitches.

Raised band herringbone stitch, a row of chain stitch,
lots of French Knots, random fly and feather stitches,
and outlined satin stitch


from left, clockwise
Seed stitch, stem stitch, buttonhole stitch, double buttonhole
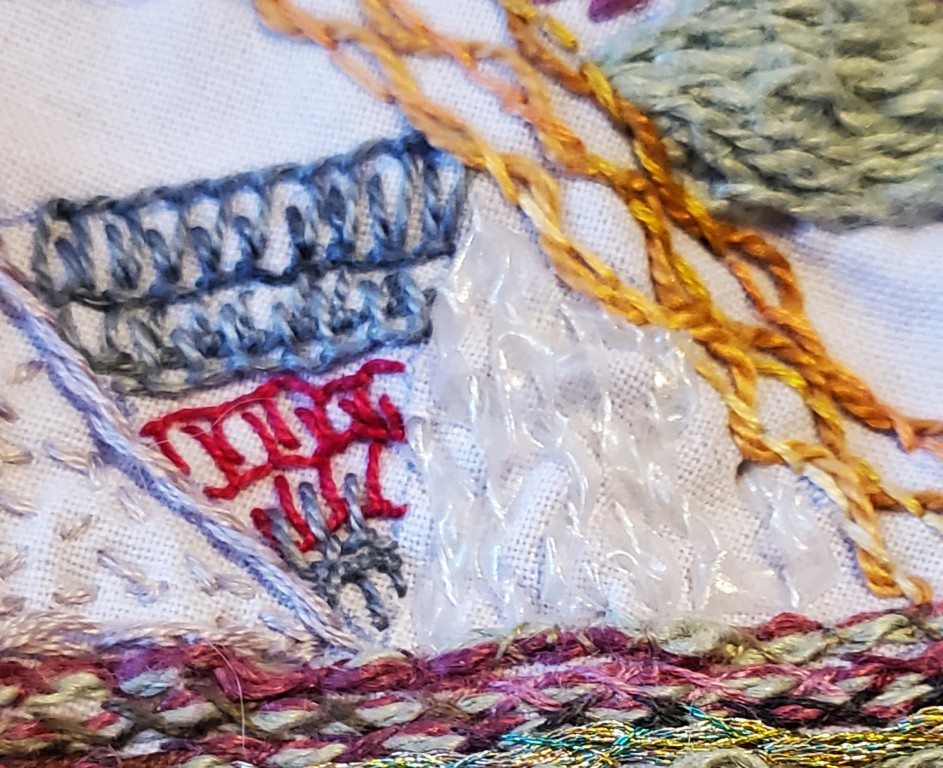
and battlement stitch, threaded running stitch (with transparent elastic),
threaded backstitch and couching stitch (at bottom)


I finished my sampler by mounting it on a canvas board.

Off the Grid Sampler

What I learned
  • As I typed out my notes about the stitches, I realised that they weren't very good - better than nothing but not consistent or detailed enough.
  • Using variegated thread for almost any stitch adds colour and interest.
  • My least successful stitches were in not very straight rows. 
  • In doing couching stitches, if you want them to show up, they need to be very contrasting and use more than one thread. 
  • I had given up on making the sampler pretty and used many more colours than I usually do. I'm not really sure why it works but it does look good. I did try to repeat the colours, so that may have helped.
  • I really like using the Mouliné étoile embroidery thread by DMC for French Knots. They are slightly fluffy and look great.
  • I love trying out different yarns for embroidery. Another fun yarn is Tencel Pearl. I've linked to the company, Trail Head Yarns, below.
  • I also discovered that you can buy linen at the yarn store for embroidery. I got 3 colours of the BC Garn Lino for Christmas. What beautiful linen and perfect for embroidery. Buying a skein of linen is economical considering how much linen it contains. It's going to last many years 😊

Related links
Linking parties
I'll be linking up this post to many fun linking parties. Let's see what's going on out there! Patchwork & Appliqué, Design Wall Monday, Sew & Tell, Midweek Makers, 

Project detail


Off the Grid sampler
Based on a workshop with Sue Stone, TextileArtist.org
Size: 8" x 6"
Material: Kona cotton, embroidery floss, metallic thread, Mouliné étoile, Tencel Pearl, perle cotton, transparent elastic, etc.
Techniques: embroidery (see post for stitches)

Sunday, December 11, 2022

Off the Grid Sampler

Hi! I hope that you are surviving December and all of its potential craziness 😎. I'm trying to stay Zen but it's not easy! Something that does help is embroidery and other slow stitching projects. Here is an ongoing project.

Creating my own Off the Grid Sampler

This sampler comes from a September class with Sue Stone from TextileArtist.org  It's taken me a while to get going but now I'm enjoying it a lot and looking forward to trying out stitches. 

Off the Grid Sampler...so far

I'm using two layers of fabric for the embroidery. The top is a Kona cotton and the bottom is a very light cotton that I've used for backing various slow-stitching projects. I've numbered the different shapes in the pattern so that I can keep track of what stitches I've used.

Pattern and numbering to keep track of stitches

Here are a few pictures at various stages. I won't be listing every combination here unless it's something particularly interesting. 

Sampler

The image below has some interesting trellis stitches with Tencel perle (section 6), double buttonhole stitch (section 5), and feather stitches in black as a filler (section 7). In sections 3 and 9, I was playing with the placement of running stitches. It's not quite what I want yet but I'm sure I'll figure it out!😊

Closeup of some stitches

The French knots below are nice and fluffy because I'm using the Tencel Perle.

French Knots within a border (section 16).
I'm still working on the border part. 

My two furry helpers


I was dog sitting and asked my two helpers to sit next to the embroidery so that I could take their pictures. Twix, always wanting to please, sat for this photo while Taffy, the independent one, promptly lay down on it to sleep 😁

Twix is always happy to pose for a picture.

Taffy taking a nap on the sampler

What I learned

  • I was hoping to make a lovely colour-coordinated sampler but I soon gave up and am using a variety of interesting threads without being too concerned with colour. It's going to be a scrappy sampler 😊.
  • When I was at my brother's place, he saw my embroidery floss, left the room and then came back with a plastic bin. It contains my niece's friendship bracelet supplies which I've now inherited. (Thanks Anna!) There is some wonderful embroidery floss in there and a few interesting beads and buttons.
  • There was also a whole bunch of friendship bracelets that she made. I had a few of her bracelets and now with these new ones, I really want to make a "collaborative" piece. I will also include some of my daughter's bracelets. So many ideas 😉 
  • I'm enjoying trying out combinations of stitches on this sampler. The fun part is that if it doesn't really work the first time, I can use different threads to try again. 
  • My motto for this sampler is: It might not be pretty but it will be useful!
  • I was happy to try out some stitch combinations from memory. I wasn't of the name but checked them out in my trusty Creative Stitches for Contemporary Embroidery by Sharon Baggon.
  • The stitches I started in section 31 are buttonhole or blanket stiches but they are not going in the direction that I want them to. Unless it's really horrible, I'm not going to undo stitching, I'm just going to work around them.😊(that's the Zen part!)

Related links

  • Creative Stitches for Contemporary Embroidery by Sharon Baggon
  • Sue Stone's website

Linking parties


Friday, July 16, 2021

Trying to get from fine to great!

Hi, it's been a while. I haven't been motivated to do much of anything except a little bit of gardening. I thought that it might be time to try to kick motivate myself out of my funk. So here's a project that I've been working on. Unlike most projects where, whether it's good or not so good, I try it once and move on, I'd really like to get this one, not just fine, but great! 

Version 1

My daughter took this picture of our "All for One" pose with her, Chevy and me. I've been thinking of how to embroider it - so this is my journey 😊

All for One

I wanted to embroider this image onto a denim coloured cotton fabric. I wasn't sure how to proceed. In this first version, I tried a couple of new techniques.


All for One - version 1

The first new technique was to mount the background fabric onto the frame of a painting canvas (8" x 8"). First I removed the canvas for the frame. Then I pinned the fabric over the frame with tacks and used the frame as an embroidery hoop. This works well if the image doesn't go anywhere near the edges of the frame. The back of the frame is much wider than an embroidery hoop, so it's difficult to stitch near the edge of the fabric.

Close-up of All for One

I started by tracing the photo onto tracing paper. For the stitching, I followed Sue Stone's suggested technique: to stitch directly through the tracing paper with the fabric underneath. I used a stem stitch of 3 or 4 strands of embroidery floss. When I finished stitching the outline, I carefully ripped off the tracing paper.

I did a little bit of filling inside the image. I even used some fluffy yarn to stitch part of Chevy's coat.

I'm not crazy about my stitching. I'm not sure if it's because the stem stitch is looser after having stitched through the paper and fabric or from pulling the paper off. The awkwardness of stitching using the frame can also account for some of it.

What I learned

  • I think that a tighter stitch would be better.
  • Sue Stone uses a backstitch, so that might have made a difference.
  • I'm not sure that I want to have just an outline or to add something extra as a fill.
  • What I'd like to try next:
    • Use a background colour that is more skin tone.
    • Use a different stitch.
    • Stitch more details such as shadow.
    • Possibly add a sleeve or two, to add texture. It's also possible to add appliqué but I don't think that I'll do it in the next version.
  • I really like having my piece finished on a frame like this, but this time I'm going to embroider it as usual and then cut and tack it to the frame after it's done.
  • I've always had problems with the corners when adding fabric to a canvas. However, after taking the canvas off of the frame, I saw how they cut and folded it. I highly recommend that you do this if you want to figure it out.
Related links
Linking parties