Showing posts with label burlap. Show all posts

Thursday, July 06, 2023

Whitework at Free Motion Mavericks

Welcome to Week 438 of Free Motion Mavericks. I did some Free Motion Quilting (FMQ) for the Table Scraps Challenge, but it needed to be posted before today, so I've included it in last week's review of Free Motion Mavericks below.

Pulled and Drawn Work (not on white!)


I keep thinking that I'm done with the pulled and drawn work (part of Whitework), but I just can't seem to let it be! I get all kinds of ideas and I just have to run with it! This one would definitely qualify as a Squirrel 😊 

I bought a huge piece of burlap, the kind that you use to cover your plants in the fall. It's got such a lovely loose weave that it was a true pleasure to work on.

I used some of my favourite techniques such as the drawn thread with twisted bar and drawn thread with offset stitches. I wove some sweetgrass, sometimes with a couple of pieces in one space. I also wove some chunky yarn as well as a band of wood that was originally used as the handle of a strawberry filled basket. The bottom section consists of various pulled thread techniques.

Pulled and drawn work on burlap

I didn't take any process pictures except this one.

Weaving in the sweetgrass

More Whitework techniques


I tried doing some pulled work on the linen but I couldn't see well enough to count the individual fibres. I did try a little section but it barely showed, so really not worth it! In the image below, I created a drawn work band and wrapped thread around three of the thread sections to create overcast bars. I got bored and stopped, but if I get back to it, I'll have to use thicker thread.

Underneath the drawn thread band, I made a small grid with withdrawn thread. I used the knotted grid stitch. It's not pretty, but I did it! 😊

Experimenting with more techniques

The first three are overcast bars

This is the grid, before being stitched

Knotted grid - not pretty but it worked, more or less 😁


What I learned
  • After trying to weave the sweetgrass and having them break, I remembered that they have to be soaked for a short while. This makes them pliable and much easier to weave. 
  • One end of the sweetgrass fit into my tapestry needle so it wasn't too difficult to weave into the burlap.
  • I also soaked the wooden handle piece for a few hours - by then it was straight!
  • Based on Tracy A Franklin's book, Contemporary Whitework, I tried some of the techniques on the linen. It's a lovely book and there are so.... many things that I want to try! 
  • Today I taught a mindful stitching class for Out of the Box Fibre Artists. It was held at a local library and really was a wonderful day. I have a few pictures of finished and in-progress blocks. I'll ask if anyone else wants to share, and then I'll prepare a post.
  • I have so many quilts to work on that I really should leave the whitework for a while...we'll see!

Related links

Linking parties
I'll be linking up to many fun linking parties. Why not check them out - and remember to link up below!


Free Motion Mavericks


Thanks to everyone for participating! 

Last week Gail posted her PHD report for June - she sure has been busy and FMQ many quilts which we've seen here 😊. The quilt below was her favourite finish. Look at that wonderful FMQ!
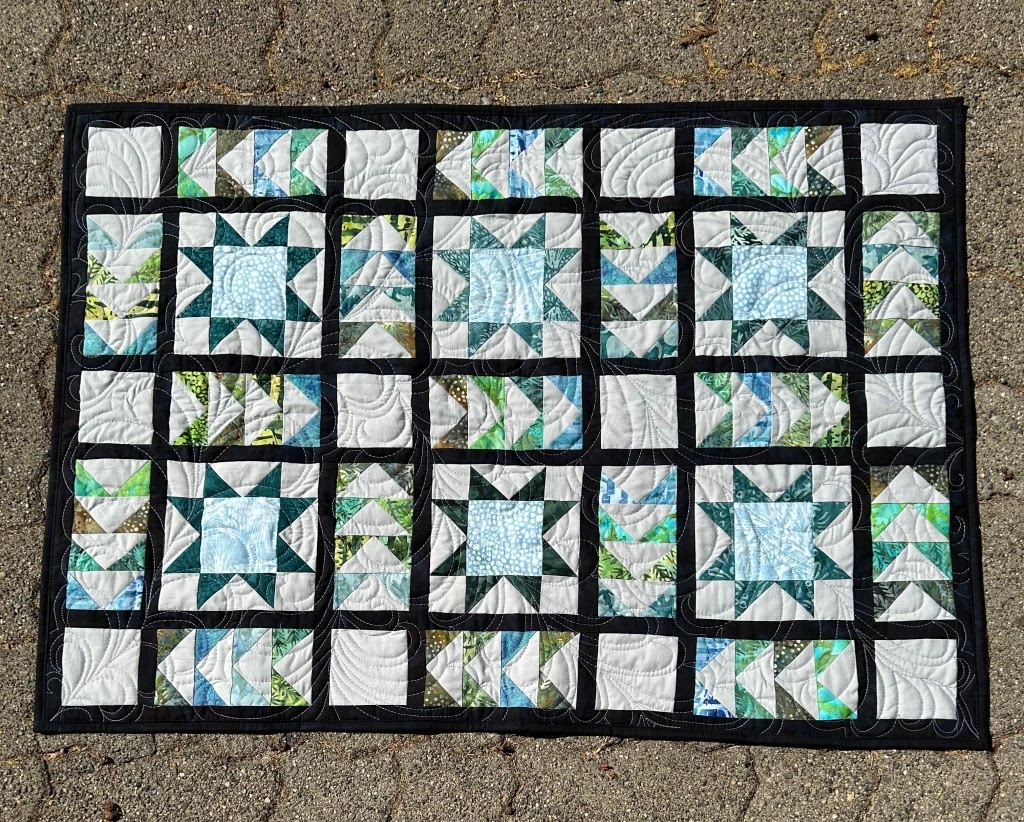

Gail's favourite finish for June


Melva free motion quilted the peace sign in one of her minis. Isn't it great? 

FMQ peace sign in Melva's mini

I didn't link up to Free Motion Mavericks, but this is the blue dots placemat that I made for June's Table Scraps Challenge. It's now on my table and I love it - it makes me smile! I was going to wait for a future challenge to make placemats for my daughter and hubby, but I'm not sure that I'll be able to wait that long!

Blue dots placemat for June's Table Scraps Challenge

It's now your turn!

You are invited to the Inlinkz link party!

Click here to enter

Monday, May 11, 2020

Adding rug hooking to my artist's tool box

It's been a while since I felt like reaching out. Although I needed some quiet time, I did continue to stitch and learn. That is my go-to in times of stress. Here is a bit of what I've been up to. 😊

Rug Hooking


I met a lovely lady, Robin Whitford of Hooking Outside the Lines, who teaches rug hooking. I must admit that it suited me better to take a virtual class rather than going to the store as it is usually taught. For an introduction course to rug hooking, it wasn't really necessary to be next to the teacher. The technique is really not very complicated. Like anything else, practice makes it easier. That's not to say that it can't get complicated, but for an introduction - it was perfect.

rug hooking - Echoed Heart
A rug hooked Echoed Heart 
After a two-hour class, I had made a square and rectangle with wool. Those were my practice pieces.
orange rectangle rug hooking
Making a practice rectangle
and then pulling it out

One of the things that I like best about rug hooking is that I can just pull on the wool to take it all out. If you don't like it, it's relatively easy to just start over. Of course that also depends on the type of yarn and the backing that you use. Burlap and the wool I used were very forgiving so that it's possible to just start over with the same wool, in the same place on the burlap.

After the class, I wanted to keep practicing because the hardest part it getting the wool hooked on the other side of the hoop. Once your fingers figure this out, the rest is fairly simple. So I started making a shape in the blue yarn. It sort of looked like a heart, so I continued with that shape. Then I got bored and added the red yarn around it (an echo in quilting terms 😊).
heart rug hooking in hoop
Echoing the heart in red

rug hooked blue heart shape
Making a heart shape with blue wool


Since I want to learn rug hooking to use in my textile art, I knew that I would want to make smaller pieces. I removed the burlap from the hoop and then zigzag stitched around the heart. I also zigzagged around the piece of burlap so that I could continue to use it without it un-raveling. 

I was very happy with this first piece and incorporated it into one of the art quilts that I'm working on. I used a square of red velour, cut out the shape of the heart from the centre and then reverse appliquéd the heart onto my piece. It was easy to attach because the wool of the heart extends over the edge. 
rug hooking inserted into reverse appliqué square
Reverse appliquéd the heart to my art piece
The next day, I decided to make a small landscape - nothing like diving right in!

It's wonderful that I can use most of the lovely novelty yarn that I've been accumulating in the last few years. It's great to see how a yarn translates to rug hooking. Some keep their shapes while others end up splitting or getting quite shaggy (like the top of the tree).  

Small rug hooked landscape

close up of rug hooked landscape
Close up of rug hooked landscape
partially done rug hooked landscape
In progress picture -
it needed help.
It was fairly simple to make the foreground in green and I added some purple in shapes that could have been flowers.

My son helped me by suggesting a longer trunk for the tree. It also helped when I added blue yarn for the sky on both sides of the tree. You can see the improvement from the progress image, which mostly looked like a big clump of fuzzy green. I used three different yarns for the sky.

I added some beads to the flowers, hoping to make them look more like flowers.

What I learned
  • Rug hooking is very cool. Not too difficult to learn the basics but has so much potential.
  • My teacher, Robin Whitford, is very experimental and doesn't follow the rules - my kind of artist!
  • I really loved how the different fibres and yarns looked after they have been hooked on. 
  • The bark was particularly interesting because I used pieces of twine that one of my favourite restaurants uses to tie the paper that wraps their sandwiches. If the twine has never been used, it comes out in distinct curls but once it's been used and pulled out, it became all fluffy.
  • I used the hoop to learn, practice and make the first heart shape. After that, I just did the rug hooking without the hoop. That's also how I do a lot of my embroidery unless it's a really precise piece.
  • I'm not sure how I will be using rug hooking in my art, but it's great to think of the potential. I do want to experiment with other types of backing. I have some cotton and linen pieces that I would like to experiment on. Actually, wouldn't it be cool to hand-dye the backing material and then add rug hooking to it, leaving some of the spaces empty? Oh the possibilities 😊
Related links
Linking parties
I will be linking this post up to Free Motion Mavericks which is hosted by Muv right now. I'll be hosting on Thursday so remember to come by. Let's see what's going on and join in the fun! Monday Making, Design Wall Monday, What I Made MondayColour & Inspiration Tuesday Midweek Makers, Needle & Thread Thursday, Put Your Foot Down, Off the Wall Friday, Finished or Not Finished Friday, Friday Foto Fun, Can I Get A Whoop Whoop?, Peacock PartyOh Scrap!, Slow Sunday Stitching,