Showing posts with label paper piecing. Show all posts

Monday, October 24, 2016

Welcoming Fall

Buck at Omega Park
Buck at Omega Park
This post is dedicated to fall in all of its glories.

The leaves are turning and there's lots of red this year! The nights are getting colder and the bucks are checking out the ladies. This is one of the bucks my sister-in-law, niece and I saw at the Omega Park near Ottawa a couple of weeks ago. We didn't approach some of the bucks, but this big guy was more hungry than protective :-)

Fall door hanging
Fall door hanging


As you may know, I have hangings for my front door for every season - yes, the door is protected from the elements. Here's the fall one on the door now. It's got colourful leaves, flying geese and even a basket with fall goodies. It was great for practicing my free motion quilting (FMQ).


Here is Fall Tree, one of my landscape art quilts featuring a close-up of a tree with changing leaves. This project was a class taken with Elaine Quehl. I finished the quilt last fall after spending a month looking at the way leaves change colours.
Fall Tree wall hanging
Fall Tree by the burning bush
One of my first paper pieced project was Patches, the Pumpkin Patch Protector. He is one of my favourite wall quilts. This is a free project from Martingale, designed by Jaynette Huff. It's much larger than I expected and looks great in the front hallway. Patches comes out each fall, at the same time as my fall door hanging.

Patches the Pumpkin Patch Protector wall quilt
Patches the Pumpkin Patch Protector

This last quilt is a new one to my blog. Years ago I gave my friend Sonya all of my Halloween decorations. She sent me this picture while she was decorating her house last week. This is one of the first quilts I made - Halloween Night from the Sept/Oct 2005 magazine of Fran's & Porter's Love of Quilting. It's machine appliquéd and hand-quilted. It was made before I learned to FMQ.

Halloween Night wall quilt
Halloween Night
What I learned:

  • I was pleasantly surprised to see a picture of one of my earliest wall hangings. I didn't realise that I made this so long ago.
  • Although orange is not my colour, I do love fall colours - they are so rich.

I hope that you'll have a great fall. They're calling for wet snow (aka slush) tomorrow morning, but it usually doesn't stick around before Halloween. Once November begins though - anything is possible!

I am linking this post to the following linky parties. Please check out what's happening: MOP Monday, Monday Making, Main Crush Monday, Oh Scrap!, Fabric Tuesday, Linky Tuesday, Let's Bee Social, Midweek Makers, Free Motion Mavericks, Needle and Thread Thursday, and Off the Wall Friday

Monday, April 27, 2015

Making a Mini Gem

A few weekends ago I decided to make a quick and easy project using mostly scraps.

Spinner mini-quilt
Spinner mini-quilt
Here is the result! It was finished in less than a weekend.

It’s a paper-pieced project from the book: Little Gems, 15 paper-pieced miniature quilts by Connie Kauffman.  The book is eye-candy. I would love to make most of the mini-quilts in the book.

Little Gems by Connie Kauffman
This pattern is called Spinner. The quilt in the book is made up mostly of softer pastels. I started that way, but that didn’t last. I just had to use my bright lovely fabrics!

I loved making these paper pieced blocks and I didn't spend much time planning the fabrics. For the amount of effort I put into it, it’s really great. Sometimes it’s great just to grab some fabric and sew. The worse thing that can happen is that it won’t come out, but then I can always use the blocks to make more scrappy blocks.

I placed the 12” by 12” quilt on a metal hanger I bough over a year ago. It’ll be fun to make different mini-quilts and rotate them.

I finally got around to taking pictures of the quilt. I love pictures of quilts taken outdoor so this quilt was perfect since it has its own hanger and wouldn't get dirty.

What I learned:

  • The colours work well but for the next one I may plan the final layout a little more.
  • As much as I love FMQ, this little piece didn't need it. I only stitched-in-the-ditch.
  • Making a mini-quilt on the spur of the moment is a great way to have fun and play with fabrics and colours.


Here is a photo of some beautiful miniature irises in my garden. They were at their best last week.

This post is linked up at Quilt Story's Fabric Tuesday. Check out the gorgeous quilts!


Tuesday, August 05, 2014

Trying new things

I'm not sure if other quilters feel this way, but I tend to stick to things that I know and feel comfortable making. Although I love to try new techniques, I often need extra energy and courage to start.

Block 2 - Amethyst
For example, most of the blocks that I've made to date for my Grandmother'sChoice quilt are pieced. For you non-quilters, a pieced block generally means that we cut the various pieces of fabric we need and then sew them together. The pieces are generally rectangles, squares or triangles in different sizes. We sew them together to make a specific pattern or block. If the pieces are other shapes, then we can trace the shape and make a template (although there are now fancy rulers to replace many templates).

Quilters will often have strong opinions about using templates. Until recently, as soon as I saw a template in a pattern, I skipped it! I was sure that cutting rectangles, squares or triangles was just much easier. Now I'm not so sure.
Block 33 - Contrary Husband


In my Grandmother's Choice quilt I consciously stayed away from anything with a template. However, there were a few blocks that I wanted to make that required templates, such as block 48 representing Canadian suffrage. So, I gave the template blocks a try. After all, they're only 8 inch blocks - if they don't turn out, I don't have to use them in the final quilt!

In my lastblog about Grandmother's Choice blocks, quite a few of the blocks were made using techniques other than straight piecing. Here are the blocks that I made using templates:
  • block 2 - Amethyst 
  • block 33 - Contrary Husband 
  • block 34 - Coffee Cup 
  • block 48 - Fair Play

Block 34 - Coffee Cup
Block 48 - Fair Play
They mostly turned out well. My favourites are the Amethyst and the Contrary Husband blocks. The Coffee Cup didn't turn out as well as I had hoped but it had nothing to do with the template but rather my choice of fabric. (I really have to listen to my instinct when I do these!)

The Fair Play block, representing Canadian suffrage, went well even if it had two challenges - templates and curves. I know I shouldn't be intimidated by curves since I've been sewing sleeves on clothing most of my life - but it's a little more intimidating on a block (mistakes show up more!)
Block 7 Alice's Flag

Another technique is the appliqué block. To date I've only done a few of these: 
  • block 7 - Alice's Flag 
  • block 21 - Parasol 
  • block 36 - Sunbonnet Sue

These blocks are more or less fine. Appliqué is just not my forte, but I will keep trying to get better! The good thing about appliqued blocks is that they will be quilted over, so that will help hide any little problems and keep them attached.
Block 36 - Sunbonnet Sue
Block 21 - Parasol

Since I LOVE paper piecing, I decided to see if I could convert a template block into a paper pieced block. First of all, I read a couple of articles by Carol Doak, the queen of paper piecing. The first article is Piecingon Paper - Converting Traditional Designs to Paper-Foundation Patterns. The second article is Piecing onPaper - Designing Your Own Blocks. Between these two articles and experience paper piecing, it was simple enough to do.
These are the two blocks that I converted to paper piecing
  • block 11 - Little Red Schoolhouse 
  • block 17 - Mother's Delight

Block 17 - Mother's Delight
For the Little Red Schoolhouse block, converting it to paper piecing was mostly a matter of figuring out where to separate the sections. The only adjustments I had to make were to cut up the side section of the sky into two parts.
Block 11 - Little Red Schoolhouse

I also had to add a border around the block since it was more like 7 inches. That was an error in photocopying the pattern.
Block 17 pattern and sample piece
Block 11 Paper Piecing Pattern
The Mother's Delight block looked easy enough but turned out to be very tricky to sew together. As you can see, I made a sample piece using scraps before trying the real thing. The tricky part was connecting the top part (A&B) to the bottom part (1,2,3,4). It involved what can either be called an inset or "Y" seam.

Those can be difficult to sew, but when I googled Y seam to make sure that this is what it's called; I found a great tutorial by JennyBeyer. I may go back and redo this block - it'll depend on how ambitious I feel when I get back to this project.

What I learned: 
  • Templates are not always difficult to use. I'll try to be a little more open to doing projects with them from now on. 
  • Appliques are still difficult! I guess I need more practice. 
  • I was really happy to convert those two blocks to foundation paper piecing. I think that for pieced blocks with many small pieces, paper piecing is a good option when possible. It was a good experience - now I know that I can do it. 
  • Next time, I might want to check out the internet tutorial BEFORE I finish the block.


Friday, January 24, 2014

Cute Paper Pieced Quilt Labels

As you may know, I'm totally addicted to paper piecing. In one of the new ebooks I bought from Martingale, Showstopping Quilts to Foundation Piece By Judy Pollard and Tricia Lund, I learned to make lovely paper pieced labels for my quilts.

I used the lovely three inch patterns that came with Carol Doak's Mastering Foundation Paper Piecing on Craftsy. These are easy and perfect to add a border to, as well as a space for writing on the label.
paper pieced tree label
Tree label

Winter vacancy wall hanging
Winter Vacancy
This first label is for Winter Vacancy. This is actually the second paper pieced tree I made. I had high hopes for the first one but it really didn't come out well. I used the same fabrics for the tree but used the blue of the border of Winter Vacancy for the triangles above the tree.  It should have looked awesome but it didn't! Both sets of fabrics were the same value - so they sort of merged together. I guess I proved the usefulness of that design element - contrast!

wreath wall hanging
Wreath wall hanging
paper pieced star label
Star label
This next label is stunning, if I may say so! That contrast principle does work! The contrast between the star and the blue fabric is really great and makes the star pop.

This label will be attached to the Wreath Wall Hanging. I'm just waiting to pick up a Pigma pen - it does a great job for writing on fabric.


What I learned:
  • Contrast is important!
  • Labels are important, almost as much as planning your project :-) I guess that's why I usually forget them! I used to do the same thing when I wrote essays for school - I just dove in and ignored the introduction and conclusion! 

Wednesday, January 15, 2014

Finishing up Winter Quilts

I started two wall hangings before Christmas. Since they are both more about winter than Christmas, that makes them....not late! Besides, they're not late if there are no deadlines, but it is better when they are made and finished for the season they represent!

The first wall hanging is a paper piecing project from the book, The Quilter's Home: Winter by Lois Krushina Fletcher, published by Martingale. The project is the "Winter Vacancy" wall hanging. It's made up of two paper pieced blocks. The first is a snow covered birdhouse and the other is a cardinal. It's very winter and lovely.
Winter Vacancy
I just love paper piecing! I like the way it comes so well together. I'm getting better at it and more organised so that I can cut the fabric and iron it on my home-made ironing/cutting table that's right next to my sewing machine.

I still have to work on having my seams not come apart when I remove the paper from my project. I'm experimenting with stitch length. Apparently if your stitch length is shorter, it'll almost cut the paper. The problem with short stitches is obvious if you have to rip out the stitching! I'm not sure what's worse - having seams pull apart or not being able to unsew. At least when you quilt the project, especially if it's a wall hanging that won't go through the wash, the quilting will keep the project together.

This next piece is from a pattern I purchased separately from Martingale. It's Ribbon Wreath Table Topper from the book, Comfort and Joy: 14 Quilts for Christmas by Mary Hickey. I really like its clean lines and the fact that the red around the wreath looks like a ribbon going through the project.

Ribbon Wreath Table Topper
Ribbon Wreath  Wall Hanging
As usual, since I just can't follow a pattern without making changes, there are a couple of things that I would do differently, if I ever make another one. I said that I liked the look of the ribbon going through the project, but it turns out that if you use different red fabrics for the ribbon, that it won't look so much like a ribbon (oops!).

The projects were pieced and sandwiched a while ago, but since I haven't free motion quilted in a few weeks, I just haven't had the energy to finish them. Thank goodness, that's what weekends are for!

What I learned:
  • When I change the fabrics in a project, I should consider if the changes will have an overall effect on the look of the project. Having a variety of reds is nice, but it does look less like a ribbon going through the project.
  • When I made an error on the size of one of the strips, I didn't think it would really make an overall difference. If I had looked at the overall project more closely at that time, I would have noticed that the corners where the red ribbons meet would be changed. It's not a big deal, but if I had taken the time to rip the seams of the strip when I discovered my error, this would have saved me a problem and more ripping out later on! I guess the moral of this story is to take a few minutes to consider the consequences of not fixing a mistake when the mistake (or design change) is discovered.
  • I was very impatient to take a picture of the Ribbon Wreath project but then realized that I haven't added the buttons to the project yet. There are 24 red buttons that look like berries on the wreath. I'll add them this week and post a follow-up picture! 

Wednesday, October 16, 2013

Ambitious Paper-Piecing Project

I’m not sure why I started this project. I had many projects in mind that I was going to make. This one wasn't even near the top of the list but somehow it was at the right place at the right time (on the top of the pile when I got bored!)

It’s the perfect time to make this project since it’s a fall scarecrow with pumpkins. I also didn't realise how large it would end up being (it’s 24 by 36 inches). The project, Patches the Pumpkin Patch Protector by Jaynette Huff, was free on one of my favourite book publishing  internet sites – Martingale. You just have to sign up. They’ll ask you to get their newsletter, which is great if you want to find out about the books that are coming out and if you want to know more about their authors. It’s one of the few newsletters that I read fairly regularly.


Here’s a picture of the pattern as well as my unfinished version.  I just need to add the patches and finishing details and then quilt it. Doesn't that black border scream for some cool quilting?

I was going to make an elaborate backing using the four pumpkins in the corners of the original pattern….but then I got side tracked with needle-turn appliqué. I also found some great backing fabric when I was taking the course last week, so I may actually finish this project before winter comes!

I have no idea where Patches is going to reside, but he’s sure to spend a few days at work with me.

What I learned:

  • It might be a good idea to look at the size of the finished quilt before starting it (I keep saying that but I’m having problems learning that one!)
  • I had the perfect hand-dyed fabric for this quilt – but I didn't want to use it! After some serious self-talk, it’s in the quilt!
  • The pattern called for 1/3 of a yard of fabric for the field background. I only had a fat quarter – but that’s the fabric I wanted. Thank goodness, it turns out that you can do a lot of fudging with paper piecing!

Happy fall from Patches and Andrée!

Tuesday, September 10, 2013

First Paper Piecing Assignment Completed

As you may recall, I have been learning up a storm with Craftsy. For the Mastering Foundation Paper Piecing course with Carol Doak, I started off by making some cute 3-inch squares. They were more interesting and less intimidating than the course assignment. Last night, I finished free motion quilting my first assignment. It’s a Sunflower Fun Foundation block. It wasn't difficult, but since all of my points and corners are not perfect, maybe it was more complicated than I thought! I still need to bind the project. As soon as it's done, I'll add a picture.

completed block
Sunflower Fun Foundation Block - partially done
Carol Doak suggested that since we had to make 4 blocks that are the same, that we use a production method (i.e. doing the same thing on all fours blocks before going on to the next part). That worked well until about half way through the project. Then I couldn't wait to see what the block would look like, so I completed one block before making the other three.

As I mentioned earlier, I thought I was following the lines, but somewhere, I must have gone off since my points were certainly not the same on all 4 pieces. I’ll have to pay attention to that in the next project.

I really enjoyed free motion quilting the project. I drew the border and tried to follow the lines. I was getting pretty good near the end. That probably means I should have practices more. I also tried out the free motion stitch that looks like a rainbow. I think that it was very effective. It was neat trying out different free motion stitches for the various parts of the quilt.

I used a very good quality gray thread in the bobbin. Since I don’t have that many good quality threads to match the top, I ended up trying some cotton thread of lesser quality on top – it worked out fine. It looks like my machine is mostly finicky about the bobbin thread it uses. Bonus!

What did I learn?

  • I can do production piecing only up to a certain point, after that, I don’t have the patience to wait to see the final result.
  • I need to practice following those lines!
  • Some more good quality thread, especially for the bobbin would be a good investment.(Any excuse to shop!)
Update! See the final version.

Friday, July 26, 2013

First Paper Piecing Project


Craftsy

I seem to be in a major learning mode - the stars must be aligned! Love it!!!

Since I'm addicted to learning, I've become a very good customer of Craftsy's. I've bought more classes than I have time to do, but since I can watch them anytime, it suits me. 

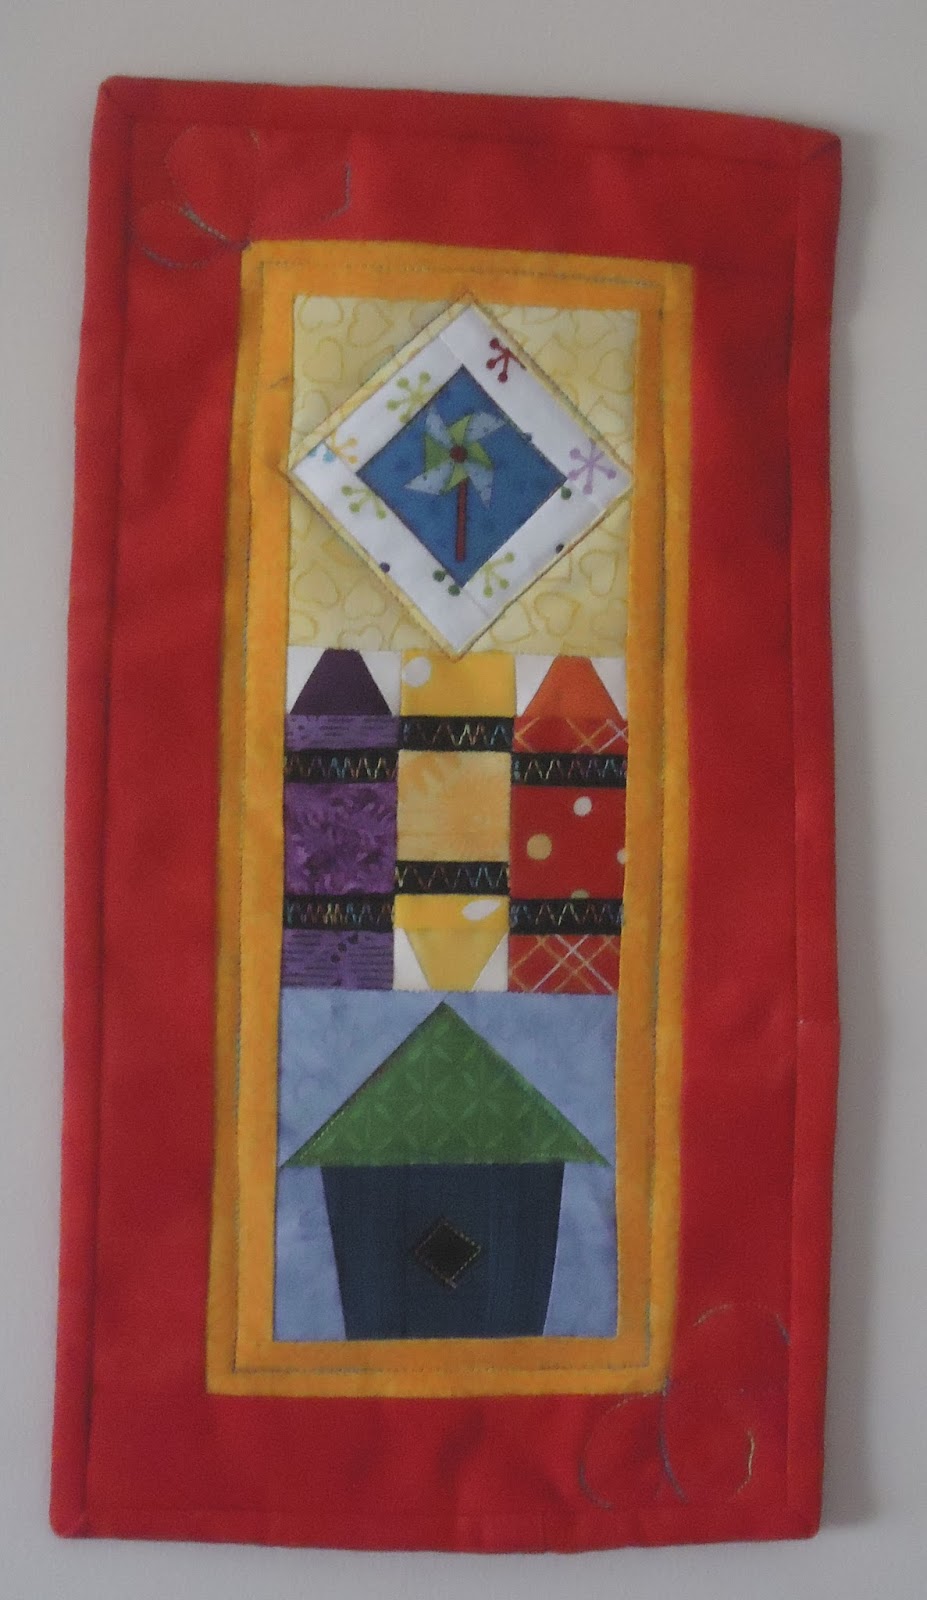
Since I was intrigued by my initial trial of paper piecing in April, I thought I would learn more about it. Of course I can't just follow along with the course. I watched the first four lessons of the Mastering Foundation Paper Piecing with Carol Doak and then went off on my own. In the course resources, there are tons of 3 inch paper piecing blocks to make. I chose three that were fun and that might appeal to my niece and then went to it.

My first block was these cute crayons. That was a lot of fun. I got lots of practice since I cut it too small and had no seam allowance left to sew it to anything....oppps!

My next piece was the framed picture. I love how it turned out.

I then pieced the bird house. How cute is that?

I framed all of the blocks and Voila! A wall hanging for Anna.


I'm linking up with Sarah Goer's Show Me Something...Mini.

Wednesday, April 17, 2013

Learning to Paper Piece


Paper piecing - the back

I recently had the opportunity to try my hand at paper piecing as part of a group project.  For those of us who had little or no paper piecing experience, we got to do the easiest pieces. It will eventually be a double wedding ring in blues and white.  I’m sure the final result will be incredible.

Final result


What a learning experience!  I enjoyed how the process was similar to making a puzzle. The only really difficult part was remembering to think backwards in 3D!  I’m not usually that careful or worried about matching things, which unfortunately usually shows. Paper piecing really does give very precise results.

I suspect that as a beginner, paper piecing a double wedding ring is probably not recommended. I hope that eventually I’ll find an easy project to paper piece, or an easy class to take.

Update: August 1, 2013

finished paper pieced double ring quilt in blue and white
The bride-to-be receives her gift
Our quilting group had a picnic and gave the bride-to-be her quilt. Isn't it wonderful?