Showing posts with label binding. Show all posts

Thursday, August 28, 2025

Finished Teal Cuddle Quilt

Allô and welcome 😊 The week has rushed by and I worked on many different things. No Cowboy quilt this week - it and I are taking a break! Here's the project that I finished this week.

Teal Cuddle Quilt


The Table Scraps Challenge for August is Aqua. I always have to look up this colour and substitute teal in my head - let's face it, aqua means water, so there are lots of colours that could fit. I'm not great at identifying colours (as my youngest adult child will confirm), so I tend to ignore fancy names and subtleties in colours. For some reason, teal I know, so there it is!

Teal cuddle or BB quilt - all washed and cuddly

The back of the teal cuddle quilt, and a loon!

It's raining out and my quick attempt at taking artsy pictures wasn't great. No worries, the quilt is done on time for the Table Scraps Challenge and I hope to bring it in to our guild in a couple of weeks.

These photos were taken last week as I Poppy sat and hand-stitched the binding.

Hand stitching the binding

Poppy, wondering what I'm up to!

You probably didn't notice but I hand-stitched the binding before I FMQ the border. I find this really useful to do since I don't cut away any FMQ as I square up the quilt and add the binding. 

This time, I also sewed down the binding after I had hand-stitched it. This ensures that my hand-stitches last longer. I know that it's an extra step but when I just machine stitch the binding, there's always overhang at the back. At least now the overhang is hand-stitched in place.

FMQ the border with vines and leaves

The binding is also machine stitched from the front.
You can see the FMQ from the back

What I learned
  • Every time I bind a quilt, I have to look up how wide to make the binding. I'm including this here so that I can look it up the next time! I used a 2½" binding. I think that a 2" binding would have been better. I'll try that next time.
  • For a quilt that might be washed a lot, machine stitching the binding down makes me feel better about the binding staying together. I will probably keep machine stitching it after hand-stitching, unless I get the correct width of the binding!
  • It was a lot of fun FMQ the orange peel design but the quilt didn't have that many squares. I'll have to consider using smaller squares for more FMQ orange peel fun!😍
  • I'm really happy to have made another BB or cuddle quilt. It's such a fun project and it will get used eventually.
Related links
Linking parties

Free Motion Mavericks


Welcome to week 546 of Free Motion Mavericks! Thank you all for linking up. Here are the projects from last week that included FMQ, ruler work or walking foot quilting. 

Kat of Scrapbox Quilts finished two baby quilts last week. Kat made Strip Tango and FMQ it with curvy strings with loops and some stars. She gave this one to a neighbour for her granddaughter, while Scrappy Red Bricks was quilted for her guild's community programs. 

Strip Tango made and FMQ by Kat

Kat quilted Scrappy Red Bricks for her guild

Gwyned Trefethen is still at it, FMQ her Rainbow Scraps Challenge quilt. Check out her post to see how she averted disaster on her latest machine embroidery project! 

Gwyned Trefethen FMQ her Rainbow Scraps Challenge quilt

Vicki of Vicki's Crafts and Quilting has been very busy making and FMQ more runners! Here are a few - you'll want to check out her post to get a better look at these and the others!

One of Vicki's latest runner - what fun FMQ

Cute fall table topper by Vicki

Fun fall runner by Vicky

Gail of Quilting Gail had a lovely purple butterfly quilt finish! Gail used the Rocket ruler for the straight lines and FMQ the curves and swirls. 

The butterfly quilt by Gail

Melva of Melva Loves Scraps finished her scrappy Hawaiian quilt. What fun! Check out her post to see the back of the quilt 😀

Melva's scrappy Hawaiian quilt

It's now your turn!

You are invited to the Inlinkz link party!

Click here to enter


Thursday, June 05, 2025

More Zen Stitching and Free Motion Mavericks

Hi and welcome! I did some hand-stitching on a sampler that I started in Karen Turner's class last week. We had lots to do!  I finally found the fabric to bind the Floral Fusion wall hanging that I started last September with Denise of the Quiltery. There's going to be a finish in the near future!😍 

Slow-stitching Sampler


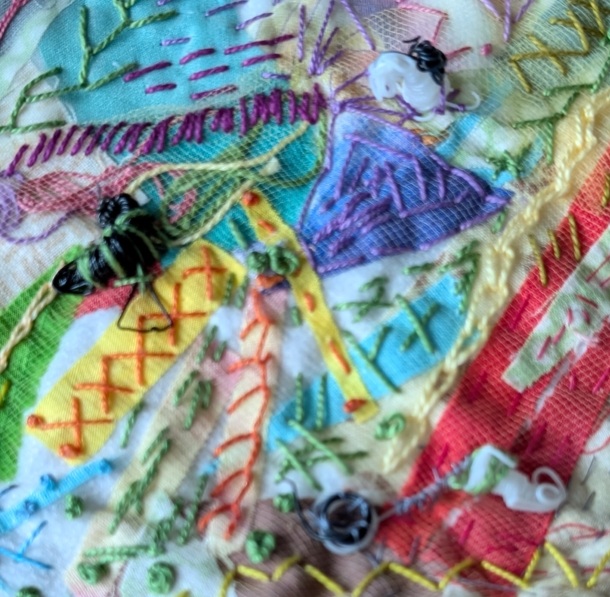
In her Making Zen class, Karen also showed us how she makes lovely hand-stitched samplers which she incorporates into a journal. I haven't worked on a meditative stitching piece in ages, so it was great to get  back to it. Karen uses fusible interfacing as the base and then irons on scraps, covered by a transparent fabric like tulle or organza to keep everything together. I did the same thing but added a piece of flannel at the back to make the sampler sturdier and easier to stitch.

Stitched sampler based on Karen Turner's workshop

I used mostly hand-dyed scraps for this sampler as well as many different types of thread, perle cotton and yarn. As long as it fits in the needle, it can be used 😁. In the end, the piece reminds me a little bit of a landscape, with the spiral sun at the top, many vines and even rain drops! 

My son's latest hobby is 3D printing. He made a box to place at the back of the printer to collect the scraps of plastic (we call it plastic poop! That's what happens when you have a dog 🐕) So I used three of these in the piece. One is black, the other black and white and the last one a gray, which happens when the black and white plastic fuse together. All of the plastic pieces have some kind of hole, so they're perfect for stitching. Apparently he now has many colours of plastic so I will get more colourful poop for my art making.

In the closeup, you can also see scraps of yarn and perle cotton placed under the tulle. 

A closeup of the plastic pieces and scraps of yarn

I've now placed it in my Mindful Meditation Journal.

Sampler placed in my Mindful Stitching Journal

This side - bottom!

I was Poppy sitting earlier this week. What a cutie! 

Waiting for the squirrels - in the jungle that is my 
backyard right now!
What I learned
  • I was happy to have something simple and fun to stitch as my energy waned. 
  • Poppy was a great distraction and I'm thankful that it was cool out for all of those walks!
  • Poppy is gone and the heat is here, but the evenings will be cool, so all is good!
  • I spent some quality time in my studio looking for the fabric to make the binding for the Floral Fusion wall hanging. When you use scraps, it's not always easy to find enough binding fabric.
  • I took the opportunity to clean up in the studio. It's not great but it's less chaotic. 
  • I'm linking up to the June One Monthly Goal and will finish this piece, hopefully sooner than the end of the month! I did finish FMQ the empty blocks a while back, so it really is all about the binding.
Floral Fusion ready to be bound

Related links
Linking parties

Free Motion Mavericks


Welcome to week 534 of Free Motion Mavericks! It was a productive week! Thanks for linking up. This week there were lots of quilts in progress. Here is the project from last week that included FMQ, ruler work or walking foot quilting. 

Kat of Scrapbox Quilts free motion quilted this lovely pink and brown quilt following one of Angela Walter's video. 

Kat's FMQ pink and brown quilt

Here's a look at the back where you can see the FMQ better. 

Kat's FMQ as seen from the back

It's now your turn!

You are invited to the Inlinkz link party!

Click here to enter

Thursday, February 29, 2024

Swirling Leaves 3

Hi and welcome! I'm thrilled to say that I finished my February Monthly Goal (OMG). It's a great motivator. Thanks Anne-Marie. 😁

Finishing Swirling Leaves 3


By mid-February, Swirling Leaves 3 had been free motion quilted (FMQ). I knew that I had the rest of the month to finish it, until I realised that I would be out of town.... It was time to get it done!

Swirling Leaves 3 finished ✔

I don't know how you feel about finishing your quilts, but it's not my favourite thing to do. In the last year, I've been working on my binding skills and I'm happy to report that this was the best binding that I ever did! I took my time, remembered my tips such as, 
  • How to make those corners straight, (see Related links below)
  • Checked to make sure that the seams would not be in the corners and 
  • Finally did lots of ironing after putting the binding on, and 
  • Since it was going so well, sewed it on by machine!
It wasn't perfect but much better than usual! 

Machine stitched the binding down

Of course we all know that it's not the end of the finishing work if it's a wall hanging that we are giving away. Next comes the label and then the hanging sleeve. 

I've managed to find a quick and easy way to make the label. 
  • I cut the fabric that I want to use, 
  • Add fusible web to the back, 
  • Use pinking sheers to trim the edges and then 
  • Iron on the label to the quilt. 
  • I also practice what I want to write on a piece of paper before using a permanent fine marker to write it up.
Label ironed on but not written on yet

Here are a couple of tips for the hanging sleeve. 
  • I use a FriXion pen to make a straight line that I follow when stitching it on. There's nothing worse than having to re-stitch it because it's crooked! 
  • I also add a dowel for the hanging and tell the person that they can add wire or string at both ends, or just hold up the wall hanging on short nails or long push pins at each end of the dowel.

What I learned
  • The binding was better because I took my time and practiced what I have learned. I do believe however that the Quilting Goddess was smiling upon me!😍
  • I used a two inch strip for the binding, even if it wasn't folded. I'm so worried about the binding not being wide enough but the next time, I'll try a 1¾" strip and see how that goes. 
  • I wrote myself a note on my bulletin board about using the 1¾" strip, referencing this post. Hopefully I'll see it!
  • I'm glad that I realised that I needed to get this done before the end of the month because even if it's a leap year, February is still a few days short!
  • The pictures are really not the best - not enough light, too much light....I need to get this post up, so this is what you get!😕
  • On a personal note, I'm back from my trip and my appointment went very well - the tumor in my eye is shrinking. It's going to be a slow process but "tout va bien aller!" (everything will be fine!)
Related links
Linking parties

Project Details

Swirling Leaves 3
Size: 22" x 18½"
Materials: commercial and hand-dyed fabric scraps
Techniques: improv piecing, appliqué, free motion quilting 


Free Motion Mavericks


Welcome to week 571 of Free Motion Mavericks. 

Diann of Little Penguin Quilts made a lovely red scrappy placemat for the February Table Scraps Challenge. She used the Hanging Diamonds quilting design and it looks great! 

red scrappy placemat by Little Penguin Quilts

It's now your turn!

You are invited to the Inlinkz link party!

Click here to enter

Sunday, March 04, 2018

Starry Bright Sky - Block 2

I am having a really hard time this winter - I seem to make my deadlines by only few hours. Not really good but then I guess that's what happens when life is busy. At least it's done.

Starry Bright Sky - Block 2

Updated March 8, 2018
Block 2 - Traditional piecing (final block) :-)


This is the second block in Alida's Starry Bright Sky quilt-along. It was a fairly simple block to make and included half-square triangles and 4-patch strips. It went together well, with most seams matching. That's always my challenge.

I used a solid blue and bright yellow, with a slightly textured very light yellow for the 4-patch units in the middle. Both picture were taken after dark, so neither is a really good representation, but the colours in the bottom picture are more accurate. However, you can see the slight circular shapes in the light fabric better in the upper picture.

To add some interest to the blocks, I've decided to use at least one non-solid in each block. It will probably be in the yellow (or orange) fabric since I have lots of tone-on-tone yellow fabric. I learned from last year's quilt-along that I quickly get tired of solids.

Block 2 - Traditional piecing
A pretty block but not a star!
Oops, as I posted the picture to the link-up, I noticed that my star didn't look like the others....because it's not a star!!! (Groan....) It would seem that my half-square triangle blocks are not on correctly. I didn't really have to fix the block, since, as Alida said, they are all just variations of the same block, but I really wanted some stars.
March OMG

One Monthly Goal (OMG)


I am keeping my OMG simple for March. I will be finishing up my  "Not playing the supporting role!" quilt, which I finished FMQ as my February OMG.

It now needs to be trimmed and the binding added. The great news is that the binding is all cut and ready to go in a bag that I still know where it is :-)

What I learned

  • I took the time to read all of the instructions and make notes, but still managed to cut double the amount of blocks I needed. Not sure how that happened. Anyway, I trimmed 4 of them to 2" and may use them to make the second variation of this block. Well see...
  • After my oops moment above, I may want to compare the picture of my block to the block on the pattern!
  • I fixed two of the half-square triangle units and thought I was done :-(  I think I may need another vacation....
  • I am keeping my OMG simple this month since I have to get my quilts ready for Fibre Fling 7. This mostly involves deciding on the quilts, doing the paper work and ensuring that they all have sleeves and labels. I'm sure that I will do my FMQ this month, but I don't want to commit to anything specific. You see, I am learning 😊 

Related Links
Linking Parties - I will be linking this post to the Starry Bright Night Quilt Along Link-up, and to the March OMG goal setting link-up. Let's see what everyone is up to!
Design Wall Monday, Moving It Forward, Linky Tuesday, Let's Bee Social, Midweek Maker, Needle & Thread Thursday, Can I Get A Whoop Whoop?, Finished or Not Friday,

Great news! My star block (the correct one) was featured by Susan on Midweek Makers. Thanks!

Wednesday, November 09, 2016

Update on Projects

I haven't been able to finish anything recently, but since I'm working on lots of projects and won't get anything done in the next week, I thought I'd post an update.

Canada's 150th Block

Canada goose block
The beginning of my Canada goose block
Many quilt guilds are creating quilts to celebrate Canada's upcoming birthday. The Common Thread Quilt Guild asked its members to make blocks representing Canada. The blocks trickled in, but I believe that we finished with over 30 blocks.

The blocks are 4" x 6" (finished) and will be made into a quilt that will hopefully be part of a travelling exhibit. I made my block during my quilting retreat this fall. As I pieced this Canada goose together, we got a post on our Guild Facebook page - someone had just finished her Canada goose block!

When I got home I thread sketched the block but wasn't going to enter it - but then changed my mind. There are so many Canada geese here that they deserve a couple of blocks!

Lovely Mittens block by Sherrill
Last night all of the blocks were displayed at the Guild meeting. There were some really lovely blocks, in all kinds of different techniques, colours and styles. It's going to make a great quilt.

Here are a couple of pictures - unfortunately I didn't have my good camera so most didn't come out.
Finished Canada Goose block


World Quilting Travel Adventure
with JoJo Hall

I'm still on a World Quilting Travel Adventure
with JoJo Hall. I'm a little behind but this is the beginning of my second destination project - this one is from Hawaii.

I got to learn about Hawaii and received a pattern from JoJo to make a Plumeria Headwrap. The flower is a plumeria, used to make a lei. Here is JoJo's finished project. Isn't that flower amazing?
JoJo's Plumeria Headwrap souvenir from Hawaii

Of course, those who know me will have guessed that I can't just make something like the pattern :-) I am going to make the two flowers based on JoJo's pattern, but will be incorporating them into an art quilt (of course!)

Here is my first flower. I cut and sewed the pieces but I still have to paint and then stitch the petals to my piece.

This plumeria will be incorporated into a mostly peach coloured project while the other flower will be in pinks. I don't expect to have this done until possibly the end of November, but I'm not promising anything because I am really trying to stay away from deadlines.
The beginning of my Plumeria 

King Size Quilt to keep me warm this winter

Finally I have put a binding on my bed quilt - it's a king size so it wasn't a quick job. When we come back from the South-West, we'll be warm and cozy.

I still have 146 blocks left to quilt (out of the 169) but I figure I will just have to take the quilt off the bed and keep at it.  Since I've quilted around each block, the quilt is solid enough to use.

Well, I haven't finished packing and we leave tomorrow morning, so I will be back in a week or so. Heading to the deserts of the South-West US.

What I've learned:

  • Writing a post is more fun that packing - that's why I'm procrastinating!
  • It's great to be able to advance projects - every little bit helps.
  • If it's not fun, what's the point? I have to remember this one!
I'll be linking up to a few linky parties. Check out what everyone is making!
Linky Tuesday, Let's Bee Social, Midweek Makers, Fabric Tuesday, Oh Scrap!