Page titles

Tuesday, May 31, 2022

Conversations Guest Book on Free Motion Mavericks

Welcome to week 384 of Free Motion Mavericks. I'm sorry that I'm a couple of days early, but I will run it until next Tuesday night. The last couple of weeks have mostly been about the Conversations exhibition and today is not an exception. I'm not getting ahead on my son's Version 2.0 quilt - but he's been very understanding 😊 

Another Journal Cover

A few weeks ago I volunteered to create a journal cover for our Conversations exhibit's guest book. I started early, but just finished it about an hour ago! No worries, the deadline is only tomorrow but it was my May One Monthly Goal (OMG) and I'm not missing out on bragging rights!

Conversations Guest Book

The Beginning

A few years ago, I experimented with sun printing. I don't think that I ever wrote a post about it. It wasn't a total flop, I did get one good print out of 3. I learned that you really need to use translucent paint - the opaque stuff just won't take. I did keep my pieces because you never know!

Original fabric with paint

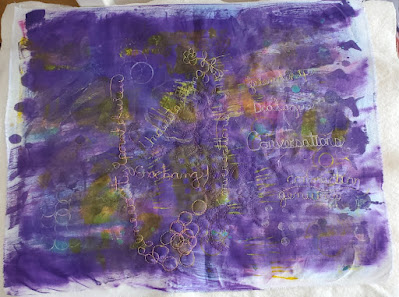
After making my last journal cover, I realised how much the FMQ adds to the fabric, so I thought that I would give this rather messy fabric a shot. I added mostly yellow paint (Colour Vie pigment system) to the mix using forks, circles, etc. I was only going for additional splashes of colour that wasn't purple! I really like how the yellow turned into a lovely gold. It also brought out the little splashes of teal from the original piece.

Painting over the original fabric

I then started FMQ. I drew a straight line and wrote Conversations more or less in the middle of what would be the front cover. See I did learn from my last project and planned the layout a little more.

I listed a bunch of words that had to do with conversations - dialogue, listening, connection, genuine, point-of-view, exchange, generosity, understanding, humility, and talking. I FMQ these in variegated thread, all with some pink and/or yellow in them. 

Some of the FMQ words


Adding fun filler by following the design
or making it up as I go along!

Putting it together

I cut the fabric a few days ago but I've been so tired that I was really stressed about cutting it properly. I had visions of having to start all over....not fun! Anyway, it all went well. Last night I chose my lining fabric, something light to contrast with the dark cover. After work, I started sewing while watching each step of Christina Cameli's Free Motion Quilted Gifts on Craftsy. 

Here's the lovely lining fabric

Here are some pictures of the whole thing 😊


The back and front of the cover


The back of the journal cover

I remembered to add my name tag.

The inside back with my tag.


Conversations Guest Book Mosaic


What I learned
  • I'm really glad that I made a journal cover not long ago for my quilting agenda. I remembered my lessons learned and applied them to this project. Awesome 😎
  • Having played with paint not that long ago also helped me with adding the paint to this one. I felt a little more confident, especially knowing that the free motion quilting would add so much.
  • Planning where the FMQ should go on my journal cover made it easier to quilt and the results are worth it.
  • It's been along time since I've been this busy with creating and blogging. I really appreciate all of your wonderful comments in the last few weeks. I've read them all and will answer them all soon. Thanks for your patience. 
Related links

Linking parties


Project details


Conversations Guest Book Cover
8" x 6" 
Materials: Original fabric painted with Pebeo Setacolor (opaque) and then marked with Colour Vie, variegated thread
Techniques: painting, mark making, FMQ and sewing


Free Motion Mavericks

Thanks to all for linking up. If you haven't seen Gail's Triangle Tricks Challenge quilt with her lovely FMQ stars, you really should visit her site.

Quilting Gail's Triangle Tricks Challenge

It's now your turn!

You are invited to the Inlinkz link party!

Click here to enter

Sunday, May 29, 2022

May's Table Scraps potholders

I made several scrappy potholders for the May Table Scraps Challenge. The colours were hunter green and sage and the theme was squares.

Finding the perfect pattern

On Mondays, I usually link up my latest post to Beth's Monday Making linking party. Last week, I fell in love with her Chevron Potholders. I watched her video and then decided that I would make a couple of them in green. 

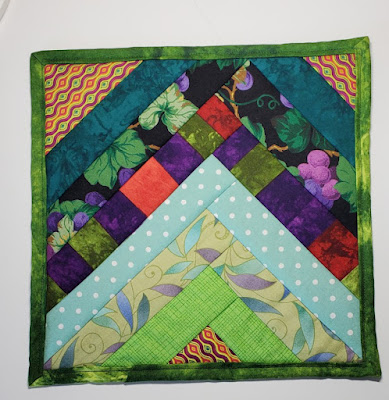
These are my first two. There is lots of green in them, and some of those greens are sage or forest 😊

Green chevron potholders - the first two

It was only after I finished the first two potholders that I went back to the instructions and realised that there should be squares involved! Of course I didn't clue in that the potholders are square! So I made another potholder with pieced squares to make the chevron pattern. They are now green and square but don't really look like chevrons any more. 😁

The chevron pattern is sort of lost but it is pretty!

Things I learned from watching and using Beth's technique.

  • Instead of using batting, Beth used old towels. That is truly brilliant😀 I have many towels that are stained with hair dye. It's a perfect use for them because you don't need loft, just a layer of protection!

Using an old towel instead of batting

  • Beth attaches her binding from the back. I followed her instructions in the video and they came out well, but for my next potholder, I'm going to watch the video that she made specifically for attaching the binding from the back. I'm sure that she'll have a few tips worth watching.
The back is quilt-as-you-go

When I realised that my white thread was showing up on the back, I decided to switch to a green one.

The first chevron potholder

The second chevron potholder

Since I love blue, I decided to make a blue potholder. I have such pretty blue fabrics 😊 I haven't attached the binding yet because I want to learn more about Beth's binding technique. I'm waiting until after the Conversations show opens before getting back to it.

A blue chevron potholder awaiting the binding

Other things I learned
  • My chevrons didn't form a straight line in the middle like Beth's did, so I stopped trying and used strips of different widths.
  • I'm usually more conservative when choosing fabric colours such that if they are supposed to be green, then I only use green fabrics with no other colours on them. I changed it up and I'm really happy with the results. As long as there was some green in the fabric, that was good enough for me :-)
  • There are many squirrels in this potholder project. It was nice to make things other than what was on my list.  
Related links
Linking parties


Project details


Scrappy potholders
Made for the 2022 TABLE SCRAPS Challenge using Beth Beth Shibley's technique
9" x 9"
Materials: scraps of commercial quilting fabric, old towel
Techniques: quilt-as-you-go


Saturday, May 28, 2022

Let Them Flourish is finished!

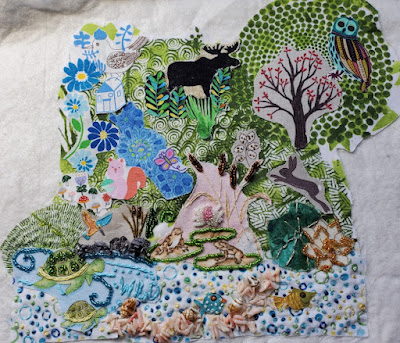
If you've been following me on Instagram, you've seen lots of images of the progress of this piece. Lately I've been adding a gazillion French Knots, finishing up the beading and then finally mounting it on a fabric-covered canvas.

Let Them Flourish - Ready for Exhibition

Let Them Flourish (aka Biodiversity)

In the Beginning

This piece started off as a fabric collage of images related to Biodiversity, the theme that was given to us as part of the February 2021 TextileArtist.org's Stitch Club workshop. Kate Tume, our instructor, had us exploring narrative potential with embellishment.

The beginning of Biodiversity (working title)

I attached the fabric pieces to batting using Heat n Bond Lite. From there I started stitching and beading. To say that it was slow going is a huge understatement. Again, not called slow stitching for nothing 😊.
Starting the embroidery and beading

At some point I got tired of its slow progress and wondered off to other projects. I came back to it during my #100dayschallenge on Instagram. I would say that the majority of it got done between March and May 2022. It also helped that I had a deadline approaching - the Conversations exhibition with Fibre 15 (see related links below).

Towards the Finish Line!

I love using my own hand-dyed perle cotton 💙

At one point I got bored and had an aha moment. I realised that I didn't have to embroider the images using the same colours that was on the fabric. Notice the house in the image below, which was printed in blue but covered in orange thread. I love that the blue peeks through. That was quite liberating! 😊

Adding different colours than those on the fabric

The green embroidered background around the moose took forever -
I was seeing swirls in my sleep!

I added a gazillion French knots around the tree. I knew by then that it would drive me crazy, so to keep it interesting, I used different shades of green and went roughly from light to dark.

So many French knots!!!

I was worried about the owl - I wanted to add beads but wasn't sure how much. I found out fairly quickly how much was "too much"! I was going to bead every other line but got mixed up and ended up beading all of the lines. It wasn't really bad but it made the owl the focal point, which is not what I wanted.

Too many beads....

Just the right amount of beads 😊

I used sewing thread to lightly embroider various parts of the owl. 

Finishing up!

Finishing up involved covering a 14" x 11" canvas with fabric and then attaching the piece to the canvas. I used Sulky's Invisible thread since it was clearer than the other kinds I have. I wasn't able to make a knot at the end of the thread, so I left a long tail and then after taking the next stitch, tied a knot at the back.

I just put in a few pins through the canvas to keep the piece from shifting as I was sewing it down. I stitched around the edges but also within the piece to keep it securely in place. It was easiest to stitch behind beads.
Attaching the piece to the canvas


Let Them Flourish

What I learned

  • I learned that this technique is called textile collage. This is probably my favourite technique of all times. I've used it a few times to make some of my favourite pieces. I'll include links to my favourite ones in Related links below.
  • I love being able to add bits and pieces of fabric to tell a story or show a moment in time. 
  • The hardest part is probably leaving reality behind since there is no way to keep the actual perspective real since the elements come in the size that they are on the fabric! I love that whimsical part of it.
  • I'm glad that I figured out that I don't have to use the same colour as the background image to embroider. It adds a different look when using a different colour and having the original fabric colour peek through.
  • I realised that I need to change things up to keep me interested. What's not to love about many shades of green instead of just using one?!
  • I really got to know my threads - there's nothing wrong with embroidering with regular sewing thread if you just want a small accent of colour and texture. 
  • A bonus is that the technique almost always needs the little bling of beads 😊
  • It's always a slow project, even if using FMQ but it's usually well worth making. I'm making myself finish this one before I start another one - it would be too easy to get sidetracked at this point!

Related links

Linking parties

I'll be linking up to many fun linking parties. Remember to visit Muv to link up to Free Motion Mavericks this week! Put your foot down, Off The Wall Friday, Finished or Not Finished Friday, Peacock Party, Beauties Pageant, TGIFF, Patchwork & Quilts, Oh Scrap!, Slow Sunday Stitching, 15 Minutes to Stitch 2022Monday Making, Design Wall MondayMay's Favorite Finish Monthly Linkup

Project details


    Let Them Flourish
    Workshop with Kate Tume through TextileArtist.org
    Attached to a 14" x 11" fabric-covered canvas
    Materials: commercial quilting cotton, beads, shells, 
    metallic, embroidery, sewing thread and perle cotton 
    Techniques: collage, embroidery, beading


Thursday, May 19, 2022

Music Version 2.0 style on Free Motion Mavericks

I can't believe that it's already been a fortnight since I last posted the Free Motion Mavericks linking party! Welcome to week 382. I hope that you've had time to play with fabric this week 😊 

Music symbols

I mentioned to my daughter today that I was too tired to do any complicated free motion quilting (FMQ) tonight and that I was going to do an easy row of music symbols. It's been well over 40 years since I last took music lessons but I was sure that I would remember everything that I needed (famous last words). Thank goodness for Google. I knew that the base clef didn't look quite right (lol).

Music symbols

Since the FMQ was on black fabric, I was able to use my chalk pencil. It worked very well.

Piano keys


Various music symbols

Stéphane loves music and played the clarinet in his high school's orchestra. He also taught himself to play the piano.

Clarinet - hopefully it sort of looks like it!

I didn't get a chance to prepare the images that I was working on last time but I did borrow his geology dish towel. I'll try to adapt some of these images for the quilt.

Geology dish towel

What I learned
  • I'm happy that I didn't try to FMQ anything too complicated tonight. Simple was good and it all turned out well.
  • I can't believe that I didn't remember how to do the base clef symbol - it has been a long time.
  • I have a little more space on the black strip, so I'll be adding the names of his favourite composers and/or opera...before the next time.
  • I hope to make the time to prepare and do some fancy FMQ next time - but it will depend on how well the preparations go for the Conversations exhibit.

Related links

Linking parties

Music Version 2.0 was featured by Denise at Put your foot down. Thanks!

Free Motion Mavericks

There are two colourful quilts that I would like to share with you this time. Denise from For the love of geese made a lovely TriAngles quilt with Island Batik fabrics. I love the way that she finished it, including those mini triangle blocks on the edge. If you didn't read about it, here's the link.

Denise's TriAngles quilt

Sandra of mmm quilts made a floral Whirling Petals - A Hands2Help Quilt. Her floral fabrics looks wonderful against the dark blue background. 

Floral Whirling Petals by Sandra of mmm quilts

Now it's your turn! Thanks for dropping by 😊


You are invited to the Inlinkz link party!

Click here to enter

Friday, May 13, 2022

Conversations - Fibre 15 Exhibition

It's time to announce the upcoming exhibition of the Fibre 15 group. As some of you know, especially if you follow me on Instagram, I've been finishing up pieces for the show.  

Conversations

"What is a conversation? Employing a diversity of fibre media, Fibre15 members explore this theme, challenging assumptions about how and what we exchange."

Conversations poster

It's going to be an amazing show. I know that most of you reading this post won't be able to make it, but if you are in the Ottawa area, I think that it'll be worth the ride to the Stone School Gallery (see details in Related links). The show runs from June 3 - 26 (from Thursday to Sunday) with the vernissage on June 3rd. 

Stone School Gallery in Portage-du-Fort, Québec

My pieces in the show

Here are the four pieces that will be in the show.

Please let me play / Laissez-moi jouer SVP

Please let me play

Description: Expressing my desire to play using a dye clean-up rag. 
Conversation: Do we have to wait until retirement to make time to play? 😊


Journey of many paths / Voyage de plusieurs parcours

Journey of many paths

Description: A journey of learning using slow and meditation stitching.  
Conversation: What makes up your journey and what are the roles of learning and reflection within it?

Let them flourish / Laissez-les s’épanouir

Let them flourish is almost finished!

Description: As human beings we must play well with the other creatures on the planet. 
Conversation: What can we do to ensure that all the creatures on Earth are able to flourish?

Best and Worst of Times / Le meilleur et le pire des temps


Best and Worst of Times concertina book


Description: A textile concertina book illustrating my journey through the pandemic. 
Conversation: How did you and your loved ones survive the pandemic?

Teaching a workshop

I'm thrilled to announce that I will be teaching a "Meditation Stitching" course at the Stone School Gallery on June 20, 2022.

Course poster


Signature and Comments Journal for the show

I volunteered to make the journal cover and provide the journal for the exhibition. 

I'm having lots of fun free motion quilting (FMQ) it. I should be able to write up a post soon.

FMQ the journal cover with conversation related words


Action shot 😀

If you want to see the progress of these pieces, you can check out Instagram, or if you  don't have access to it, my Instagram images are on my blog's right side-bar. Just click on the images to see them.

What I learned

  • It takes an incredible amount of work applying for and getting ready for a group show. I'm very grateful for everyone's help in getting this done 😊
  • I'm almost ready for the show.
  • I've finished fixing my concertina book so that it can stand on its own.
  • I only have a little bit of beading left on the Let them flourish piece. I may have overdone it on the owl and may have to re-do part of it.
  • I prepared my Artist Bio / Statement and after I decide on a photo, it will be sent off.
  • I may, or may not, have all four pieces in the show - it will depend on the amount of space we have. Our group's curating team will be figuring that out.
  • There is also a video being created by one of our members. I'll include the link below when it's available 😊
  • What you do think about art as conversation? I'd love to hear from you.

Related links
Linking parties

The almost finished version of Let Them Flourish was featured Muv at Free Motion Mavericks. Thanks!