Page titles

Monday, April 29, 2019

Break time with improv piecing

It's DrEAMi! (Drop Everything And Make It!) or Squirrel time again with Sandra at mmm quilts.
Policeman and black squirrel in High Park, [Toronto, Ont.], 10 Nov., 1917
Photographer: Boyd, John, 1865-1941
Library and Archives Canada (see Related links below)
Improv piecing

When I'm up against a deadline, I usually need some serious procrastination time! Maybe it's to let my brain peculate while I distract myself, but what ever the reason, it happens almost every time.

To procrastinate, I've read 3 books in a series (I suspect that they were short but who knows when it's an ebook!) and did a little bit of improv piecing. A little bit as in a 10 inch square that finishes to an 8 inch pocket. You read right....a pocket!

My husband gave me this gorgeous bag that he got at a conference. The front is really stunning, but the back, not so much.

The front of the bag
So now, the bag has a new back, and an extra pocket.
The bag's new back and pocket
To make the improv piece, I used batik fabrics in colours that went with the front. There was no way that I could possibly make anything that could match the front, so I made my piece to blend in, in a way that it's obvious that it wasn't part of the original design.

Once again, I used the Extended-border binding technique. I treated the outside strip of the block as a border and made it about an inch wider than necessary. I then turned it over and pressed it as if it was a binding.

Making the border of the improv piece wider so that it can be used as a binding

I then cut the batting and backing to the finished size of the block and then slipped it inside the "binding".
The backing and batting are now inside the "binding".
I flipped it over and did my free motion quilting (FMQ) thing! I started by quilting in the ditch around the border, then quilted the design in the middle. Since I wanted the "binding" to be securely attached, I FMQ inside the border.  
Playing with FMQ

Here's the back. You can see where I stitched in the ditch. The quilting inside the border ensured that the binding is securely attached.
The back of the FMQ piece, ready to be attached to the bag.
I very carefully sewed the finished block to the bag. I left the top open so that it can be used as a pocket and therefore reinforced the top sides and the edge of the top so that it won't come apart.

Attaching the pocket to the bag
 If you want more details on the Extended-border binding technique, see Related links below.

What I learned
  • As I mentioned, this small project was a great way to productively procrastinate! I got to play with fabric but not get too wrapped up in a new project.
  • If the FMQ design looks familiar, it because I featured it in the last Free Motion Maverick's post.
  • Isn't the image of the squirrel and the policeman great? It's from Library and Archives Canada's wonderful collection of old images. See Related links.
  • I'm really happy that this bag is now ready to use. I'm going to try it as a purse, but I tend to like the ones with a long strap, so we'll see. At the very least it will make a great project bag (because we can't have too many of those!)
Related links
Linking parties
This post will be linked to DrEAMi! party with Sandra of mmm quilts!, Free Motion Mavericks with Muv, and many other link-ups. Let's go see what's happening in quilt land. Monday Making, Design Wall Monday, Moving It Forward, What I Made Monday, Tuesday Colour Linky Party, Midweek Makers, Let's Bee Social, Needle & Thread Thursday, Finished or Not Friday, Friday Foto Finish, Can I Get A Whoop Whoop?, TGIFF,

For To-Do Tuesday, I'd better get back to working on my art quilt!

One Monthly Goal Link-up

My art quilt is my May OMG. I learned that it doesn't have to be quite finished by mid-May, just finished enough to supply a description etc. for the show. Yeah!!! But it will get done by the end of the month.

This is my latest picture, but it's mostly for my reference. There are too many things all jumbled together, but it gives me an idea of what does look good together and shows me that I probably have enough pieces cut to finish it.

The next step is to pull it all off and work on the background. I'll keep posting my progress as it happens 😊

Thursday, April 25, 2019

Free Motion Mavericks and an art quilt in the making

Welcome to Free Motion Mavericks (week 226).

Since I didn't get a chance to do any free motion quilting (FMQ) in the last couple of days, I'm going to just share my last practice piece from the weekend. You can read about it in my last post (see Related links below)

Practicing my FMQ
Progress on the art quilt 

This piece is due in less than a month. It will be part of an Out of the Box Fibre Artists exhibition, Summer Fibrations, at the Mississippi Mills Textile Museum this summer. On the weekend I was auditioning fabrics. The main fabric that I'm using is Gradients by Moda. It's just absolutely beautiful.

On Tuesday I went through my stash to find other fabrics that I will be fussy cutting from. As I was playing with them this morning, I realised that I will have to keep going through my stash for more.

This is just the beginning but I think that the layout will probably stay. I'm sure that the flowers and details will get revised many times.
The start of the piece

Working on my design board from my ironing board
As I mentioned in my last post, I took the week off and will spend most of it working on this baby.

Unfortunately it hasn't been as peaceful as I would have liked. Below is the view from my window, which is why I'm working on the ironing board instead of my desk. I think that the bulldozing is finished so at least the ground should stop shaking!

I've also joined Amy's challenge on Instagram, #onethingwithamy
We set a goal for the week on Monday and report our progress on Friday. This is perfect for the next couple of weeks since I'll actually get things done during the week instead of being in a vegetative state when I get home. 😊

If you want to read more about this project, see the Related links below. That's also where you'll find "What I learned" so far on this project.

Related links
Linking parties

Free Motion Mavericks

Thank you to everyone who linked up two weeks ago. As always there was some lovely projects linked up. This week's highlight is Gretchen's Wiggly Whimsy Quilt with its 'organic wavy line' quilting. Don't you love her glamour shot? If you didn't see it, check it out.


You are invited to the Inlinkz link party!
Click here to enter

Saturday, April 20, 2019

FMQ practice and planning

Practicing FMQ

I was in the mood to do some free motion quilting but nothing serious, so I doodled for a while and then took out a practice sandwich. Last week I received a book from a fellow quilter who is cleaning her bookshelf. Isn't that the greatest thing?

In a FMQ book, there were a couple of designs that I hadn't seen before, so I practiced these, put them in my FMQ journal and now I'm ready to pass the book along. Here is the result of that practice sandwich.

Practicing the main design, essentially a series of curves

Also practicing those cursive "l" and "e" shapes

Auditioning fabric for my next art quilt

I have a final quilt to make for this summer's fibre art exhibition at the Mississippi Mills Textile Museum. I have till May 20th, so it's really time to get to it!

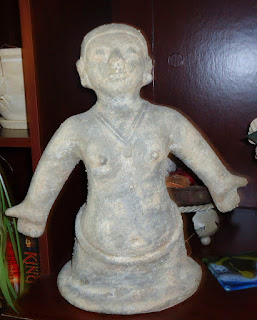
For this piece, I am using the same image that I used a couple of years ago for my Art With Fabric piece, Gaïa, Mother Earth. The image is of a reproduction statuette of a beautiful Pre-Columbian female figure from Colombia, South America. 

Reproduction statuette from the Tamaco culture

This is the image that I originally created with the help of photo transfer medium.

Image made with photo transfer medium
This time, the Goddess will be located in a lush garden. I found some amazing fabric that is all soft colours. I'm going to fussy cut it as well as tons of other fabrics to create a colourful Earth for Gaïa.

Auditioning fabrics for my Goddess piece
I would like it to have the same feeling as my Morning Has Broken piece.

Morning Has Broken
What I learned
  • For the free motion quilting, I really need to keep practicing those cursive "l" and "e" shapes. I really like the look of them as they go from small to large and then back again.
  • For my piece, I don't want to reproduce Morning Has Broken, but I really love the look and feeling of it. I hope that I'll be able to translate that into something new.
  • Looking at the picture of Gaïa with the auditioned fabrics, I realise that I will have to make sure that she is not lost among all that colour.
  • I will be on holidays next week - so my goal is to fussy cut the fabrics and finish the design.
Related links
Linking parties
I will be linking up to Free Motion Mavericks as well several other parties. Off The Wall Friday, Finished or Not Friday, Friday Foto Fun, Can I Get a Whoop Whoop?,

Have a great long weekend and Happy Easter!

Saturday, April 13, 2019

Slow stitching Update

To try to minimize the evenings when I go home and do absolutely nothing quilty,  I joined The 100 Day Project (#the100dayproject) on Instagram. Will it work? I guess we'll find out...

The 100 Day Project on Instagram

Herringbone stitch added to the mix
Why would I want to add this to my plate? Well, it's on Instagram, so it takes about 2 minutes to post, which is a plus. Also, even if I'm wiped, it would be nice to do something that is productive but simple and stress free. My answer to that is to follow #the100dayproject and at the very least do 10 minutes of hand-stitching (embroidery or English paper piecing, etc) a day. It's a goal and no one will care if I do it or not - but it would be nice!

I won't be posting everything on the blog, but I'm sure that I can manage an occasional update. 😊

While I was practicing the herringbone stitch and playing with hexies, I created a fabric page dedicated to the Herringbone stitch.

I got the idea from Janine at Rainbow Hare, who is also participating in the Take A Stitch Tuesday (TAST). I get bored easily and love the embroidery work that she is doing. One of her ideas is to create a page of the different stitches. You can check it out in the Related links below.

This is my Herringbone page so far. I've been experimenting with the size and angles of the stitches, and of course the more colour the better. And, just for something different, I added hexies to the mix. I'm starting to think that everything is better with hexies (and chocolate)!
Herringbone page
I started the chain stitch page a while back. This week, I did a little bit of embroidery in the car on my way to work. It was a really great way to start the day. I'm going to try to keep that up!
Chain Stitch page
I've also working on the final hexie flowers for my Kingfisher Stitch Along. The Stitch Along started last May and finished in July, so I'm not a year late....yet. Hopefully the sewing of the diamonds will go well. My objective is to finish it by the end of July, so that it's only one year late!
Last two diamonds coming along
Love that blue-black batik!
What I learned
  • I need a variety of small projects to keep me going. If I have a few easy ones started, I'm more likely to pick one up in the evening. That's the theory anyways.
  • I'm still following TAST but getting pretty far behind. When I feel ambitious I can work on new embroidery stitches, and when I'm not, I'll just do more chain stitch or practice other stitches that I'm getting better at.
  • I also want to experiment with the size of the stitches as well as the size of the embroidery thread and perle cotton I use.
  • I have a colleague at work who is learning to embroider - so next week we are going to embroider during our lunch.
Related links
Linking parties
I have posted all of these on Instagram, as well as many others. If you're on Instagram, you can follow me at https://www.instagram.com/quiltinglearningcombo/

I will also be linking up to many fun parties. Let's see what's up in quilty blogland! Slow Sunday Stitching, Moving it Forward, Design Wall Monday, Monday Making, What I Made Monday, Tuesday Colour Linky Party, Midweek Makers, Needle & Thread ThursdayFinished or Not FridayFriday Foto FunCan I Get a Whoop Whoop?,


Wednesday, April 10, 2019

Adding Color and Free Motion Mavericks

Welcome to Free Motion Mavericks (week 224) link-up.

Free Motion Mavericks

Lotus flower
A month ago, I foolishly thought that spring had finally arrived in Ottawa. During yesterday's small snow storm, I heard some not-so-funny guy mention that we had spring two weeks ago and that next week would be summer. That's not very funny because it's happened before. Since my favourite seasons are spring and fall, this would not be good news.

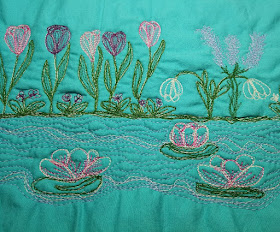
So, spring or not, I decided to add some colour to the free motion quilting (FMQ) that I created to celebrate the coming of spring.

Although this image is not great, you can click on it for a better look.
Spring is in the air FMQ
Adding a little bit of colour
was not very impressive
I had started FMQ with grey thread but originally I was going to use a variety of coloured thread. Since the piece was very dull, I wondered if I could add different colours over the grey thread to create some interest.

At first, going over the grey just added colour over the grey. It was not impressive. You can see the results in the image. Since it looked better in the flowers that were densely quilted, I just kept on FMQ.

After going over the grey many, many times, it started to look pretty good.
Adding colour to the original FMQ with grey thread
Here are some details.
The flowers are brighter after a lot of FMQ

Even the pond gets a make-over.

More colour over the grey
What do you think? Adding the coloured thread over the original grey certainly makes the FMQ stand out. I don't think that I would do this on purpose, but this did let me keep practicing and I now have a piece that is fun. Of course now I'm going to have to embellish it 😊

What I learned
  • The finished grey piece was a good practice piece but nothing else. Adding colour to it now gives it some potential to be a fun mini quilt.
  • FMQ over something that is already quilted is different than FMQ on a blank fabric. Because I had to follow the original stitching, I ended up FMQ the flowers from the top down so that I could see what I was doing.
  • Did you notice the blue flowers that I added behind the snow drops? I did go over the FMQ a few times to make the stitching denser but they are pretty dull compared to the other flowers around them.
  • In the original piece, I was pretty disappointed with the lotus flowers in the pond. After adding some variegated pink thread, I really like them. I was even able to change the original shape of a couple of them. 
  • I think that the water in the pond adds a lot to the piece. Now I need to find a frog!
Related links
Linking parties
I will be linking up this post to other linky parties since we need to get the word out and see what else is going on in the FMQ world! Tuesday Colour Linky Party, Midweek Makers, Off the Wall Fridays, Finished or Not Friday, Foto Fun Friday, Can I Get A Whoop Whoop?, TGIFFDesign Wall MondayMonday MakingMoving it ForwardWhat I Made Monday, Wondering Camera,

Wonderful news! This post was featured on Midweek Makers. Thanks so much Susan!

Thank you to everyone who linked up two weeks ago. The FMQ was wonderful and it was really difficult to choose only one project to highlight. If you didn't see it, you really should check out Alycia's string quilt with its matchstick quilting and Greek keys in the border!

If you keep forgetting to link up, you can always follow this blog by email. Then you will see when the Free Motion Mavericks link up is on. You can also do the same at Muv's blog, Lizzie Lenard Vintage Sewing.
You are invited to the Inlinkz link party!
Click here to enter

Saturday, April 06, 2019

Moose Cubicle Mini Quilt

It's a cubicle mini - a little late because I didn't finish on time for the March One Monthly Goal (OMG) but not too late since my son is still working in his cubicle 😊

Moose Cubicle Mini

I've made a few foundation paper pieced minis using Made by Marney's patterns. This is the latest.

A Moose for you
Since I added a border to the mini, I actually remembered to used the Extended-border binding technique. It really worked out well. I stitched in the ditch around the border and then free motion quilted (FMQ) the mini, up to the border. I then flipped the border towards the mini and cut the batting and backing about one inch from the sewn edge of the border.

Cutting the batting and backing
I had ironed the binding so that I knew where to trim the batting and backing. At the bottom of the image below, you can see that the batting reaches to the border (if it's laid flat). Once the batting and backing were trimmed, I flipped the mini over and hand-stitched the border to the back, as if it was a binding. For more details see the link to the tutorial in the Related links below.
The border will cover the back, as if it was a binding.
Here is the mini from the back. The backing and batting have been cut and it's now time to fold the borders over them.
Getting ready to sew down the border
A moose for you
What I learned
  • I used a different fabric for the bottom of the mini since I wanted it to look like vegetation. Next time, I think that I'll just add an extra piece between the sky and the bottom so that the vegetation doesn't go all the way up to the antlers.
  • After trimming the batting and backing, I realised that the moose's antlers were not very visible, so I added some FMQ.
  • Preparing the extended-border was much easier this time than the last.
  • I used a quilting marking pencil that turned out to not be erasable! I got rid of it, but not before making a mark that won't go away!
  • I could have made it on time for the March OMG (barely) except that I didn't have two small matching buttons in all of my button stash!
  • As much as I love linking up to OMG, I'm going to give myself a break this month - I really need to just go with the flow for a while :-)
Related links
Linking parties
I am linking up with Muv at Free Motion Mavericks as well as many of the fun link-up parties in the neighbourhood. Let's go see what's on! Can I Get a Whoop Whoop?, TGIFF, Finished or Not Friday, Friday Foto Fun, Brag About Your Beauties, Oh Scrap!, Monday MakingDesign Wall MondayMoving It ForwardWhat I Made Monday, Tuesday Color Linky Party, and Meadow Mist's April Favorite Finish Monthly Linkup.


Project details


A Moose for you
8¾ " x 9"
Materials: cotton and buttons
Techniques: Foundation paper pieced, free motion quilting, extended-border binding technique


Thursday, April 04, 2019

My first baby quilt on Throwback Thursday

Welcome to Throwback Thursday. I'm co-hosting with Sandra from mmm! quilts. We will take turns hosting on alternate months.

My first baby quilt

My son was looking for something in his closet last weekend and took out his first baby quilt. I made it with my mother in 1991! We picked out a cute dinosaur wallpaper border and made the quilt from the design.
My first baby quilt - made with my mother (1991)

I don't really remember making the quilt but I do remember making the matching skirt and bumper pads for the crib - so it's possible that my mom made most of the quilt - but I did draw the design using the projector that she borrowed. We'll just call it a collaboration 😊


My son in his crib. You can see the dinosaur
wallpaper at the top of the image.

At Grand-maman's house with the quilt
 So that cute baby turned into this amazing young man.
My son with his first quilt
Related links
Linky parties
I will be linking up to some great link-ups. Let's see what's going on in Virtual Quilt Land! Monday Making, Design Wall Monday, Moving It Forward, What I Made MondayTuesday Color Linky Party,


Thowback Thursday Link-up


You are invited to the Inlinkz link party!
Click here to enter