Page titles

Thursday, July 27, 2023

Cottage escape on Free Motion Mavericks

Hi and welcome to week 441 of Free Motion Mavericks. I hope that your summer is going well. It seems to zoom right by, doesn't it? This week I have a couple of things to share with you - including some oldies but goodies! 

Cutwork and Broderie Anglaise


My daughter and I went for an overnight trip to my brother's cottage. We had the place to ourselves and had a lovely, relaxing change of scenery. Of course I brought supplies to keep working on my whitework. I just can't seem to leave it 😊 I added some cutwork to my original sampler.

Cutwork added to the Whitework sampler

The closeup photo is very revealing. I started working with beige perle cotton since I couldn't see the white on white well, even with a strong lamp. Photos from afar are forgiving!

Photo of the sampler outside

I also did a little sample of Cloth Stitch - this looks a bit like lace and covers an entire hole cut out of the fabric. It was lovely and simple enough to make, however the sampler looks much better in this image than the finished one. When I went back to this the next morning, my stitches were much looser and I messed up the finishing of it. I'll have to try this again, but in one sitting!

Cloth Stitch sample in the making

Meditation Stitching 


In my Meditation Stitching Journal, I've been making small meditation pieces to commemorate specific events. Sometimes it's abstract but it can also depict something specific. Last November I attended a Jann Arden concert that was also the annual National Arts Centre (NAC) Gala. We had amazing tickets and I've been wanting to make a meditation piece about it. I finally took the time at the cottage. 

Remembering the NAC Gala

I used the logo from the top of the program and added some glittery and rich textiles and ribbon, just like Jann's dress!. The funny looking pink piece is a flute of bubbly pink drink that was served πŸ˜‹.


Gala meditation piece with a view from the cottage

Quilts at the cottage


Finally, here are a few quilty gems that are in the cottage.

I finished this quilt in August 2013. It went to Denmark, came back, and is now at the cottage. It was FMQ with a square within a square. It also had a great backing that you can see if you go to the original post (see Related links) 

A very scrappy quilt!

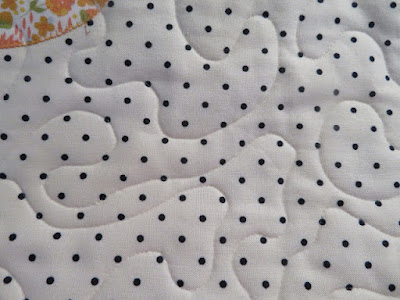
This is a wall hanging that is now a runner. It was made in 2017 for my niece. For the FMQ on white fabric, I had to quilt it from the back, since I couldn't see anything from the front's white on white. It is very heavily FMQ with wild quilting. You can see the details in the original post.

Black and white wall hanging

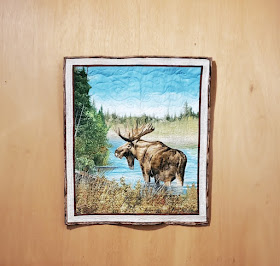
This next piece is a wall hanging that I made for my brother for the cottage. It's a panel that I FMQ. If you want to see the difference that the FMQ made, check out the original post. 

FMQ moose panel

This is a quilt that my mother made for my brother. This flying geese quilt has been around for a very long time and still looks good!

One of my mother's quilts

I made these tab top curtains for my niece a couple of years ago. Don't they looks great?! 😁
Tab top curtains in
buffalo red & black plaid flannel

What I learned
  • The cutwork and broderie anglaise were very interesting to do, and like most skills, would require a lot of time to get good at.
  • When making the Cloth Stitch, tension is very important...so is reading the instructions properly to finish it off!
  • I'm not sure that I will keep working on cutwork and broderie anglaise. It was great to try and see how it's made, but would require a lot of practice. I think that just playing with whitework on burlap will probably be best for me at this time.
  • It was so nice to chill out at the cottage. It was also great to see some of my earlier work! I hope that you enjoy them, and their original links!

Related links
  • Whitework sampler
  • Quilts at the cottage
    • Procrastination Over - Quilt on its Way to Denmark, August 08, 2013 
    • White and Black Wall hanging: Learning QAL - October Goal Setting Link-up, October 01, 2017
    • FMQ moose panel finished, October 09, 2020
    • Tab top curtains in buffalo red & black plaid flannel: September OMG done, September 29, 2020

Linking parties

Free Motion Mavericks


Quilting Gail participated in the Sew It - Show It Picnic Party Blog Hop by making a lovely picnic bag. She had to design it herself since she wanted it tall enough to fit a thermos. That's a colourful and useful bag!

Gail's picnic bag that's big enough to hold a thermos

It's now your turn!

You are invited to the Inlinkz link party!

Click here to enter

Monday, July 24, 2023

A handmade album covered with Glimpses of Antarctica

I still haven't written my posts about our Antarctica trip, but I'm one step closer - I finished my stitched piece "Glimpses of Antarctica" and used it as the cover for an album to hold a few photos, postcards, etc.  

Glimpses of Antarctica


In February, I wrote a post about a few of my ongoing hand-stitching projects. The first was a mark-making and stitching project with Gwen Hadley through TextileArtist.org (see Related links below). I made marks on two pieces of white cotton - the first was heavily marked while the second was not.

I cut up the pieces and put them back together again with lots of stitching. Sometimes it was fun, other times a little tedious and even frustrating, but I must admit that I love the finished piece.

Finished Antarctica piece mounted
at the front of a handmade album

Here are a few process pictures.

Heavily marked cloth

Lightly marked cloth   

Both pieces cut up to be re-sewn together

Stitching on the ship


While I was on vacation, I stitched quite a bit and started adding shapes and images from Antarctica. There is a penguin, whales, birds, fish, and whales blowing water (see Related links). I quickly learned that good lighting was more important than ambiance when stitching on the ship. I also had a few interesting conversations with my fellow passengers. 

A glimpse of the water

Finding a well lit bar 😊

Finishing it at home


The frustrating part came at the end of May. I didn't know if it was finished and I also wasn't in love with it. A friend gave me the perfect ribbon to add to the bottom of the piece. I added an embroidered a scene from the rocks and glaciers of the South Shetland Islands. 

Almost finished

At the very top, a scene of glaciers and rock formations
from the South Shetland Islands

The stitched scene above is a compilation of a few photos, but this is the general image.

Glaciers and rock formations in the South Shetland Islands

Making the album


In the archives of the Handmade book club, I found the perfect book - the hard cover stab bound album. The pages of the album are not folded in half, so it's easier to make a larger book. Instead, the pages are folder about an inch at the top, so that the album won't bulge after you add things to the pages.

You can see the additional fabric sewn around the piece

The album cover is made of book board covered by a book cloth. I added strips of batik fabric around the Glimpses of Antarctica piece to make it large enough to cover the board and to go over the edges by about 1". I then covered the fabric with fusible web and then ironed a very large piece of copy paper to it. This is then glued onto the book board. I did the same thing for the back, except that it was a lovely piece of batik with penguins on it.

Additional fabric is sewn around the penguins to fit the book board

There is less fabric around the back cover. The end sheet
is craft paper with vintage postcards.

Wider fabric behind the front cover with a craft paper end sheet

Photo shoot and next steps


I went into the garden yesterday and took some lovely pictures.

A very sturdy album

Album among the flowers and chicken!

The back, from a better perspective

  • This is what I've done do far: 
    • I went through my souvenirs and have organised them by days and regions travelled.
    • All of my photos have been transferred from my phone to my computer.
  • This is what's next:
    • Pick a very few pictures from each day or region to print and add to the album.
    • Write my posts!
I had Poppy keeping me company in the back yard today 😊

Poppy basking in the sun

What I learned
  • I managed to put the front cover on backwards so that the album opens up from the wrong side. I could say that it reflects the other hemisphere....but who are we kidding - I'm just accuracy challenged.
  • I have no idea why the penguins are not facing the correct way on the back cover. I only noticed after it had been glued to the board. Again...see point above!
  • I mentioned that I didn't really like Glimpses of Antarctica. It was like I was seeing the trees and not the forest. Once I placed it on the cover of the album, I knew that it was good! It really does look like a map. I had lost sight of that.
  • I know that it's going to take a while to get my trip posts done, but I do hope that it's sooner rather than later. 

Related links

Linking parties

Project details

Handmade album covered with Glimpses of Antarctica (hard cover stab bound album)
Size: 13¾ x 11"
Album: book board, craft paper end sheets, thick craft paper signatures (pages)
Glimpses of Antarctica: fabric paint on cotton, embroidery, appliquΓ©, embroidery floss, MoulinΓ© Γ©toile embroidery thread, perle cotton, silk thread, organza, yarn, ribbon


Thursday, July 20, 2023

A Gorgeous Red Basket on Free Motion Mavericks

Welcome to week 440 of Free Motion Mavericks. I hope that you've had a good week. I haven't done much until yesterday but I now have a pretty red basket to share with you.

Making A Gorgeous Red Basket


When I made the microwave fabric bowls in March for the Table Scraps Challenge, I promised one to a friend who said that they were so pretty that she wouldn't use it in the microwave because they might get dirty. Rather, she would use it as a bowl or holder. So, remembering this, I decided to make a red basket for July's challenge. Since this month's letters are A and G, I'm going for A Gorgeous Red Basket 😊

A Gorgeous Red Basket

I've made these types of baskets before, following Christina Cameli's Free-Motion Quilted Gifts course on Craftsy. It's also the course that I follow to make the agenda covers.

I started off with a red piece of hand-dyed fabric from my friend Elaine's scraps. I quilted it with triangles and match stick FMQ. It got pretty tedious by the end, but I did it! I tried to do this in a meditative manner but eventually gave up on that and just listened to music!

FMQ alternate triangles with match stick stitches

Of course I managed to cut the fabric for the quilted piece too small, so I made the lining just slightly smaller than the outside. While I was FMQ, I remembered that the project was supposed to be red and scrappy, so I made this very scrappy lining.

A scrappy red lining

Putting the basket together went fairly well. I'm happy to say that my stitch ripper was not overused!

Here are a few pictures from last night.

You can peek in and see the lining!

Here's another peek!

How appropriate - Mr. Coffee Bean is getting a medium roast in the sun!

Here are some garden pictures from this morning 😎

Hen and a basket!

A Gorgeous Red Basket and White Roses!


Same flowers and basket from two different angles!


What I learned
  • I was trying to be so careful about cutting things the right size but somehow, I cut the outside fabric too small. At least it wasn't difficult to adjust the lining to fit.
  • The basket is more square than it should be, but that's ok!
  • I used a lovely variegated pink and yellow thread to do the match stick FMQ. I think that it looks great.
  • The red scraps had been pulled for another project but there are enough for both projects! It was nice that they had been sorted already. Most of my scraps are by colour, but in batches - so that red is with yellow, orange and pink. I don't have enough scraps of each colour for their own basket (except for blue!). 
  • The outside strip is from some great coffee bean fabric that I bought a while back. I have it in peach and blue. It's soooo cute!
  • I didn't make a strap for this basket since it was so small, but I just re-read my posts and discovered that I had used a lanyard under the fabric to make the handles. What a great idea. 
Related links
Linking parties
I'll be linking up to many fun linking parties. Why not check them out? Also, remember to link up below! I'll be linking up to the ABC Table Scraps Challenge as soon as the link opens up. Design Wall Monday, Sew & Tell, Midweek Makers, Put your foot down, Needle & Thread Thursday, Off The Wall Friday, Finished (or Not) Friday, Peacock Party, TGIFFPatchwork & Quilts, Oh Scrap!, 15 minutes to stitch 2023


Free Motion Mavericks

Last week Donnalee did some meandering FMQ with invisible thread. It worked out really well. Way to go Donnalee!

Check out Donnalee's meandering FMQ with invisible thread!


Gail has made another gorgeous Hugs and Kisses quilt - this one for charity. She used her 3″ and 4″ Cupid rulers to quilt it. It's so full of loving hearts!

Gail's Hugs and Kisses quilt for charity

Anja or Anja Quilts made a lovely mini to swap with one of her guild mates. Isn't it cute with that fussy cut tiger? She made it specifically to practice her FMQ skills. Way to go!

Anja's Mini quilt to practice FMQ

It's now your turn.

You are invited to the Inlinkz link party!

Click here to enter

Thursday, July 13, 2023

A Hare with Jo Hill on Free Motion Mavericks

Welcome to week 439 of Free Motion Mavericks. I started a new free motion quilting (FMQ) project - just for you, so that I would have something interesting to share. I hope that you'll like it!

Taking Jo Hill's "Hare" Class


I took a course with Jo Hill through TextileArtist.org's Stitch Club last July. I love her work so much that I purchased the "Hare" online class and I'm finally getting around to doing it a year later! I hope that you'll love Harry the hare as much as I do 😍

Harry the Hare is almost done

Jo Hill is a great teacher - her videos are clear and instructional. What I learned had more to do with my fabric and thread choices. I'm happy that I keep learning but sometimes it would be nice to skip those hard lessons!😊

The previous project that I did based on Jo Hill's class was FMQ on the back of a denim vest - you may remember it, my Wildflower vest. It was a great project. I now understand that the free motion quilting went extremally well because it was on denim, a very sturdy fabric. 

Wildflower vest made last year

This time, I decided to make the project on a light denim shirt that is lined with flannel. I thought that it would be perfect....but, I'm afraid that it wasn't. There is unfortunately a lot of puckering. It's easy to forget how FMQ draws in fabric because we usually do it on a quilt, which consists of two layers of fabric and batting.

I've tried to reduce the puckering on my photos, but you can see it clearly on the back on the shirt. 

FMQ has created a lot of puckering on the shirt

I also learned about the colour value of my thread. Jo was quilting her project on an off-white canvas, so her thread colours showed up well. Quilting on a blue shirt, the light gray thread that was supposed to be of medium value, really didn't show up. I'm not sure why I thought that it would....oh well, at least it's fairly simple to stitch over it with a darker brown. 

My original stitching of the hare


Hare over-stitched with brown thread


The body of the hare still isn't as strong as it could be, but I'll wait to see how it looks when I'm done. 

So enough about learning through my mistakes - here are some other things that I learned!

Using my machines' cording foot as a couching foot


I wanted to couch some yarn for the flower stems but since this piece will be washed, it really needed to be sturdy. Hand couching just wouldn't have done it. So I watched Jo's video on various couching feet and then started reading my manual. It turns out that I do have a cording foot and it worked perfectly as a couching foot. 

I'm very proud of myself - I even stitched a couple of samples! I'll be sticking those into my manual for further reference. For single cording, the yarn is attached in the middle slot of the foot and then a zig-zag is used. Very cool 😎

Using my machine's cording foot to couch yarn for the stems

I also used a hoop for doing some of the FMQ on the hare. It wasn't the first time, and I'm not convinced that it made a huge difference, except that I didn't have to hold down the fabric so tightly. 

Using a hoop

I'm not quite finished working on Harry. He still needs whiskers, which I will probably FMQ. I wouldn't want to hand-stitch them since they could get damaged in the washing.

Harry in his garden

I still have work to do in the garden. I love the plants but they are a little bare. I'll need to add a bit of filler, without making the puckering worse. 

Update - July 14

I found a way to minimize some of the puckering by using a light interfacing on the inside of the shirt. It didn't solve the problem but did minimize it.


Harry the Hare is done ✔

More plants in the garden


Light stabilizer on the back


Harry would be ready to wear,
if it wasn't so hot!


What I learned
  • FMQ is so much fun, but it can draw up your fabric if you're not FMQ on a quilt. 
  • It turns out that a flannel backing is perfect for meditation stitching blocks, but not for FMQ.
  • I need to be more aware of my thread colour choices. Light gray is not of medium value, especially on a light blue fabric!!!
  • Using a cording foot to do couching by machine was a great discovery. I'm more likely to use it for couching than cording!
  • Despite the challenges, I love Harry my hare. I would love to make another one some day.
  • Jo Hill also has a River Birds course, a Wading Birds course available as well as templates of birds. One or both of these are in my future courses list! 
  • Update
    • I added a light stabilizer behind the stitching. It did set some of the puckering but then minimized them on the new stitching.
    • I free motion quilted Harry's whiskers. He's even more handsome!😊
    • I may have added too many plants - it's hard to know when there's enough (just like in my real garden)!

Related links

Linking parties
I'll be linking up to many fun linking parties. Why not check them out and consider linking up below also! Design Wall Monday, Sew & Tell, Midweek Makers, Needle & Thread Thursday, Off The Wall Friday, Finished (or Not) FridayPut your foot downPeacock PartyTGIFF, Patchwork & Quilts, Tips and Tutorials on the 22nd

Free Motion Mavericks


It was a very quiet week for free motion quilting and the linking party, so here is what Margo Yang of MY Quilts and Crafts is working on now. Have you ever had an idea, not have it work out the way you want, and then start over to find what was missing? This is how Margo's denim quilt is going. I think that her new blocks have lots of potential. Good luck Margo!

Margo's new denim blocks

It's now your turn!

You are invited to the Inlinkz link party!

Click here to enter