Welcome to week 447 of Free Motion Mavericks. I've started putting together the t-shirt quilt. After doing all of the prep work, I'm finally having fun putting these t-shirts together. A couple more weeks and there'll be some free motion quilting (FMQ) happening. 😊
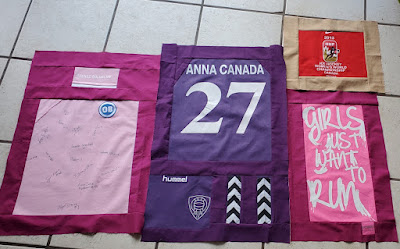
4 T-shirt blocks made
It's been a slow start. In May, I went through all of the t-shirts and started cutting. My May and June One Monthly Goals (OMG) were to have the t-shirts cut and the fusible interfacing ironed to the back. That didn't happen until a few days ago.
 |
| Anna's Quilt - blocks 1 to 4 |
On the weekend, I added the interfacing to all of the t-shirts. It was a long and tedious job, but I was well organised (see What I learned), so it went quite smoothly. This morning, I decided that it was the day!!! No more procrastination. 😁
 |
| Anna's t-shirts |
 |
| T-shirts getting prepped |
This spring, I bought some dark teal Kona solid to use for the quilt. This morning, as I lay the t-shirts down on the fabric, I realised that it wasn't a great colour choice. I went through my Kona stash and found quite a few darker colours that would be much better suited. The Kona fabric used will depend on the t-shirt's colour. I don't have a lot of some colours, but I had enough of the dark pink for my first two blocks.
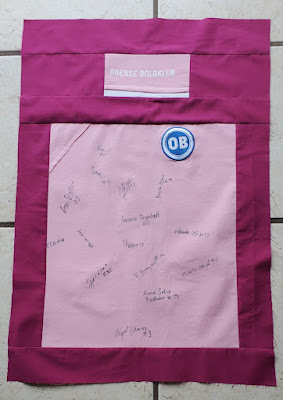
Next I made the second dark pink block. This t-shirt includes the store's logo in the bottom sashing. I used a brown Kona for the next block - it matches the background in the decal.
It's now your turn!
 |
| First block - a signed t-shirt and the sleeve with the team name |
Next I made the second dark pink block. This t-shirt includes the store's logo in the bottom sashing. I used a brown Kona for the next block - it matches the background in the decal.
 |
| Second and third block - with different coloured sashing |
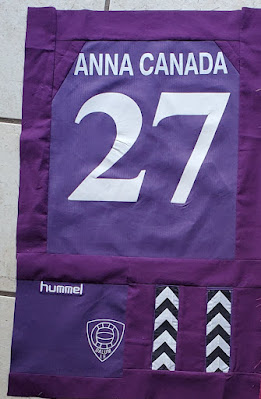
This fourth block was interesting. I had to cut around the sleeves, so I ended up adding some fabric in the top corners. They're not the same but it looks fine. The front of the t-shirt in at the bottom and then the shoulder patches are attached next to that. I did forget to add sashing to the front piece at the bottom, so I'll have to figure that out when I attach the t-shirts together.
 |
| Fourth block includes the front, back and sleeve patches. |
With 4 t-shirts block done, I have 9 more trimmed blocks to add borders to. Most of these are very straight forward. After that, I have 10 more t-shirts that I could trim down if I need to make them fit with the others. This is where I'll have to figure out the layout of the quilt. I'll be doing these last and I can add borders/sashing as required to make things fit.
All of these will be done by the end of September, so in 17 days. That means an average of 2 blocks per day with a week or so to put everything together. When broken down, it seems quite reasonable. 😓
What I learned
- I really don't like prepping anything, but I knew that already 😁
- For the fusible interfacing, I bought a package of Stabili-tee from Connecting Threads. The package contains a 60" x 72" piece of fusible interfacing. This will probably be enough, although I do have some other t-shirt stabilizer from my previous projects. This product is wonderful and I highly recommend it.
- To make the prepping of the t-shirts a little easier, I first cut all of the t-shirts and figured out what to use on the quilt.
- After cutting a few of the t-shirts, I figured out that I might want to keep more fabric on the t-shirt and cut away any excess later. It's so hard to tell if I'll have enough t-shirts for a queen sized quilt.
- Once the t-shirts were roughly cut with scissors, I went back with my rotary cutter and evened everything out.
- When I started adding the fusible interfacing, I cut a couple of pieces of interfacing and then ironed them on. This proved to be rather inefficient.
- I decided to cut all of the interfacing to roughly the size of the t-shirts and then lay the t-shirt and interfacing aside in a pile.
- This weekend I ironed all of the interfacing to the t-shirts in a few very sweaty sessions. Rough but finally done!
- I've decided to use a variety of Kona solids for a 2" sashing.
- I'll have to decide what to do when I start piecing them together, but for now, I'm concentrating on the t-shirts that can't be trimmed further. They'll get an all-round border that can always be trimmed down. I have 9 more of those to do.
- After these, there are 10 more t-shirts that can be trimmed, as well as a few odd and ends. I'll prepare these as I figure out the layout.
Related links
- Stabili-tee from Connecting Threads
- I've made two t-shirt quilts to date. Here are the links:
- Great Hockey Jersey Quilt in the Making, August 23, 2016
- Picture of the Finished Great Hockey Jersey Quilt
- Planning 2019 and finishing Charlotte's quilt, December 31, 2018
Linking parties
I'll be linking up to many fun linking parties. Let's see what's going on out there. Design Wall Monday, Sew & Tell, Midweek Makers, Needle & Thread Thursday, Put your foot down, Finished (or Not) Friday, Can I Get A Whoop Whoop?, Peacock Party, Patchwork & Appliqué, 15 Minutes to Stitch 2023,
Free Motion Mavericks
Melva worked on a couple of pieces. The first one is a cover for her husband's table and was quilted with diamond grids. The second one is the beginning of a feather.
 |
| Melva's table topper quilted in a diamond grid |
 |
| The back of the fabric - Melva FMQ a feather |

I hadn't understood the technique for making t-shirt quilts before I read this post. Thank you for explaining. That would be a good way to incorporate any stretch fabrics into a quilt...I'm looking forward to watching this come together. I like the way you are pairing your kona solids with the shirts :)
ReplyDeleteThanks Janine, it is quite the project and it's coming along nicely.
DeleteSo happy this project is moving forward!
ReplyDeleteThanks Pat. It's now a flimsy. Yeah!!!
DeleteYou've got a great start on the T-shirt quilt. They are a lot of work, but are really fun when finished.
ReplyDeleteThanks Kate. I'm sure that my niece will love it. They hold so much memories.
DeleteWhat fun!! this will be a very colorful T shirt quilt!!!
ReplyDeleteThanks Alycia, it sure it :-)
DeleteBon courage avec le T-shirt quilt, je vais suivre ton aventure de près : j'aimerais bien en faire un aussi, un jour...
ReplyDeleteMerci Frédérique. C'est une bonne aventure mais je dois admettre que j'aime mieux les quilts un peu plus petits :-) Bises.
Delete