Hi! Welcome to the last Free Motion Mavericks linking party of the year! I hope that you have survived the Christmas/holiday festivities😊
FMQ Feathers
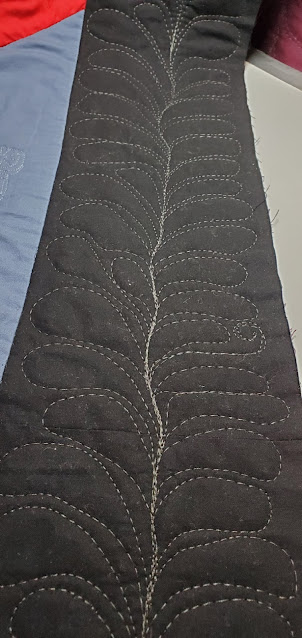
Yesterday I free motion quilted (FMQ) two side borders of the Version 2.0 quilt with feathers. I'm not really sure how it's usually done, but I'm going to quilt one huge feather all around the quilt (no start or finish lines).
Here I am zooming back to quilt the feathers. I had to adjust my technique to suit the borders and the "one feather around the quilt" idea. For the first feather I marked the spine with a chalk pencil but I didn't bother doing that again since I didn't really follow it!😁
 |
| Zooming to create a large feather |
For that first border I also marked a ½" from the edge of the quilt so that I wouldn't quilt inside the binding (which I always do!)
Here are a few pictures of some interesting variations (nothing complex that's for sure!)
 |
| Adding a swirly thing |
 |
| Varying the size of the feathers |
When I got near the end of the first border, I ran out of thread, so I left it there to link up to the top border eventually. On the second border, I managed to turn the corner before having to stop.
 |
| Making the corner before stopping |
What I learned
- I didn't practice my FMQ before starting but I did draw some feathers within a 5" area to get the feel of the scale of the feathers. I believe that these are the largest feathers that I've FMQ so far.
- It took me a while to get the hang of quilting near the edge of the fabric. That was the hardest thing to get used to.
- Eventually I got into a rhythm. I would FMQ the spine a few inches ahead, then come back and stitch the right and the left sides as I went.
- This is very different from my usual quilting of feathers. I usually stitch the spine, come back and then quilt one side and then the other. I'm happy to say that varying my technique wasn't as daunting as I expected.
- As I got more comfortable, I started focusing on my stitch length since I tend to make larger stitches on the underside of the feather.
- I did take a break between sides but when I got near the end of the second side, I skipped a stitch and just stitched over the feather. Then I got to the top, where again it skipped a stitch, and then my hand went numb! I think that's as good a sign as any that it's time to stop 😊
- I'm hoping that the couple of skipped stitches are due to fatigue (mine and my Jag) and not the need for a new needle, since it is a new titanium needle.
- My One Monthly Goal for December was to finish the FMQ on the Version 2.0 quilt. It might get done - but the quilt won't be finished since I don't have enough Kona fabric (we had agreed on burgundy) for the binding. Since most of the local quilt shops open January 3rd, I'll be picking some up then.
Related links
- Version 2.0 - almost done! December 22, 2022
Linking parties
I'll be linking up to many fun linking parties. Check them out after you've linked up below! Design Wall Monday, Patchwork & Quilts, Finished (or Not) Friday, Peacock Party,
Free Motion Mavericks
Welcome to week 413 of Free Motion Mavericks. Thanks so much for linking up - you really make my day! 😎
Here are the Free Motion Quilting projects from last time. Karin is using Golden Thread paper to copy the quilt design to then FMQ it. What a great way to stitch a design and keep it the same all over the quilt. Here is her lovely Charm Square quilt.
 |
| Karin FMQ her Charm Square quilt |
Next we have Gail with her beautiful tree skirt that she made for Island Batik’s Fall/Winter ’21 catalogue. Her loops look great on those gorgeous fabrics!
 |
| Quilting Gail's tree skirt |
Finally Nanette Chopin Cook finished FMQ a couple of quilts. This is her Bunny Quilt.
 |
| Nanette's Bunny Quilt |
It's now your turn!

You did great on those feathers. 5" wide is a big space and it takes courage to get going. Hooray for you and your love of FMQ!
ReplyDeleteThanks so much Kathleen. It was hard to get going but it was soooo much fun :-) The binding is now on (more lessons learned) and I just need to check my machine's tension. I'm hoping that a day off will have solved everything! Take care.
Delete