Page titles

Friday, September 30, 2022

Paint Night Party!

 Hi! I hope that you are doing well. I have something a little different for you today. I hosted a paint night for my daughter and her friends last weekend. I'm happy to say that fun was had by all!


Painting an aurora borealis night sky and tree

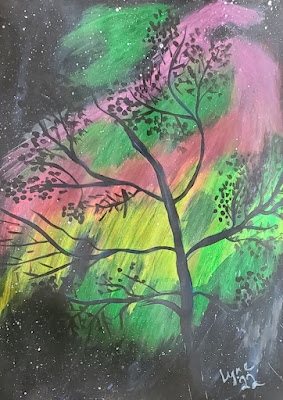
My daughter organised a paint night for her friends. I invited my artist friend, Lyne Gรฉnier to teach it.  It took quite a bit of preparation to choose the image that everyone was going to learn to paint. Thank goodness for social media (I had nothing to do with that part ๐Ÿ˜). The final decision was a colourful aurora borealis night sky and tree. 


Aurora Borealis by Lyne Gรฉnier

Here are my daughter, son and his girlfriend applying a background coat to the canvas.

Painting the background with not quite black


Lyne at her easel 

Lyne is a great teacher. She gives clear instructions but encourages her students to do their own thing while giving advice if they get stuck or want to do something a little different.

The girls are hard at work at the other table. 

Working hard!

After adding the aurora borealis colours to the sky, it was time to wait for the paint to dry. 

Aurora borealis sky is drying

Before it got dark outside, everyone went to the back yard to add the stars to their canvas with a toothbrush. We had a lovely pot-luck snack break and then it was time to add the tree.

Enjoying themselves!

Getting ready for the finish!

The final reveal!


I see a lot of smile! Isn't it incredible how each one is different?

A group photo with the paintings (and Coco)

The classic on-the-stairs photo ๐Ÿ˜Š

A dog friendly event - Poppy made new friends!

What I learned
  • The students had a great time and are looking forward to the next paint night! They requested a winter scene with options to add various things like a snowman and other winter elements.
  • I even have a few friends who are interested in attending Lyne's next party ๐Ÿ˜Š
  • Jeannine's friends are experts on social media, so they organised a group site and voted on the date and then on the painting that they wanted to make. 
  • The event started at 4pm. By 8pm the paintings were completed and it was time to chill. Lyne has lots of experience so the clean-up was fast and painless!
  • I'm looking forward to hosting another party in a couple of months.
Linking parties
I'll be linking this post to many fun parties. Let's see what going on out there. Off The Wall Friday, Peacock Party, Put your foot down, Free Motion Mavericks with Muv, Patchwork & Quilts


Thursday, September 22, 2022

Wildflowers on Version 2.0 with Free Motion Mavericks

Welcome to Week 400 on Free Motion Mavericks! I'm back to free motion quilting (FMQ) on my son's Version 2.0 quilt. It's getting cool. I'm sure that he'll want to snuggle into it soon๐Ÿ˜Š 

Stitching up wildflowers


Wildflowers have always been one of my favourite things. When I walk in the woods, it can be dangerous because I'm always looking at the ground at the flowers. I've been practicing drawing wildflowers for the last few days. 

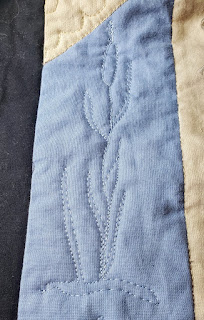
This first one is the easiest to draw, a cat-tail or bulrush. The FMQ is done on the blue, but it shows up so well on the back, which should be burgundy and not pink.
Bulrush, from the back

Cat-tail on the front of the quilt


The next one is also fairly easy to draw, a lily-of-the-valley. I have lots of these in my garden. They are gorgeous.
Lily-of-the-valley (back)

Next comes the humble clover, one of my favourite flowers ๐Ÿ˜Š

Clover (back)


Another favourite is the black-eyed Susan. I've had some practice FMQ this one because it's pretty much the same shape as a rudbeckia. If you want to learn to FMQ this, you can find the link to Muv's FMQ video in Related links below.

Black-eyed Susan (back)

Black-eyed Susan flower


The next two are asters and lupin

Aster (back)

Lupin (back)


I finished up the wildflowers with some chives. I love all flowers from the Allium family!

Chives (back)

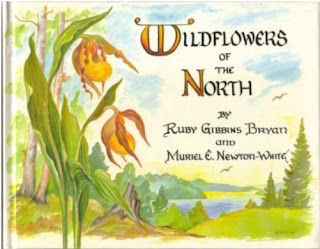
To practice drawing the flowers, I found a book on Wildflowers that I bought over 40 years ago at the Highway Book Shop in Cobalt, Ontario. They used to publish many books about Northern Ontario. I've included the link to this book in Related links. It's still available through quite rare - a real treasure.

Wildflowers of the North - a favourite book


A Strip of triangles and squares

I quilted one of the tan strips with meandering triangles and squares. It was nice to be able to quilt so quickly!


Meandering triangles and squares

Meandering triangles and squares next to the wildflowers

What I learned
  • Most of my favourite wildflowers were much too complicated to draw. I did try, but it wasn't going to happen for this quilt. Maybe one day....
  • I thought that I had lost the Wildflowers of the North book because I hadn't seen it in years. Turns out it was in a bookshelf that mostly contains my husband's books. It's now going to reside in my studio!
  • It's too bad that the quilting doesn't show up very well in pictures of the front of the quilt. There is little sun this week so no possibility of going outdoors for pictures.
  • It was great to FMQ the meandering triangles and squares. I will probably do at least one more strip with an easy quilting motif.
  • In 5 weeks, I hope to spend a lot of time FMQ this baby and finishing it up.
  • My September One Monthly Goal (OMG) was to finish FMQ 2 areas of Version 2.0, so that's done! 
  • To keep myself motivated, I've put the quilt and the threads at my sewing machine. I hope to take advantage of the fact that it's there and ready to go....we'll see how that works!
Related links
Linking parties

I'll be linking up to the Finish Link-up of September's One Monthly Goal (OMG) as well as many other fun linking parties. Let's check out what's going on out there! Monday Making, Midweek Makers, Needle & Thread Thursday, Put your foot down, Peacock Party, Off The Wall Friday, Finished or Not Finished Friday, Design Wall Monday, Patchwork & Quilts


Free Motion Mavericks

We have to lovely finishes from last time. Melva made Hanna's First Year quilt and Denise made a lovely mug rug for her sister.

Melva's Hanna's First Year quilt 

Denise's sewing machine mug rug


You are invited to the Inlinkz link party!

Click here to enter

Friday, September 16, 2022

Embroideries in hoops

I've been doing some slow stitching in the last few weeks. It's always such a relaxing thing to do. 

Stitching a second seascape 

Last month, I wrote a post about Embroidering a seascape. It was based on TextileArtist.org's workshop with Bethany Duffy (see Related links below). I decided that I wanted to go further with this technique since it's a lot of fun and since I changed it up a little, was able to learn a new beading technique ๐Ÿ˜Š!

A second seascape with a shell and sea glass

As you can see, it's still a work in progress (WIP). 

I used a piece of cotton for reinforcement and a hand-dyed piece as the background. On top of that, I added hand-dyed cheese cloth. I love the way that it looks like an old fishing net.

I attached the sea glass by making a beaded bezel. Since I had not way of attaching the sea glass, I treated it as a cabochon. I used Thom Atkins' book, Beading Artistry for Quilts. His explanations were great. It's obviously working since the sea glass is still attached after a couple of weeks!

Update: Here is a picture of the finished Seascape and Sea Glass 

Finished Seascape and Sea Glass (Dec 2022)

I love how it's turning out, so much so that I started another squirrel - literally ๐Ÿ˜Š

Getting caught up in a Squirrel

Here is my second WIP. I found a half nut shell that had holes inside, so why not use it too? With a nut comes a tree and a squirrel! I used a double layer of a blue-grey sheet as my base and added some of my own hand-dyed cheese cloth. I love the texture that it gives the piece. 

A tree, a nut shell and a Squirrel!

I started with a tree trunk (a scrap of brown batik) and then some kind of olive green voile (from an old skirt) for the top of the tree. I've added a few daisy stitches as leaves and I'll continue doing that. I haven't attached the squirrel on the log yet. The squirrel may move, depending on what else I add to the piece. 

It's far from finished but it makes me smile when I look at it. 

Meditation stitching


Last weekend I spent a couple of hours at the Out of the Box (OOTB) booth at Fibrefest in Almonte. I did some great shopping beforehand and at the booth worked on some meditation stitching. A little difficult to be mindful with people asking questions but it was enjoyable talking with like-minded people ๐Ÿ˜Š

Wonky star mat and the meditation block

Practice wonky star block


Can you see the quarter of the practice wonky star block as the background to the meditation block? I love trapping bits of thread and yarn beneath the tulle. This tulle is nice and glittery. I just finished the block, so here it is!

The beginning of a meditation block
Finished meditation piece


What I learned

  • Learning how to create a beaded bezel was interesting. I'm surprised that I was able to follow it easily - the instructions were very well written. 
  • I should have used smaller seed beads as I went up and around the sea glass. I didn't even know that they made them smaller than size 11! I'll have to go to a beading store for those.
  • I don't think that I have much to do to finish the seascape embroidery, just tidy it up and finish the back.
  • I pierced a hole on the inside of the nut to attach it. It was tricky getting the needle through it. Now I know what a curved needle could be used for!
  • I will probably be working on the squirrel hoop for a bit - there is still lots to do.
  • I'm working on more meditation pieces since it looks like I'll be teaching this later in the fall. I want to create a few finished articles to show what can be done with these, other than my huge traveller's blanket.
  • Did you notice the lovely polar bear pin cushion that Turid sent me last year? I love it ๐Ÿ˜

Related links

Linking parties 

I'll be linking up to many fun linking parties. Let's see what's going on around the quilty world! Put Your Foot Down, Off The Wall Friday, Peacock Party, Slow Sunday Stitching, Finished or Not Finished Friday, Oh Scrap!, Patchwork & Quilts, Monday Making, Design Wall Monday, Midweek MakerDrEAMi!


Saturday, September 10, 2022

Blue Wonky Star Mat

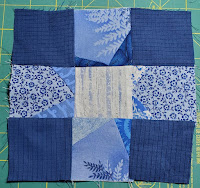
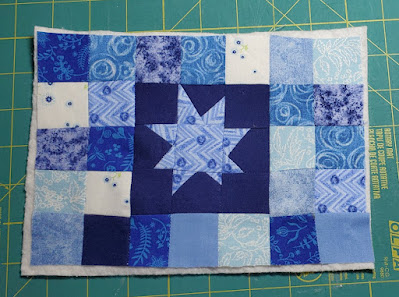
I had originally planned to just read today but then I went down the rabbit hole of quilting blogs ๐Ÿ˜Š. This is a squirrel and a blue wonky star mat for the 2022 Tables Scraps Challenge. A quilter who is doing the RSC-22 challenge is making some very lovely wonky star blocks. I got intrigued and a few hours later, my mat was done! 

Learning to make wonky stars

Wonky star mat for September's 2022 Table Scraps Challenge

September's colour is light blue and the theme is pumpkins. Sorry, don't go looking for the pumpkin - it's not part of the mat.

I found a tutorial on YouTube by Jenny Doan of Missouri Star (see links below). It really took me a while to get the hang of making the wonky star. I kept wanting to place the second leg of the star backwards. 

I did a quick practice block to see if I could make a wonky star. I did it, but realised that the fabric colours were all wrong. Since I'm going to Almonte on Sunday to demonstrate meditation stitching at the Out of the Box booth at Fibrefest, I'm going to cut this block up and see what I can do with it. 

Practice wonky star block

Once I knew what I was doing, I cut up a bunch of 1½" squares and made a small wonky star block. I then sewed the other squares together. 

Wonky star block surrounded by blue squares

I sewed the block to the batting using the walking foot. To make sure that I learned from my experience, I re-read my blog post of the Happy Hexie Mug Rugs. I'm glad to say that I didn't make the same mistakes...just some new ones ๐Ÿ˜.

Getting ready to attach the back

I just realized as I'm writing this that I forgot to stitch-in-the-ditch on one side....oh well.

I stitched the front to the back and then in the opening, turned the mat out. Once the opening was stitched up, I sewed around the edges with the walking foot.

Glamour shot :-)

I found a pumpkin!

Blue Wonky Star Mat with Pumpkin ๐Ÿ˜Š

What I learned
  • I should know better than to work with tiny square pieces of fabric. They don't hide the fact that I'm accuracy challenged. I did quite well on the wonky star block but the other square pieces aren't great. I know that I shouldn't worry about the quilting police but somehow it's ingrained in me!
  • I ended up cutting the back fabric the same size as the front but it didn't give me much fabric to close up the opening.
  • I sewed the front and back using a seam allowance that was too small. I had to go back and fix one area that hadn't been stitched properly. A generous ¼" would have been good.
Related links
  • Check out Ivani's orange Wonky Star block - I love it!
  • Make a "Tiny Wonky Stars" quilt with Jenny Doan of Missouri Star (Video Tutorial)
  • Happy hexie flower mug rugs, July 25, 2022
Linking parties
I'll be linking up to many fun linking parties. I'll be linking up to the 2022 Table Scraps Challenge as soon as it opens at the end of the month! Let's see what others are up to! Put your foot downPeacock PartyOff The Wall Friday, Patchwork & Quilts, Oh Scrap!Monday Making, Beauties Pageant, Needle & Thread Thursday, Finished or Not Finished Friday, Free Motion Mavericks with Muv, DrEAMi!


Project details

Blue Wonky Star Mat
Made for the September 2022 Table Scraps Challenge
8" x 5¾"
Materials: commercial fabric scraps
Technique: stitch-in-the-ditch quilting with a walking foot


Thursday, September 08, 2022

Wildflower Vest on Free Motion Mavericks

Welcome to week 398 of Free Motion Mavericks. I hope that you've had a chance to play this week. I did ๐Ÿ˜Š 

Dynamic Wildflowers in Stitch Workshop

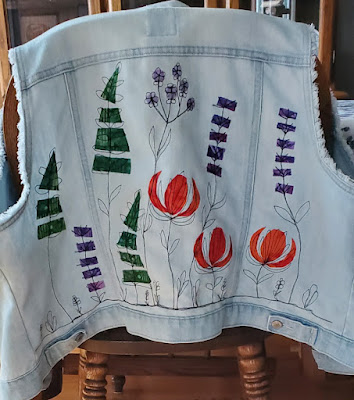
I've been wanting to free motion quilt (FMQ) the wildflowers in Jo Hill's July workshop on TextileArtist.org's Stitch Club. Since I wasn't up to tackling Version 2.0 this week, I thought that this would be a quick FMQ project - and it was!

The back of my Wildflower Vest

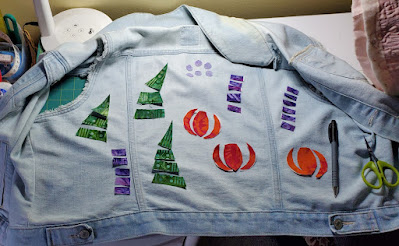
The first step was cutting up shaped for the flowers. I decided to use some bright batik scraps. You essentially cut up large circles for the large flower (red), some elongated triangles (green), cut up some strips (purple) and some small circles (light blue).

Placing the batik fabrics

After placing some Heat & Bond Ultra Hold at the back of the batik, I cut everything up and then placed these on the back of a old denim vest. I actually used the back of the red batik because it was a little less bright! 

After ironing these down, I used some regular black cotton thread for the FMQ. I did use a larger needle (a topstitch 100) and it went very well. I mostly followed Jo's sample to piece and quilt the flowers. I wanted to see how it would turn out before I started experimenting.

Fun FMQ with black thread

I really love how the black thread looks against the batiks and the denim. I was thinking of adding either different coloured thread or embroidery but I think that I'll leave the back as is. I can always experiment with the front.

What I learned

  • Since I had the ultra hold of the Heat and Bond, I thought that I would try it on the denim. That was probably a good idea.
  • It was great to use some lovely batik scraps for this project. 
  • I might consider using a thicker thread next time - I have some nice stuff, somewhere...
  • I'm looking forward to FMQ the front of the vest. There is less space since there are pockets, but the long vertical space could be cool!๐Ÿ˜Ž
  • I've also been thinking about other jackets and such that I could use this technique with. That would be a lot of fun!
  • If you like this style, check out Jo Hill's website (see below). She has really lovely work. She also offers some FMQ courses online that look interesting. She is a great teacher.

Related links

Linking parties

I'll be linking up to many fun linking parties. Why not check them out, after you've linked up your project below! Midweek Makers, Put your foot down, Needle & Thread ThursdayTGIFFPeacock PartyOff The Wall Friday, Finished or Not Finished Friday, Patchwork & QuiltsOh Scrap!, Monday Making, Design Wall Monday


Free Motion Mavericks

Did you see Sandra's lovely Grapefruit Pizzazz quilt last time? I so love those colours - they look good enough to eat!

Grapefruit Pizzazz quilt by Sandra at mmm quilts

It's now your turn!


You are invited to the Inlinkz link party!

Click here to enter

Monday, September 05, 2022

More books with fabric

I seem to be flitting around these days with many short, fun projects. Here are a couple more ๐Ÿ˜Š 

Book with a woven binding

I used to weave, many moons ago, so when I saw this project in the easy section of the Handmade Book Club, I couldn't resist. Anything woven catches my interest.

Hand-made book with woven binding

If you follow my blog, you will have seen a few posts on accordion books since July. I bought the accordion book challenge and made three of them (a fourth one is partially finished). Making books won't become my next passion but it's been amazing to learn and play with fun paper and fabric.

I did sign up for the Handmade Book Club. For a monthly fee, you have access to all of their many years' worth of archives. The videos are very well made and everything is super organised. I'm hoping, at least for the next few months to keep playing and learning to make books.

I wanted funky fabric on my cover. These two fabrics are from a former colleague's mom's stash. Thanks Judy, these are great!

I was so engrossed in making this book that I forgot to take pictures ๐Ÿ˜ฎ. Here is the back of the book.

Back of the book with the woven binding 

I did have quite a few learning moments making this one but I'm thrilled with how it came out! 

Fabric Meditation Book in progress

This project is from a Handmade Book Club workshop with Emma Freeman. Since I've been doing lots of meditation stitching I had to check it out! The whole book is made of fabric pieces and made in the traditional Japanese aesthetics of wabi-sabi. I'll be reading up on this and will share at a late date.


Couching on the front of my fabric meditation book

I ripped up 5 pieces of hand-dyed fabric from the scraps that my friend Elaine gifted me. The ripping adds such lovely texture.  There really isn't any rules for making these books except to try to make them in a slow, mindful manner. The front page has couched strands of some sari yarn.

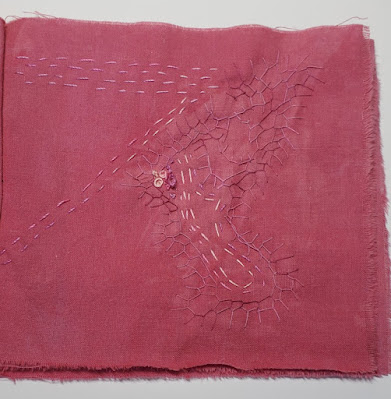
Keeping the pages simple is probably my biggest challenge. I'm not sure that I won't go back and add a little something but it won't be my usual more is best. ๐Ÿ˜Š The second page has some organic slow stitching using some of Mirjam Gielen's embroidery techniques. 

Organic stitching

This next page has a wonderful small piece of embroidery that I cut out. I'm not sure what my plans were for it but since I only got this far, I ripped the embroidered piece out to attach here. I also love pieces from the selvage edge.

Repurposing a small piece of embroidery

I'm also working with layers. This one has a piece of organza topped with a tiny scrap of hand-dyed fabric. I love the marks here - they almost look like their own language. Below it is another tiny piece of fabric that is folded like a bow.
Layering and stitching

I still have one final blank page. Maybe it's actually finished and the last page represents future possibilities! ๐Ÿ˜Š

Thanks so much for accompanying me on my crazy learning journey. Here is what I learned from these wonderful projects.

What I learned
  • The pages in the book are called signatures. I learned the hard way that we are supposed to trim the pages before you bind them....yup, makes lots of sense in hindsight ๐Ÿ˜Š
  • I had watched the video on making the signatures but I should have watched it a second time. You may wonder why the back fabric isn't the front since it's so "me" but the pages sticking out of the bottom will give you a clue.
  • It's fun trying different aesthetics - from in your face colourful to subtle. I'm rather surprised that the calm, minimalist stitching of the fabric book really appeals to me!

September's OMG
I really need to spend some time free motion quilting (FMQ) on Version 2.0 My One Monthly goal will be to complete two more areas of Stรฉphane's quilt. It's going to get cold soon and he'll need his quilt to keep him warm ๐Ÿ˜Š

Related links

Linking parties

I'll be linking up to many fun parties this week. Why not check them out...and remember to visit Muv on Free Motion Mavericks! You can also come back on Thursday for my turn at Free Motion Mavericks! September's OMG, Slow Stitching Sunday, Design Wall Mondays, Oh Scrap!, Patchwork and Quilts, Off The Wall Friday, Put Your Foot Down, TGIFF, Peacock Party, Beauties Pageant,