Page titles

Wednesday, August 30, 2017

August Finishes

Growing Up QAL with Alida
It's been a huge month of finishes. And here I was worried that nothing would get done!

Growing up QAL for August
Getting block 8 done on time!

I had to write this post to link up my finished Growing up QAL block which is a Bargello block. This was the first time that I had done one, although I have admired them from afar for a long time.   
Block 8 - Bargello
I love the gradual changes in colour but I knew that it wouldn't be easy. I'm sure that if you're piecing is accurate and your good at following directions that it's not so bad. But since I'm not so great at both of these things, there was a lot of re-arranging of blocks behind the scene! But it's done and I'm very proud. Thanks Alida for this learning opportunity.

I've posted all of my finishes but if anyone has missed them, here's a recap.

One Monthly Goal for August


I managed to finish my August goal early! It was my lovely Hexie Table Topper.

I've been working on a few ideas for more hexies. After playing around I figured out that I like the pieces that have some consistency in the colour combinations.

I've been making more hexies with at least 6 hexies of the same fabric, so that I'll have at least one flower of the same colour. I love playing around with combinations and should have a few ideas to show you soon.
Neutral Lap Quilt FMQ block

One Monthly Goal for July

My goal for July was to finish quilting and binding my Neutral Lap Quilt - Take 5 Loves Coffee Milk. It didn't happen in July, but I did finish it this week. I only have to make a label for it. I'll be posting the results of this project within the next couple of weeks!

Learning QAL Goal for August

Whimsical Daisy appliqued block


Finally my goal for the August Learning QAL was to dye my own fabric. I was very good at procrastinating! I cleaned up and inventoried my quilting supplies, made an cute applique block and finished the second Classy and Scrappy placemat!
Classy side of the placemat


But I did it! I finally got my act together and dyed my own fabric!

It took quite a while to get it to dry but it's done. Now I just have to make something with that amazingly colourful fabric :-)

I couldn't resist - I took a picture of Chevy watching me lay out the fabric to dry on the lawn. She was not impressed with the fact that I wouldn't let her join me outside! Can you image a hand-dyed doggy?
Chevy - not allowed to play
with the dyed fabric!

What I learned

  • Procrastinating can be very productive. Maybe not for the project you're supposed to make, but for everything else that you procrastinate with!
  • I was getting tired of making hexies with no goal in mind. Now that I've picked out a few fabrics to make a few hexies from, it's given me some encouragement. I can't wait to see what combinations I can come up with. It's like making a puzzle but with fabric - how can it get any better?
  • I've been thinking about my month of September since I have an Art with Fabric Blog Hop coming up in early October. I hope that I'm not being overly ambitious but only time will tell!
  • I also have to come up with a learning goal for the September Learning QAL. The easy thing would be to make the Art with Fabric piece the goal, but then I wouldn't be showing it off till two weeks later, so I don't think that's going to work. Well, I have a day to think about it. No pressure :-)
Related Links

Linking Parties
I am linking this post to the Growing up QAL link-up. I will also be linking up to many other linky parties. Join in the fun and see what others are doing! Linky TuesdayMidweek MakersLet's Bee SocialNeedle & Thread Thursday, Off the Wall Friday, Finished or Not Friday, Can I get a Whoop Whoop?, Oh Scrap!, MOP Monday, Main Crush Monday,

The September Learning Goal Setting Link-up will be open from September 1st to 10th, 2017. You have a few more days to figure out what you want to learn this month. Join in the fun - you can even win a terrific learning prize!

Monday, August 28, 2017

Results of learning to dye fabric

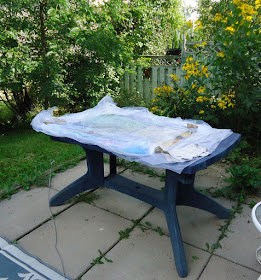
I did it! All the fabric has been dyed. The drying of the fabric actually took two days - much longer than the dying process. I guess when they say that you can leave your fabric to dry on the table between sheets of plastic, they mean that you can do this if it's hot outside. I guess a high of 20 C (68 F) and a low of 14 C (57 F) just doesn't cut it!
The fabric on the table didn't dry - it was too cool outside.
The fabrics looked great on the table but only the bottom ones were slightly dry - the rest were still dripping!

Fabric drying in the sun
In mid-morning, I placed plastic sheets on the ground, in the sunlight, and very carefully transferred the fabric from the table to the plastic.

The fabric on the left was originally a white-on-white.
I even had to hang one piece since I didn't have enough plastic! Once the smaller pieces were dry, I was able to rotate them. Within two hours, everything was dry.

A very colourful yard!
I think I was supposed to start by rinsing the fabrics individually to get rid of the excess dye....oops! I put everything in the washing machine with some fixative and two dye catcher sheets. I washed in hot and rinsed in cold - twice. The third time I washed them only in cold - by then the dye catchers were almost white. Since these fabrics will be used for art quilts, I think that this is good enough!

Lots of yummy fabrics to play with now!
My final fabrics are a little brighter than in the pictures. These are some of my favourites! You can see the see-through cotton on the fence. Below are two pieces of the cheese cloth.

Finished hand-dyed cheese cloth and cotton.


I now also have some very lovely pink gardening pants and rags :-)

What I learned

  • Because I was nervous about the whole process, I spent all my time planning the dyeing part. I should have spent a little more time on the details of what to do after it was all dyed!
  • The fabric is lovely, though perhaps a little on the extremely colourful side - nothing subtle this time around.
  • It would be lovely to work with only a couple of colours but with more shades.
  • I'll be checking out the internet to see what fibre artists do with their dyed fabric!
  • I dyed some cheese cloth as well as some rather see-through cotton. These are my favourites! This was not what I expected. 
  • I would love to dye some organza and such...and of course more cheese cloth.
  • Since fall is almost here, the next time I dye fabric will likely be indoors. I plan to make something with my hand-dyed fabric before I dye more, but I think that it's safe to say that I will be doing this again.
  • Thanks to everyone who encouraged me. It was a wonderful learning experience. 

Related links
Posts of my dyeing experience


Linking Parties: Since it's my party and someone has to show up :-)  I'll be linking to the Learning QAL - August Sum Up. I will also be linking to many fun linking parties. Check them out! Monday MakingMain Crush MondayDesign Wall Monday, Linky TuesdayMidweek MakersLet's Bee Social, Needle & Thread Thursday,

Don't forget to plan your September Learning Goal for the Learning QAL. Join in the fun - learn something new, share with the community and maybe even win a prize!

Thursday, August 24, 2017

Learning QAL - August Sum Up

Welcome to the first 
Learning Quilt-A-Long Sum Up post and link-up.


My learning goal for August was to dye my own fabric! This was big! I was nervous! The actual dyeing was almost anti-climactic :-) Isn't it typical to see new things as complicated and difficult?

Learning to dye fabric

I approached it as I mentioned in my goal setting post.
  • I started by reading a couple of books and blogs, and watching some YouTube videos. I have listed my favourites resources in the Related Links section below.
  • I bought some supplies since the measuring cup, funnel, measuring spoons and whisk shouldn't be used for cooking any more. 
  • I already had my kit and some fabrics but bought a little bit more :-) and raided my stash for a few fat quarters.
  • I made notes - lost the notes and re-wrote more notes!
  • I washed all of the fabric last week, even the Prepared For Dyeing (PFD). After reading all kinds of advice, I just used my usual unscented laundry soap.
Fabric pile ready to dye
  • I put away all of the laundry in the laundry room so that nothing could get accidentally dyed.
  • I mixed the soda ash with the warm water (about one cup for a little more than a gallon), unfolded the fabric and placed it all in the mix.
  • I set everything up on the top of the washer and dryer, with rags under everything.
  • As suggested, I misted the rags so that the dye powders would stick to them rather than float in the air. That was a very valuable tip. You can see from the picture below that the rag underneath the jars is quite colourful from dye powder that stuck to the wet rag.
  • You can also see that my two cups measurement was pretty uneven.
Black, fuchsia, yellow and turquoise prepared dyes 

My supplies and prepared dyes on the washer and dryer
It was now time to take everything outside. 
  • I placed my old picnic table in the sun and then covered it with plastic. 
  • From the original yellow, turquoise and fuchsia dye mixes, I made purple with the turquoise and fuchsia; and green with the yellow and turquoise. I realised half way through the day that I had forgotten to make orange dye.
  • I placed some of each dye in the plastic squirt bottles for easier application.
Dyes ready to use

Table set up in the sun
Then the real work began!
  • I took fabric out of the soda ash water, wrung it and then placed it on the plastic covered table.
  • I found that the hardest part of dyeing fabric was to decide what colours to use. The only piece that I used just one colour on was a fat quarter that I dyed purple, since I had lots left near the end of the day.
  • I tried to dye the fabric with colours that might be used for landscape art quilts. Of course, if I don't like all of the colours on one piece, I can always cut it up.
  • I did a few pieces the way Sharon Collins makes them, by applying different colours of dye on half of the fabric and then folding the other half over it to get a mirror effect. 
I have no idea what I was thinking!
The picture was taken before I covered it with plastic and spread it out.
Let's hope for the best :-)

The fabrics are white on white.
I heard that you can get nice effects by dyeing them.
As I look at the pictures I took of the fabric with dye on it, I'm not sure what to expect. I may have gone a little too crazy with the colours. Oh well, this is what learning is about!

I wish that I could show you the results in this post, but the fabric is still outside. I placed the table where it will get maximum sunlight. I will be removing the fabrics tomorrow and then washing it.

Fabric dyed and waiting to dry.
What I learned
  • Dyeing fabric is a lot of work, but I'm sure that it gets easier with practice!
  • I'm really glad that I misted my work space with water since I got dye powder on the rags. I should have known since I always get flour and sugar all over everything when I bake!
  • I should have cut my plastic pieces before starting to dye - and I should have used heavier plastic. I did use medium weight but I think that heavy weight would probably not have wrinkled as much when placed on top of the fabric. I'm not sure what effect this will have on the dyed fabric. I guess we'll see soon enough!
  • I'm happy to say that I wore my plastic gloves most of the day. I did take them off to arrange the cheese cloth on the table, and then only used one gloved hand to apply the dye. Since most of it was fuchsia, the pink doesn't look too bad on my fingers - and most of it washed out after a shower and doing some dishes.
  • Next time I will probably dye a smaller batch of fabric. I was tired about half way through dyeing my fabrics. 
  • Next time I also want to think more about the colours and the effects that I want to achieve on the fabric since I won't be so worried about the process.
  • I still have some dye mix ready to use. From everything that I've read, it seems to keep from 1 to 5 weeks.
Related Links
Linking parties: I will be linking this post to many link-ups. Follow the fun and see what everyone is working on. Finished or Not FridayOff the Wall FridayCan I Get A Whoop Whoop?Oh Scrap!Monday Making, Main Crush Monday, Design Wall Monday, Linky Tuesday, Midweek Makers, Let's Bee Social,


Wednesday, August 23, 2017

Classy and Scrappy 2


First placemat - Classy side
In May I made a placemat for a dear friend. She liked it so much that she asked for a second one :-)
First placemat - Scrappy side


Of course I couldn't make two identical placemats...that would be boring, but they do match!


Simply Strips Placemats
by Cindi Edgerton


For this second placemat, I used some of the original fabric, some new fabric, as well as fabric from the same line. I looked in my collection of placemat and table runner patterns (yes I have one of those!) and found a Little Bits Simply Strips Placemats by Cindi Edgerton. The pattern includes six different designs for foundation paper piecing strips.


Second placemat - Classy side

Foundation paper pieced strip


This was the first time that I did foundation paper piecing with the pattern printed on "dressmaker" weight tissue paper. Although it was a little more fragile, it worked out fine.

For the scrappy side, I went even more improvisational. I love sewing fabrics together, cutting them up and then sewing them back together at crazy angles. I also included a "T" for Tipi (my friend's name). That was the only planning I did!


Second placemat - Scrappy side
I free motion quilted (FMQ) this placemat with the same overall design of small flowers as well as quilting in the ditch around the foundation paper pieced strip.

Details of improvisational piecing
What I learned
  • I looked at the pictures from the blog post to remind me of the pattern and the fabrics I had originally used. Too bad I didn't re-read the actual post before quilting it. I couldn't remember what thread I had used but didn't check the post because I don't usually mark it down. Oh well!
  • Did I mention that I LOVE doing improvisational piecing? I think it had been too long since I had just played around. To me this is the ultimate play time.
  • As I mentioned in my last post, I spent most of my week sorting and inventorying all of my quilting fabric and supplies. As you can see, Chevy helped by chilling out and staying out of my way! BTW, I haven't found those blocks yet :-( Maybe if I stop looking...
Chevy napping while I clean!
Related Links
Project Details
Classy & Scrappy placemat
20" x 13"
Classy side - Little Bits Simply Strips Placemats by Cindi Edgerton
Materials: cotton
Techniques: piecing and improvisational piecing, FMQ

Linking Parties: I will be linking this post to many fun linking parties. Check them out! Main Crush Monday, Design Wall Monday, Linky TuesdayLet's Bee Social, Midweek Makers, Needle and Thread Thursday, Finished or Not Friday, Off the Wall Friday, Can I Get A Whoop Whoop?, Oh Scrap!, Monday Making, Free Motion Mavericks

This second placemat was also one of my goals for the 3rd Quarter Finish-A-Long. Here are the links to my original goals, the 3Q FAL goal setting link up and the final link up.


Remember to start planning your learning project for September! For more details, visit the Learning QAL site. Be ready to link up between September 1-10.


Sunday, August 13, 2017

Cleaning up and procrastinating

Block 3 - Still Missing!
I pretty much have the house to myself this week, and instead of relaxing like I should, I've started to clean my quilt studio (aka bedroom). It's not really that messy, it's just that I have no idea where I've put stuff.

For example, I'm about to send out a search party for my first three blocks of the Growing Up QAL. I have proof that I did them, since I posted the pictures, but I still haven't found them.


Block 2 - Have you seen it?
Block 1 - Hasn't been seen in months!

I'm really hoping that I'll be able to solve the mystery of the missing blocks by the end of the week. They are definitely in a good place, which remains unknown at this time.


So not only am I cleaning up, but I'm writing down where things are. I realise that this will get outdated quickly, but at least it will be a start!

There are no photos of the cleaning process since it gets worse before it gets better - right?


Beautiful botanicals book
I got sidetracked when I found a cool project. Once upon a time, I had illusions of doing hand appliqué. That didn't last very long, but I had started cutting out fabric for a daisy from Deborah Kemball's beautiful book.

The petals I had cut out were a pastel blue. I thought I would take a few minutes to find some fabric from my scraps for the leaves and stem. Well, I guess I was in a whimsical mood because I totally re-interpreted my appliqué.

I had a great time choosing fabrics for the petals. I even cut up the larger leaf into three so that I could get more fabric on there! Of course the zig-zag stitch was a life saver. I also got to use my Kimono silk threads :-)


Whimsical Daisy
I'm not sure what I`ll do with this block, but it's bound to find a home someday. Of course, now I have to put it away in a place that I will remember write down!

I hope you're having a great week.

What I learned
  • There is nothing worse than a good place to put something. It means that it may never be found again!
  • The daisy block was a procrastination for cleaning - which is also a procrastination....for dyeing fabric!
  • I'm really glad that I made something from the Beautiful Botanicals book. I keep buying these beautiful books. I hope someday to make a project that mixes the appliqué with embroidery....Life is just too short!

Related Links

Linking Parties
I will be linking to many link-ups. See what other quilters are doing! Oh Scrap!Can I get a Whoop Whoop?, Finished or Not FridayDesign Wall MondayMain Crush MondayMonday Making, Linky Tuesday, Let's Bee Social, Midweek Makers, Needle & Thread Thursday, Finished or Not Friday, Can I Get a Whoop Whoop?

Remember to start planning your learning project for September! For more details, visit the Learning QAL site. Be ready to link up between September 1-10.

Sunday, August 06, 2017

Hexies table topper

I love playing with colourful fabrics. That's why English Paper Piecing (EPP) suites me so well. I get to use up some of my favourite scraps while making something pretty.
Hexie  flowers top assembled
This little hexie piece has been fun to make and I did learn a lot by making it, especially while finishing it with a facing instead of appliquéing it to a fabric background. I found a great tutorial by Badskirt for using a facing made up of more hexagons. It allowed me to keep the hexagon edge on the finished piece. (See Related Links below.) It was challenging but turned out great!

Quilted backing before the facing is attached
Once I finished the quilt top, I marked the batting and backing with a marker following the top's outline. I cut these to the same size as the top. The next step was to free motion quilt (FMQ) everything together. I very slowly quilted everything in the ditch, except the final lines leading up to the edges. I thought that I would quilt these once I had attached and finished the facing but found that it wasn't necessary.

Hexie facing on top of the piece
I made the hexagon facing to match the edge of the piece. This was the most challenging part. The hexies have to be attached to each other correctly because they need to match the quilt top. It turns out that matching the hexies following the back is not the same as matching the front! Let's just say that there was almost as much un-stitching as there was stitching. It's a good thing that it was easy to undo!

The next step was to attach the facing to the top. With right side together, as in the picture above, I attached the facing (which still had the paper pieces in them), being very careful to stitch on the outside of the hexies so that the stitches wouldn't show when they were flipped over.
The finished back with the hexagon facing attached
After removing all of the papers, I turned the facing over, making sure that the edges were poked out properly. It was simple to attach the facing to the back.

Finished Hexie Flowers Table Topper
Playing with a friend


Lyne's first foundation paper pieced block
This weekend I finished my hexie piece while spending some quality time with Lyne, a childhood BFF who now lives in North Bay, Ontario. Since she's an artist, we spent a few hours at the National Art Gallery where we took a great tour of the new Canadian art section.

We spent the rest of the weekend talking, eating and playing with fabric. Lyne was intrigued with a foundation paper pieced bunny pattern I had. She decided to make it on the weekend! The pattern was one that I've wanted to make for a while but just don't have the patience to - it's got lots of small pieces, even if I doubled the size of it!

Isn't it gorgeous? This was her first foundation paper piecing project. She did a great job! It's going to look wonderful on her grand-daughter's quilt!


What I learned
  • Basting EPP pieces is a great way to finish up my almost-empty spools of thread. 
  • Piecing the facing was a huge learning experience. I think that I was twisting the hexagon pieces when I was holding them to sew. Even if I checked the hexies twice before starting to sew, I would still end up with the wrong edges sewn together. Finally I learned to pick up the hexies only to attach them with a knicker knot. After that I would place them over the quilt top as a guide and sew the correct edges together.
  • To make the facing, I used colours that matched the top. They don't really show from the side but the back look neater.
  • I was very eager to see what the facing would look like when it was flipped, so I took the paper shapes out and flipped a few over before the facing was fully attached. Since the hexies are sewn together using silk thread, I ended up breaking some of the thread. Silk is lovely but not made to take any abuse. Luckily it was very easy to sew them back together.
  • If you want to use silk thread to sew hexies together, a trick I learned recently is to make a knot at the top near the needle so that the thread won't come out of the needle. Since the silk is so fine (#100), the knot goes through the fabric but keeps the thread in the needle.
  • Quilting with a friend is awesome! Thanks Lyne for a great weekend. 😊

Related Links

Project Details


Hexie Flowers Table Topper
10" x 10½"
Materials: cotton scraps, hexagon paper pieces, silk thread
Techniques: English Paper Piecing (EPP)


Great news! This little hexie topper was featured on Midweek Makers. Thanks Susan!

Linking parties: I will be linking this project to the One Monthly Goal August Finish Link-up as soon as it opens up in the last week in August, since this was my OMG for August. I am also linked up to the following parties - come join us! Slow Sunday Stitching, Oh Scrap!, MOP Monday, Can I get a Whoop Whoop?, Finished or Not Friday, Design Wall Monday, Main Crush Monday, Monday Making, Midweek Makers, Let's Bee Social, Linky Tuesday, Free Motion Mavericks, Needle & Thread Thursday, Off the Wall Friday, Finished or Not Friday, Oh Scrap!, Can I get a Whoop Whoop?Slow Sunday Stitching

This little hexie project was also one of my goals for the 3rd Quarter Finish-A-Long. Here are the links to my original goals, the 3Q FAL goal setting link up and the final link up.