Page titles

Saturday, May 28, 2016

Quilting in the Bush

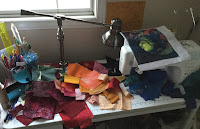
The view from our sewing room
I've spent the last four days quilting in the bush, at a retreat with friends. It's been fabulous. It's only about an hour from home. I took 3 vacation days and am spending 5 days quilting. In that time, I prepared one meal. We each make one of the meals for Thursday to Saturday. On Sunday we eat leftovers and then leave in the early afternoon.

Some of the ladies are energetic and take daily walks - not easy since the area is full of hills. It's also black fly season - and I'm considered a delicacy, so I've mostly stayed indoors except for a few photo shoots and to put my feet into the river:-)

Wednesday
My first day was productive. I finished a batik lap quilt top that I had started a year ago, and I put the sashing and borders on my Applique Inside the Lines UFO.

Batik Lap Quilt Top
Batik Lap Quilt Top
I was so impressed with the first batik lap quilt I made that I bought more Charm Packs to make some quick gifts. I couldn't understand why I didn't have enough charm squares (5") to make this quilt until I read my original blog post - it takes 3 packages and I only bought 2! I was able to add more squares from my stash. Hopefully they will behave when the quilt gets washed since you can't pre-wash pre-cuts.

For this quilt, I used 2 packages of North Country Trail Batiks Charm Pack by Holly Taylor for Moda.
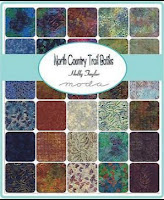

North Country Trail Batiks Charm Pack by Holly Taylor for Moda
North Country Trail
Batiks Charm Pack 
The Leaves project is from the book, Applique Inside the Lines by Carol Armstrong. I've actually written about this project in a couple of posts. In the March 2014 post, I wrote about embroidering the first red leaf at work during my lunch break. I finished the last of the three leaves in June 2014 while embroidering in the car on a road trip...and the finished leaves sat in a pretty project bag until this week.

When I looked in my stash for sashing and border fabric, I quickly decided on a beautiful batik of green, blue, gold and red in a cathedral windows print. Unfortunately this image doesn't do it justice. I hope that the final picture when it's done (not 4 years from now!) will be better.

The Leaves with sashing and a border
Thursday
It spent part of the morning making lunch and then tried to start on a Sew Together Bag. I was obviously not in the right head-space because every piece of fabric I cut was wrong! You may know that I really don't like measuring and following a pattern, so I can't say that I was surprised but I am better at it some days that others.
Background of the landscape art quilt

Finally I broke down and started a new landscape art quilt. I was really hoping to only work on WIPs this week, but everything I brought require measuring and following instructions. Fortunately I had brought a dozen solid Kona fat quarters with me. I decided to cut strips, between 1 and 2 inches and see what I could do. While looking at the results one of my retreat buddies suggested that the dark brown could be a dock. That's when the project fell into place.

Here's what it looks like after a couple of days of playing with it. I've only pieced the bottom section, but this will be the background to the landscape art quilt, very loosely based on the view from our quilting room.

I will piece all of the strips together and then add fabric details to the background. There's not much of a sky in the picture but since it's one of my favourite parts of a landscape art quilt, I decided to add one. I have a lot of time to change my mind about all of this, but this is the first rough sketch.
Inspiration for my next Landscape Art Quilt

Fox in a Box
Friday
It took me 2 days to finally start relaxing. I worked on another WIP (Work in Progress). This is for my good friend Sonya's third child. I've posted about Alexandre's quilt but I can't find any mention of Charlotte's quilt. I'll show all three once I finish this one. I've almost finished piecing the flying geese blocks. I still have a way to go but I'm now encouraged to finish it - so there's hope that William will get it before his first birthday, maybe!

What I've learned

  • I know that I can measure, cut and follow instructions - but my ability to do so is much better when I'm well rested.
  • It would seem that I can't stay away from creating new landscape art quilts. Next time I go to a retreat, I'll make sure to pack for one!
  • Thursday night I couldn't sleep, so I came down and sewed a bunch of scraps together. It was very relaxing and I slept well after that (and a peanut butter, honey and banana sandwich).
  • It's been great to be able to spend time writing this post. Now it's time to get back to my projects.

Do you get a chance to get away to quilt with buddies? Tell us about it in the comments section.

Check out the many quilty projects: Fabric Tuesday at Quilt Story, Main Crush Monday, Freemotion by the River, Let's Bee Social and Fabric Frenzy Friday.


Sunday, May 15, 2016

Art Quilt Practice Pieces

After last week's whirlwind (a guild quilt show and the Art with Fabric blog hop) I didn't think I'd want to quilt for a few weeks. Well, I stayed away from my quilting for 3 whole days! However, the two little projects I made were pressure-free playing using new techniques or materials.

So far, I've participated in 3 of the Colour Me Positive 2016 Weekly Journal Challenge, by creating mini art quilts that are mostly words with free motion quilting (FMQ). I love seeing everyone's art work on the dedicated Facebook page. The pieces are fun and use all types of art journalling techniques. I didn't even know that this existed until joining them!

Week 18 of the Colour Me Positive Challenge - Healing Art
Week 18 of the Colour Me Positive Challenge - Healing Art (13" x 7.5")
Since I'm also using words in these quilts, I'm now learning to write again with Joanne Sharpe's Whimsical Writing books and videos. Between all of these resources, I've learned about all kinds of neat writing, drawing and art products that are easily adapted to fabric. That's why I couldn't wait to start playing with stamps, markers and stencils.

Week 18 - Healing Art

Details of the tree - coloured and thread painted
I started this piece using the tree stencil and then went a little nuts with some of my daughter's stamps.

I took out my permanent markers and coloured the tree and outlined some of the butterflies and flowers. Since the green of the tree was too intense, I toned it down with some thread painting in browns and darker green.

I then added the "Healing Art" using some cool grungy alphabet stamps. The letters didn't stand out enough so I experimented with my new markers and played around with a colourless blender. Wow! I love the effect it has on the letters - I even used them on the tops of the tulips. It makes them look like water colours. I then added metallic thread through the bobbin and did a little bit of FMQ

As with all of my art, the hardest part is knowing when to stop. I looked at the piece from the perspective of the art theory I've been learning.
Does the piece have:

    • a focus point; 
    • contrast; 
    • balance; and 
    • flow?

I think that the answer is yes. However, since the techniques used on this piece include FMQ, stencils, markers and stamps, I though that I should add appliqué to the mix. That's when I dug into my scrap stash and found two cools cats! Nothing says mellow like cats hanging around :-)

Week 9 - Live like a grownup, play like a child

At the quilt show last weekend, my daughter bought me a couple of hand dyed cheese cloth by local fibre artist Linda Palaisy.

Fantaisie 2 -my creation for Week 9
Fantaisie 2 -my creation for Week 9 (6.5" x  9")
The colours were so lovely I could just taste them! I couldn't wait to try making something fun and whimsical, so here it is - Fantaisie 2, a fibre collage.

I attached the cheese cloth to a blue cotton to lighten it up. In my stash I found three different fabrics - the hollyhock, the faeries and half meter of fabric that had butterflies, hummingbirds and these great borders.
Fantaisie 2 - close up
I attached the fabric using thread painting. It was flimsy and difficult to sew, so I used a minimum of stitching and then quilted it. Since it's just a fun little piece, I decided to leave the borders as is, without binding. I was hoping to use the same technique I had used for Woven Landscape  - to just fold the backing between the batting and the borders, but it didn't work out. Those are the drawbacks to just forging ahead without planning!

What I learned:
  • I should stop when I'm tired - that's when challenges happen.
  • Challenges are not important when playing. Fix it, or just move on :-)
  • To colour or write on cloth, just iron the cloth to freezer paper to make it more stable.
  • The Fantaisie 2 piece is dark, but I think that the borders lighten it up and give it contrast.
  • I love the look that the cheese cloth adds to the piece.
  • In case you're wondering, yes, week 9 should come before week 18, but we're encouraged to add our pieces whenever they're ready. 
I will be linking up to the following parties - check them out!
Oh Scrap!  Let's Bee Social, Needle and Thread Thursday, Free Motion Mavericks, Off the Wall Friday, and Freemotion by the River


Monday, May 09, 2016

Art with Fabric - Light at the End of the Tunnel

Original painting by Sheila Langlois of Kirkland Lake Ontario
Welcome to the Art with Fabric Blog Hop.

My art quilt is based on a painting by Northern Ontario artist Sheila Langlois (1930-1996). More about Sheila and how I met her at the end of my blog.

I love this art work. Sheila painted it when she went back to art school as an adult. It was a study in primary colours. I call it "Study in Primary Colours or Light at the End of the Tunnel".

This is the first piece of original art that I owned. It's been a part of my life since I went to Ottawa University some 35 years ago. It had pride of place in my dorm room.
The art quilt as it was two weeks ago
The art quilt two weeks ago - see previous post

When I was asked to participate in the blog hop, it didn't take me long to decide to quilt this art piece. I love it's vibrant colours and movement.

I took many photos of the painting, but none of them really does it justice - just like when you see an original Renoir and discover that it's much more vibrant than the pictures you've admired all of your life.

Although I loved the painting, it's now obvious that I had never "really" seen it. I had no idea how complex it was until I started to think about recreating it in fabric.

The first thing I did was raid my scraps stash. Not long ago I had placed all of the scraps that hadn't been cut into squares or strips, into bags by colour. It made my search for the right fabrics much easier.

Reds and oranges are starting to appear in the art quilt
Reds and oranges are starting to appear
The first week, I spent most evenings working on this project. On Saturday, with daylight coming into the room, I realised that my colours were off. What I had seen as dark blues and blacks were actually medium and dark blues - there is no black except for a couple of thin branches. I pulled the piece apart and started over, only choosing colours during daylight hours.

The choosing, cutting, placing and gluing of the fabric took about three weeks. The painting has so many details - it was hard to decide what to skip. I knew that it didn't have to be a replica of the original painting, but that was easier said than done. Near the end of the three weeks though, those decisions were much easier to make!

It's starting to look like the painting!

A mess - happy to put away the fabrics to FMQ
Happy to put away the fabrics to FMQ


I have to admit that I was thrilled when the piecing part was over. After all that work, it only took me a weekend to thread paint and quilt it.

I'm always nervous about knowing when to stop thread sketching and when it's time to quilt. This time it was an easy decision to make since all of those pieces where glued in place. It all had to be sewn down, or it would fall apart the first time it got washed!

For the thread painting, I used two green threads and one each of blue, red, orange and yellow thread. I paid particular attention to emphasize the circular movement of the painting. I did pretty much the same thing when quilting it, while using less thread colours.


What I learned:

  • This was the first time that I made an art quilt based on a piece of art. I really miscalculated a few things. 
    • I didn't want to make a pattern - it would have been too difficult and for me, it would have taken the fun out of making it. I took a photograph of the painting and divided it into 9 equal(ish) parts to guide me. It turns out that my proportions were off (too wide and not long enough).
    • I also didn't account for the border. The quilt was originally 16" x 16" but after making the backing, I lost a lot of the painting's top and bottom details. Oops! After it was finished I realised that I could have left some of the white background fabric at the edges since it wouldn't have shown once the backing was attached. I suspect that I'll remember this lesson.
  • I didn't realise how complex this piece was until I started trying to create it. I was so tempted to start adding the details of the branches in the middle of the yellow section right at the start, but I knew that I could only do this in the end, after it was all pieced. Staying away from those branches was the hardest part of the piecing!

Sheila Langlois, Artist and Friend

Sheila Langlois, 1994
Sheila was a well know artist from Kirkland Lake and my mother took a couple of her painting courses. I didn't really know her until the summer before leaving Kirkland Lake for university. That summer, I didn't have a full time job, so I took as many short term jobs as I could get. Sheila was looking for someone to do housekeeping once a week.

Working for Sheila was the highlight of my summer. When I got to her home, I never knew what I would be doing that day. Sometimes it was normal housekeeping work like vacuuming and dusting, but at other times it might be cleaning windows or helping Sheila make chicken kiev for a dinner party that night. Sheila would always prepare us a lovely lunch and we'd spend an hour chatting about everything, from art and music to philosophy.

One day we cleaned out the room where her paintings were stored. Sheila worked mostly with water colours of Northern Ontario scenes. This painting was very different from her usual work. I fell in love with it and bought it!  The painting hangs in my dining room, across from two of her water colours of trees and water that I inherited from my mother.
Quilt: 15 1/4" x 15 1/4"
Painting: 20" x 16"

I'm thrilled that this quilt will now hang above my sewing machine. For me, this work of art symbolizes the light at the end of the tunnel - in other words, hope. I also reminds me the summer I met Sheila.


Art with Fabric
Thank you so much for dropping by. I hope that you'll get a chance to visit the other participants in the blog hop. I'm looking forward to seeing everyone's art this week.

Here are the links to the other participants' blogs:

Monday, May 9th, 2016
Maartje Quilts in Amsterdam
Lee Anna at Not Afraid of Color
Renee at Quilts of a Feather

Tuesday, May 10, 2016
Kathy at Qreative Quilts
Yvonne at Quilting Jet Girl
Chris's Quilting Universe
DeAnna at Georgia-Girl Quilter

Wednesday, May 11, 2016
Alida at Tweety Loves Quilting
Yanicka at Finding myself as an artist
Heather at Heather's Blog
Sarah at Georgia Girl Quilts

Thursday, May 12, 2016
Cynthia at Cynthia's Creating Art
Janeen at Quilt Art Designs
Wendy at Kwilt Krazy
Afton at Quilting Mod

Friday, May 13, 2016
Carol at Quilted Fabric Art 
Jennifer at The Inquiring Quilter
Nina-Marie at Creations...Quilts, Art...Whatever by Nina-Marie
Joan at Moosestash Quilting

You can also check out these linky parties: Free Motion Mavericks, Off the Wall Fridays, Oh Scrap!  and Freemotion by the River

Wonderful news! My quilt was featured on Muv's Free Motion Mavericks.

Saturday, May 07, 2016

Floral Fantasy Wholecloth Quilt

It's finished and now hanging at the CTQG So full of love quilt show this weekend. If you're in Ottawa, I hope you'll consider attending. We have very talented quilters. It should be a great show.
Almost finished Floral Fantasy Wholecloth Quilt


I didn't take a final picture of this beauty before it left home because the deadline for handing in the quilts was Tuesday at 6 pm. At 5:40 I was still beading. Thank goodness an extra hour wasn't a problem, but there was no time for pictures.

I've added a couple of pictures at the end of the post, now that I've finished volunteering at the show this afternoon.

This project is based on Cindy Needham’s Machine Quilting Wholecloth Quilts on Craftsy. One of the topics in her course is making a medallion wholecloth quilt, using a variety of stencils and free motion quilting (FMQ). I've used many of her techniques and advice in the last two years. This my second project based on her class - the first one was another wall hanging with tons of FMQ, but all made by following the printed fabric at the back of the quilt. It sounds weird but is so cool! This is a technique that I actually want to make again.

Figuring out what to do with the centre
Here's the process I followed:
  • I drew the stencils directly onto the fabric then added the batting and backing. It was nice not to do any piecing!
  • To be honest, I had no idea how to quilt this thing. I FMQ around the medallion using a relatively heavy King Tut variegated cotton thread.
  • I then outlined the border and added metallic thread through the bobbin. That was relatively easy to do since I only had to stay in the centre(ish) of the outline. 
  • Finally it was time to outline the butterflies and add metallic thread to their body. 
I still had no idea what to do with the medallion, so I ignored it. I knew that sooner or later I would figure it out!


Before adding pebbles to the circles of the flowers
I then proceeded to FMQ in straight(ish) lines around the design. I believe these are called match sticks. Since there are many angles to this piece, I just tried to be consistent when changing the angles of the FMQ.

When that was done, I still didn't know what to do with the medallion. I started by FMQ pebbles with metallic thread in the centre circle. I then echoed every second flower with the same variegated thread. Since the flowers that weren't echoed were standing out too much, I FMQ inside them, following their outline. As you can see in this picture, it was starting to look good, but I felt that the circles in the quilted flowers stood out too much so I quilted pebbles.

What I learned:
Floral Fantasy Wholecloth Quilt at the Sew full of love quilt show
  • I really wanted to block this quilt as Cindy Needham recommended, but I ran out of time. It really could have used it since the medallion was quilted last and was less densely quilted in some areas. Not good practice but if I had waited to quilt the medallion first, the quilt would still be a work in progress (WIP).
  • As usual, this project wasn't planned - not because I didn't want to but because I didn't know what to expect and what to do next. Now that I have some experience, I'll choose my next stencil pattern more carefully, based on how I'll be quilting it (I hope).
  • I liked the beads and may add a few more once I get the quilt back.
  • This was one of the first times that when I quilted the outline of the border, I should have taken the time to tie off the thread. It was a good quality polyneon thread but it tended to undo. Since I have quite a bit of this type of thread, I will try to remember to tie off my ends.
  • I wasn't as careful as I should have been when I FMQ the corners of the quilt. I actually had to go back and sew a few more lines on two of the corners. This happened because I was quilting them at an angle. I'll have to watch out for the corners next time.
  • I'm so happy that the next CTQG quilt show is in 2 years! I need a serious break from deadlines.
In front of my art quilts at the Sew full of love quilt show

I have linked this post to the following Linky Parties:


I have linked this post to Sarah Goer Quilts - Show Me Something with Solids.