Page titles

Wednesday, July 29, 2015

Fireworks for July's Landscape Art Quilt

Here is the result of my Monthly Landscape Art Quilt Challenge and the 2015 Lovely Year of Finishes...Fireworks in July.
Fireworks in July (14" x 8")
Canada Day is the 1st of July. I must admit that I haven't braved the heat and the crowds to see the festivities and the fireworks on Parliament Hill in a few years. After my rather muted June landscape, I was ready for some colour and sparkle. Here's my journey.

Parliament before the appliqué
I found a couple of photos of Parliament and cut out the shape in a grey fabric. I put a black fabric behind it to make the grey stand out.

I did some thread sketching of the parliament building with grey thread on grey fabric, which, not surprisingly, didn't show up. I was, however, able to use the stitched outline as a guide for sewing with metallic thread in the bobbin.

Thread painting with metallic thread in the bobbin 
After starting over the sky on my last landscape art quilt, I was more careful with this one. I cut out the colours I wanted in long, wavy strips to blend them into each other. I didn't want to deal with the buildings or landscape around parliament, so I just made it black. It's great to be making a representation, and not trying to copy the real thing.

I've learned that in a landscape quilt, it's important to minimize the details and get to the essence of the image. If you're not sure what to cut out, just ask yourself "What am I really trying to show here?" In this instance, it was the parliament building, the sky and the fireworks. Nothing else was necessary.

Embroidered and beaded fireworks


I embroidered the fireworks using as inspiration my favourite embroidery book, The Beginner's Guide to Freestyle Embroidery by Christina Marsh. One of the projects actually includes fireworks. I used the shapes of the fireworks but not the same stitches. For the two largest fireworks, I appliquéd fabric as a background and then embroidered over them. I really like the glittering stars of the yellow firework.

I then FMQ by echoing the fireworks and following the curves of the sky.

The last step was beading the fireworks. I didn't have any mauve beads, but the ivory beads on the mauve fabric look mauve as they reflect the colour around them.

I used a new technique for finishing the art quilt. Instead of binding it I created a facing for it. Here's the link to the tutorial by Terry Aske. It worked out well. I'll probably keep using this technique whenever I don't want a border and binding.

Fireworks in July Landscape Art Quilt
I took some lovely pictures of the quilt one morning outside of the building at work. I thought I was finished, but I forgot something...the Canadian flag! I've looked for a couple of days, but I can't seem to find any small Canada flag pins. The flag will be at the top of Parliament as soon as I find one!


What I learned:

  • The wavy strips for the sky worked really well. I joined the strips using narrow ends. I learned a lot from my first attempt last month!
  • Using metallic thread in the bobbin is really easy and gives such a lovely result.
  •  I liked using a facing instead of binding the piece. It gives it a clean look. Thanks to Terry Aske for the tutorial.

What's coming next in the Monthly Landscape Art Quilt Challenge? You'll just have to come back and see!

Thanks for dropping by.

This post has been linked to A Lovely Year of Finishes, Fabric Tuesday at Quilt StoryWIP WednesdayLet's Bee Social, Free Motion Mavericks and Link-A-Finish Friday with Richard and Tanya Quilts. Check out everyone's work.


Monday, July 20, 2015

Two Quilts Are Better Than One!

Charley Harper Quilt
My version of the Charley Harper Quilt


In the winter of 2014, after reading the International Quilt Festival Quilt Scene magazine (2013\2014), I fell in love with the Charley Harper Quilt by Melissa Lunden (it's featured on the cover of the magazine, at the bottom right).

I had bought many modern fabrics a couple of years earlier and wanted to make something with a lot of negative space for free motion quilting (FMQ). My fabrics were more in the brown, gold and red so I decided to use a darker brown fabric that would bring it all together. Although I'm not a huge fan of browns, it does make for a very rich looking quilt.

While I was at it, I thought that I would make my first pieced backing (as in intentionally pieced, not the "Oh my goodness, I ran out of fabric, how can I make this backing big enough?" version).
Street Art Quilt

My version of the Street Art Quilt


I looked around in my stash of books and magazines for something that would be modern but also not too time consuming to make (right!). I was intrigued by Mary Patterson's Street Art quilt which features fabric by Stephanie Brandenburg in the Quilt Trends magazine, Summer 2014. It had some funky fabrics, large blocks, some of them framed within the quilt. I knew that this pattern would translate well into what I wanted to make. It was also simple enough that I could adapt the size to the quilt top.

It's been a long time since I finished the quilt top and backing. I remember that the Charley Harper quilt went together fairly simply. I also remember that I had to adjust the Street Art quilt quite a bit because I had started by drawing it all out. When I started putting it together, I quickly realised that my pieces were too small and wouldn't have the same effect...and I really got tired of working with the same fabrics for so long (yup, my secret is out! I tried to plan it out but got bored!!!)

 I think that both quilts would have made a fine front and back, but when I looked at both quilts a few weeks ago, I just couldn't bring myself to put them together to make one quilt. I had put too much effort into making both of them, and doing FMQ on the top would not have necessarily been the best quilting for the back.

I'm now in the process of FMQ the Charley Harper Quilt. I still haven't decided what to quilt in the negative space but I've started "sewing every stinking seam", as suggested by Cindy Needham.

I find that this is a great suggestion because when I look at the quilt, I am totally intimidated by all of that negative space to quilt. As I quilt almost every stinking seam, I am getting familiar with the quilt and slowly getting ideas for quilting it. As Cindy suggests, I will also divide and conquer the space so that it won't be such a huge task.

Right now, I'm thinking of quilting feathers in most of the negative space. My feathers aren't too bad, and I find that drawing them out at the beginning gets me in the grove. Eventually I can stop drawing them and I will be confidant enough to just sew them.

What I've learned:
  • I'm not sure that I'll ever be patient enough to piece a whole quilt back. I love the effect of a pieced back but that's a lot of work, when you've already put in so much time and effort into the front!
  • I took my unfinished quilt and quilt top to work with me this morning and had a "photo shoot" before work. It was a lot of fun. The light was good but it was quite windy. This didn't make much difference for the Charley Parker quilt, but the Street Art quilt top was flapping all over the place! I'm going to learn more about photographing quilts and I'll share what I learn.
  • I spent a lot of time looking at the Charley Harper quilt, which is made of fabrics from Charley Harper's wonderful drawings. After I finished the quilt, I went on Etsy.com and bought quite a bit of the fabric which is created by Birch Fabric. It is truly beautiful - but that will be for another project!

Charley Harper fabrics
I am linking this Work-in-progress (WIP) with MOP MondayMonday MakingFabric Tuesday at Quilt Story.

If you have time, check out everyone's links.

Friday, July 10, 2015

A Small Fantasy Art Quilt

Fantaisie 1
I had a couple of days off and was actually getting ready to do homework when we had a power outage. After a while, I turned off the electric things around the house and wondered what to do - I couldn't even use my sewing machine!!!

Since I don't really have any hand sewing to do, I started a mini quilt. It was supposed to be a quilted postcard in the style of Positively Postcards, but I couldn't fit it onto 4" by 6", so it's turned out to be a small wall hanging (7½" by  9").

All of the fabric comes from my scrap stash. The project ended up taking most of the two days to do (with a lot of chilling time with Chevy since I was on vacation!)

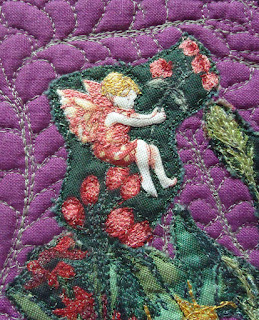
Flower garden fairy
Flower garden fairy
The first fabric I picked out was the garden fairy. I found other plants that looked like they came from the same garden. After that, it was mostly about choosing what else to add. I tend to want to add tons of things, so I had to work hard at keeping it fairly simple. I added the frog, insects and scrolled leaves for a feeling of light-hearted fantasy to the piece.

I placed the fabrics onto a Pellon interfacing that I bought years ago and never used. I really liked the feel of the thread sketching on it. I also used a glue stick for the first time to hold fabric pieces in place. That worked really well except for when I changed my mind and moved or removed pieces. Glue remained, but it washed off easily (more about that later).

Thread sketching details


I had a great time thread sketching the flowers and plants. I love the fact that if you don't really like what you just did, you can usually cover it up with another thread! It's very forgiving that way. It's great to try different threads (weights, colours and fibre) and see how they work out. I had bought a couple of spools of silk thread from Superior Thread. What an amazing sewing experience. It's the peach thread that I used on the fairy and her flowers. I'm going to have to very slowly invest in more of that!

The only un-sewing came when I was trying to figure out how to quilt the solid background. I started with a purplish thread around the butterfly. It was just too blue and too obvious. Since I really didn't have any matching thread for the background, I used a very thin Superior Bottom Thread. It didn't blend in as much as I would have liked, but was a huge improvement over the first one.

I think that the quilted feathers give the piece some movement and takes the eye on a discovery tour around the piece. I also like the look of quilts that go over the borders. I'll have to keep working on that.

What I learned:

  • I found it really difficult to decide if I should FMQ the negative space (the purple background). I wish I had taken a picture before I quilted it so see if I made the right decision.
  • Thread sketching is a lot of fun and very forgiving. I like the fact that I can sketch what I want, and when I've had enough, I can stop. Not everything needs to be covered in thread!
  • As I mentioned, I very gently hand-washed the piece before binding it. I found that after washing it, the borders weren't as stiff and they puckered a little. I was able to work them out when I added the binding, but it might have been better to wash the piece after binding it. 
Thanks for stopping by.

This post was linked to Free Motion MavericksMOP Monday, Quilt Story: Fabric Tuesday and Oh Scraps! Check out everyone's work!

Friday, July 03, 2015

Landscape Art Quilt Challenge Ongoing

Welcome to the third post of my Monthly Landscape Art Quilt Challenge. I've even made a button, should anyone choose to join me! Check out the details of the challenge.

My first project was a lone tree, on rocks, with water and sky. It took a lot of adjusting before I liked the results. Here's what the first try looked like. See the details in the June Landscape - the Lone Tree post.

The first try -  "before"

There wasn't enough contrast so that the tree was hidden. I ended up cutting around the tree and inserting a new sky that started lower. I think that it added the contrast that I was looking for.

I also added tulle over the sky. This gave me the opportunity to add more fabric and softening the sky.

I've been looking closely at the real sky for the last week or so and although the sky is full of different colours and textures, it's not in a straight line like my first attempt. I will definitely try making a sky with strips in one of my next landscape art quilts.

Lone Tree - Final Landscape
This lovely piece will be hanging in my husband's office. I'm thrilled that he likes it!

What I learned:
  • I wasn't sure how to quilt this - so I waited. Last night, it just came together! I love it when that happens.
  • It's great to be able to just change what I didn't like. There's usually parts that are fine; that are worth keeping and working around.
  • The real sky doesn't follow straight lines - so I guess a strip sky shouldn't either. 
  • I am very happy with my first attempt.
  • I want the next one to have brighter colours! I need reds and sparkles! (That's a hint for the next one :-)  )
I didn't accomplish my June goal for A Lovely Year of Finishes. I guess it's just not ready to be finished, despite my intentions. My next landscape is my July goal (a 2 for 1!) for A Lovely Year of Finishes.

I've also linked up to Oh Scraps! since most of the fabrics used in this art quilt are scraps, as well as with MOP Monday and Needle and Thread Thursday with My Quilt Infatuation.

Don't forget to check out everyone else's goals and blogs.


Thursday, July 02, 2015

9-Patch Pizzazz Wall Hanging

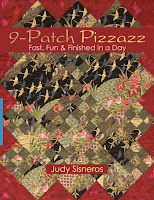
9-Patch Pizzazz book cover by Judy Sisneros
9-Patch Pizzazz by Judy Sisneros 
There is a blue-green that has been very popular in the last couple of years. As I shopped, I've been very attracted to fabrics of this colour and have accumulated a lovely collection.

I've put them aside to make something. When I looked at them, I realised that they all blended beautifully, but there was no contrast. What to make that would require blending fabrics and only a little contrast? A 9-Patch Pizzazz wall hanging of course!

I had seen a beautiful wall hanging at a local church quilt show and was told that the pattern was from the book, 9-Patch Pizzazz. Good thing it was easy to remember because I was able to find the book and buy it.


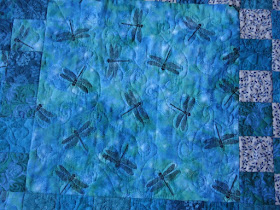
Close up of the FMQ around the dragonflies
FMQ around the dragonflies
The quilts from the book are easy to make and adjust for size. It was the perfect pattern for my beautiful fabrics.

Part of the charm of this pattern is the way that fabrics blend into each other. It also made taking photos difficult! There's just enough contrast in some of the 9 patch to give it a focal point.

I also loved using big pieces for a change. It didn't take long to put the quilt together.
FMQ swirls and following the lines of the flowers

Determining the free motion quilting (FMQ) was a real pleasure.

  • I used swirls for the swirly fabric;
  • Quilted around the dragonflies; 
  • Added continuous leaves in the focal 9 patch; and
  • Used the lines of the flowers in one fabric to create a star-burst effect.


It's finally stopped raining, so today was the perfect day for that outdoor picture of quilts I love so much. After all that rain, everything is green....and the mosquitoes were out with a vengeance. I spent as little time as I could out there. Mowing the lawn will take care of that on the weekend!
9-Patch Pizzazz with my neighbor's lovely clematis
What I learned:

  • It's nice to make something that you can put together fairly quickly. Projects don't always have to be complicated to be lovely.
  • I really love the blended effect in some of the 9 patch. It gives the piece an impressionist feel.
  • The contrasting 9 patch give the piece contrast, movement and a focal point.
  • The large dragonfly fabric is my favourite - even if it's technically a bug!
  • Choosing the different FMQ motifs for the various blocks was a lot of fun. I love letting the fabrics inspire the design.
  • I'm looking forward to making many more 9-Patch Pizzazz quilts!
It's a link-up frenzy!!!! I've linked up to Can I get a Whoop Whoop?, Fabric TuesdayNeedle and Thread ThursdayLink-A-Finish Friday, Fabric Frenzy Friday and Free Motion Mavericks. Check out all the wonderful blogs.